
Make your artwork look like they're from an alternate universe. These Cyberpunk presets work with Photoshop (via the Camera Raw filter) and Lightroom. Download all 788 presets for 90% off.

Now, with all those elements done, let’s now select all the layers that we created in this step and group (Ctrl/Cmd + G) them. Name this group to “FOG”.
Step 9: Create the Vignette
Now, we will learn how to create a vignette which will help enhance the focus on our subject. To start, go to the Menu bar and click on File > New and use the same settings we used to create our canvas. (Refer to Step 1). Take note, the background contents should be: WHITE Once it has been created, go to Filter > Distort > Lens Correction. Find the tab Vignette and use these settings:
- Vignette amount: -100
- Midpoint: +50

Now that that’s done, drag the vignette to our canvas using the Move tool (V) and put it on top of all the layers that we’ve created, and then set the following:
- Blending Mode: Multiply
- Opacity: 25%
- Flow: 25%

The result:

Step 10: Retouch
Now, we will be fixing the colors of the image to give it a more “cold” look. To start, let’s create a Solid Color adjustment layer from the “Create New Fill/Adjustment layer” button.
![image083[1]](https://cdn.photoshoptutorials.ws/images/stories/fe3862fc252f_F0C/image0831.jpg?strip=all&lossy=1&quality=70&webp=70&avif=70&w=1920&ssl=1 "image083[1]")
When it opens, click on the following:
![image084[1]](https://cdn.photoshoptutorials.ws/images/stories/fe3862fc252f_F0C/image0841.jpg?strip=all&lossy=1&quality=70&webp=70&avif=70&w=1920&ssl=1 "image084[1]")
Input the following on the # field:
- #: 030221

Now your whole canvas is covered with a dark blue color. We’ll need to make that blend with our image so change its Blending mode and Opacity to the following:
- Blending Mode: Exclusion
- Opacity: 40%
The result of that should be similar to this:

Next, let’s create a Color Balance adjustment layer.

When the Color Balance box opens, input the following:
- Color Levels: -10, 0, +10
- Tone Balance: Midtones
- Preserve Luminosity: Check

The result of that would be similar to this:

Now, that we’re done let’s compress all the layers for us to save it as one image. To do that, right click on any layer and then click on Flatten Image. See image below:

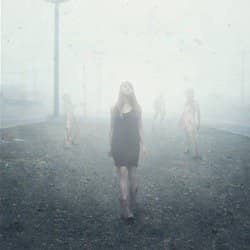
Step 11: Make the image glow
In this step, we will give the image a luminous effect to compliment the mist. Now, duplicate it (Ctrl/Cmd + J); click on the duplicated layer and then go to Filter > Blur > Gaussian Blur. Input the following:
- Radius: 16.0 pixels

After that, you’d see that your image is really blurry; so to make it glowing, change the Blending mode of the blurred (duplicated layer) to Lighten and set its opacity to 25%.

The result should be like this:
![image004[1]](https://cdn.photoshoptutorials.ws/images/stories/fe3862fc252f_F0C/image0041.jpg?strip=all&lossy=1&quality=70&webp=70&avif=70&w=1920&ssl=1 "image004[1]")
- Michael Vincent Manalo