

Luminar AI lets you turn your ideas into reality with powerful, intelligent AI. Download the photo editor and see how you can completely transform your photos in a few clicks.


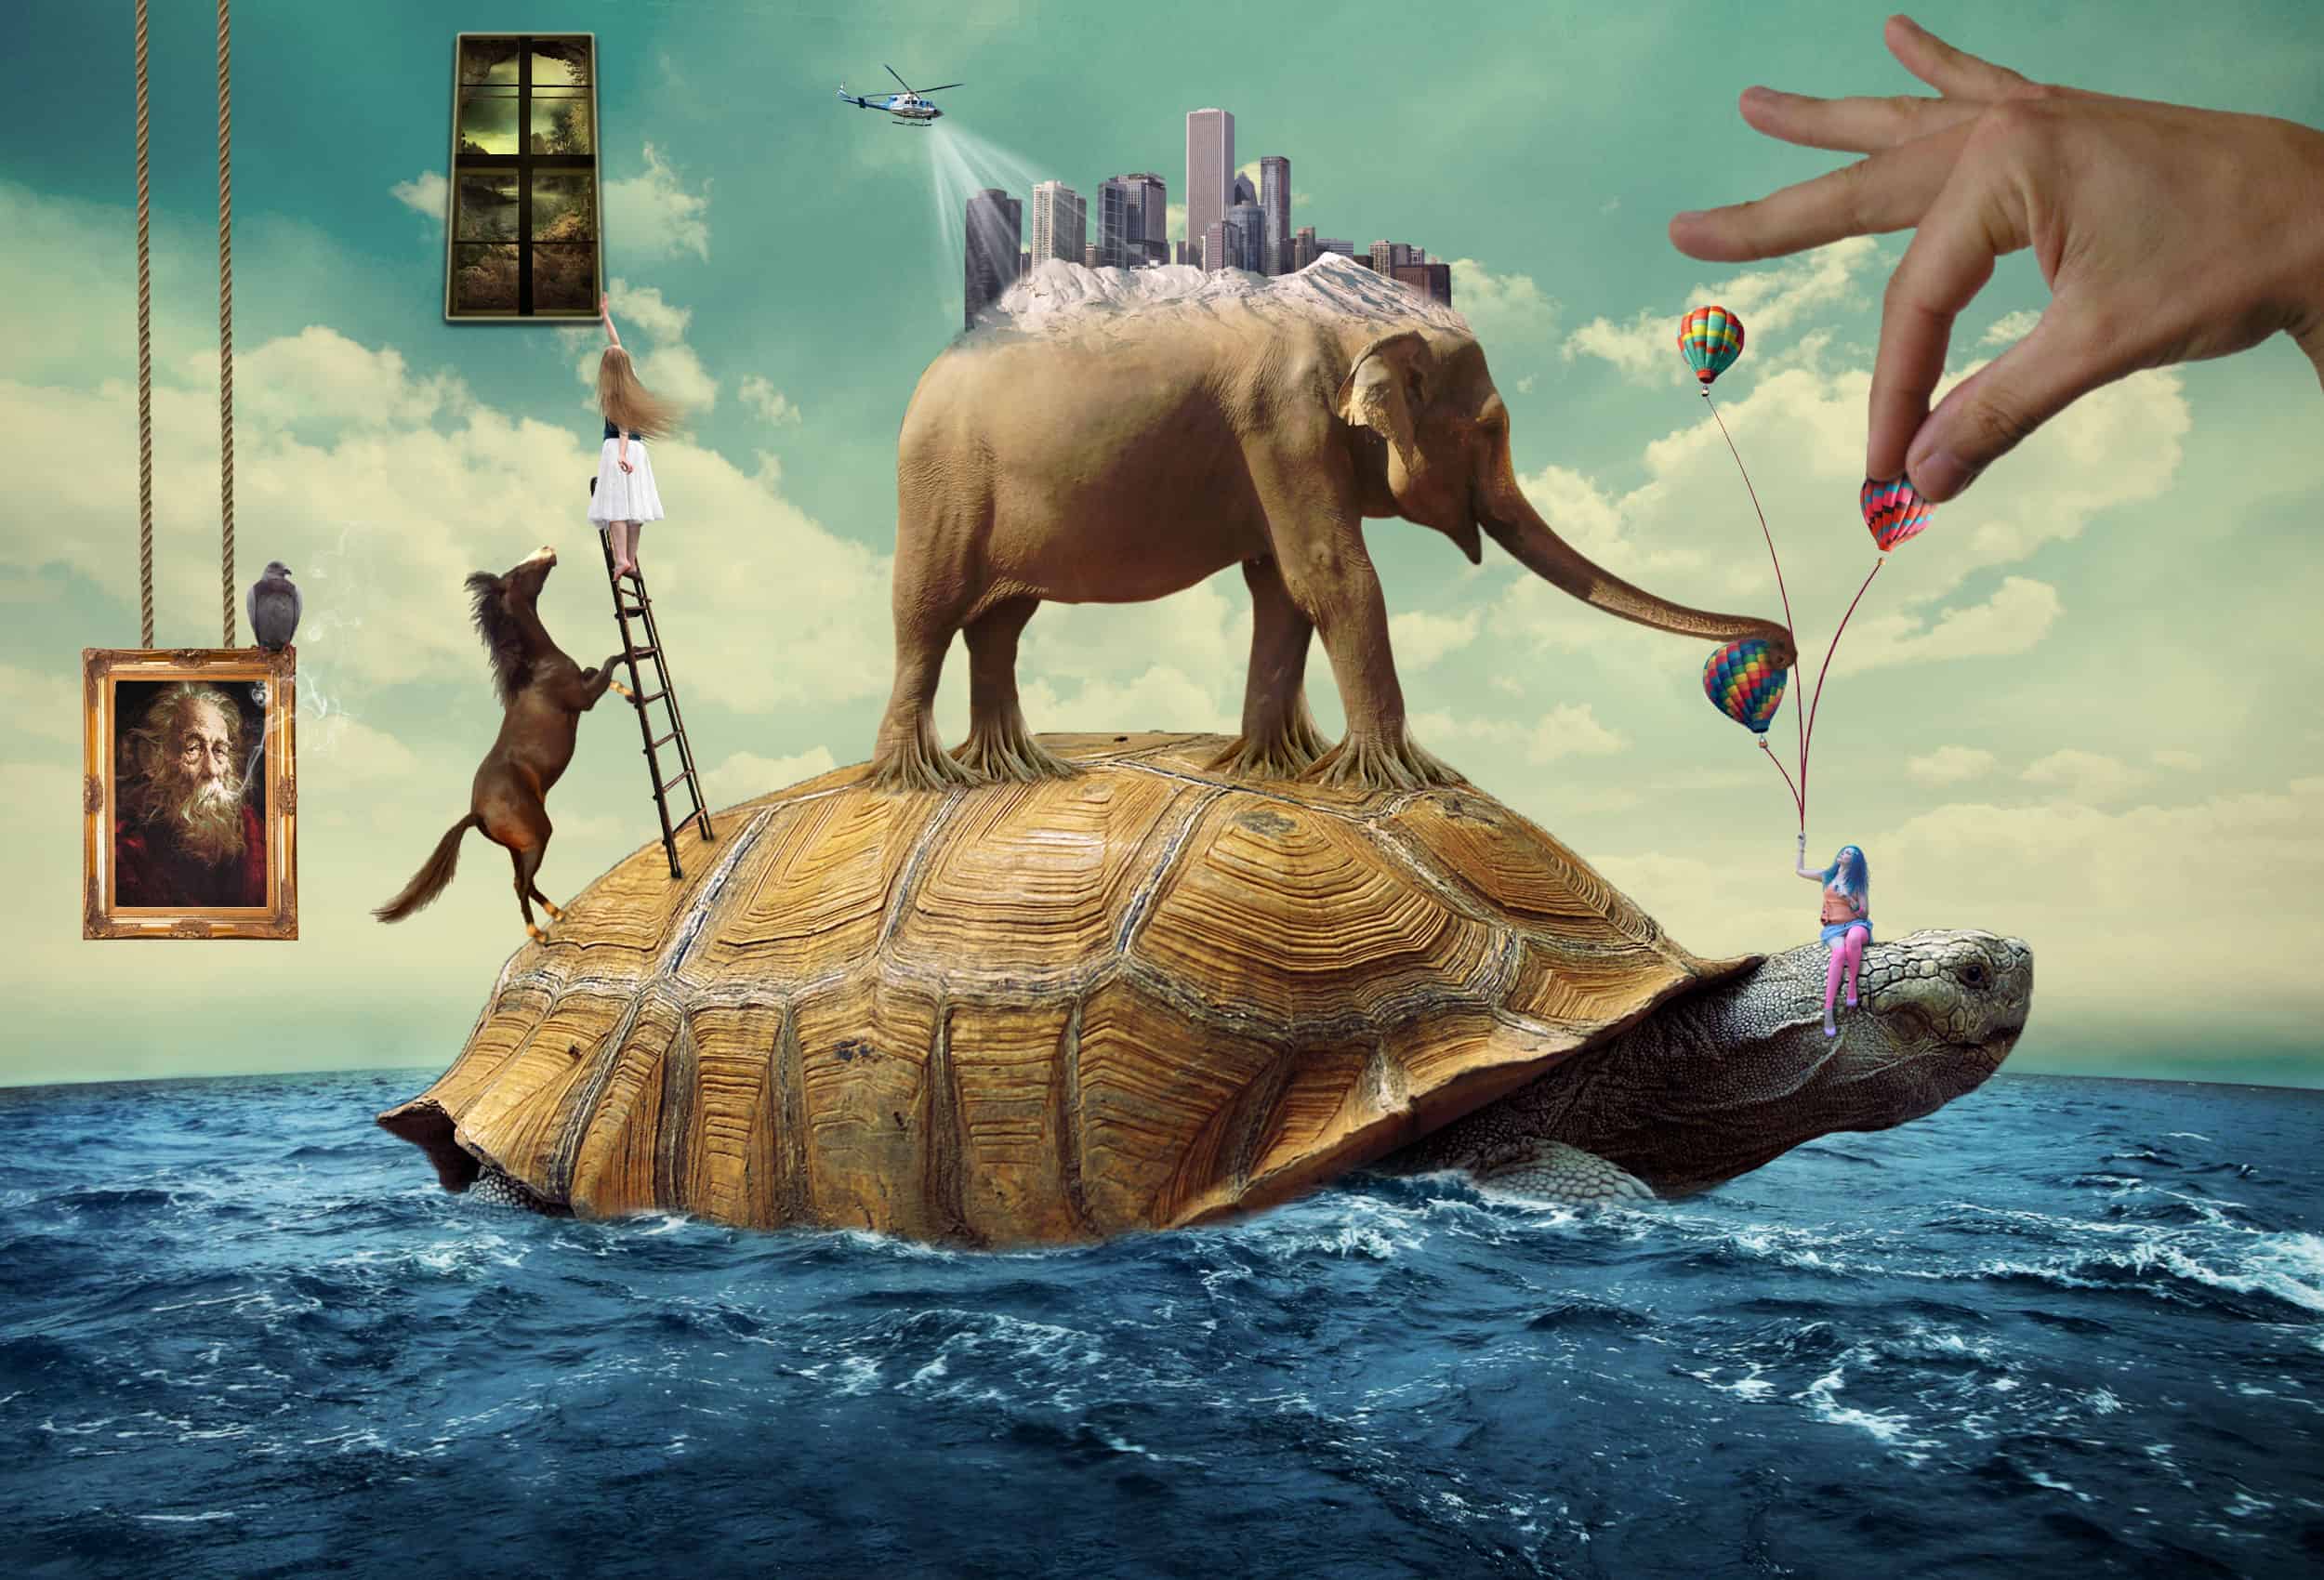
Now go back to our ribbon stock and copy and paste the red ribbon again into our image. Resize it and place it in the same place as the other one in the beginning.

Go into the Free Transform mode again and increase the height of the ribbon. There will be three squares in the top part of our ribbon, select the middle one and drag it to increase the height. Take a look at the image below:

Now do the same thing we did with the other ribbon. Right click the ribbon, select Warp and make it look like its pulling the balloon.


With two ribbons your image should be similar to this one:

To add the third ribbon the process is exactly the same as the others. Go into our stock, copy and paste the ribbon for the last time, resize it and place in the same position as the others in the beginning.

We're going to increase the height of this one too. Go to the Free Transform mode and pull the middle square of the top section again to increase its height.

While in the Free Transform mode, click with the right mouse button in the ribbon and select Warp. Warp it to make it look like its holding the first balloon.


With all the ribbons, your image should be like this now:

If you created the Ribbons group in the beginning and placed all the ribbons in it, you should have this group now.

Step 13: Add the hand pushing the balloon
Open the hand stock and select it with the Quick Selection Tool (W).

Paste it into our scene and go to Edit > Transform > Flip Horizontal.

Now resize it using the Free Transform Tool and place it in the right corner of our image, on the top.

Create a new layer by clicking in the 'Create a new layer' button (you can also press Ctrl/Command+Alt/Option+Shift+N to create a new layer). Then, rename it to 'Shadow' and place it behind the hand layer.

Paint the shadow using the image below as reference.

Open the Balloons group and while holding Ctrl/Command click in the thumbnail of the second balloon (the one underneath the hand). We have to do this to make sure that the Gaussian Blur doesn't make the Shadow go over the sky.
32 comments on “How to Create a Surreal Scene Full of Life in Photoshop”
oh,I know it.
I like it very much.But how can i entire to see it.
thank! so much for that creation
Such a beautiful artwork!!
great tutorial thank you
this tutorial was awesome thanks
Really great tutorial. Very well explained step by step.
You've made a very nice and comprehensive collection of WordPress Themes. I appreciate it. Really great art work with typography. Thanks for sharing this nice post.
You’ve made a very nice and comprehensive collection of WordPress Themes. I appreciate it.
Outstanding tutorial!Clear instructions and awesome picture instructions. Very nice, thank you a bunch.
Beautiful image. Congratulations to the technical and thanks for the tutorial:)
Loved it!! Thankyou, I learnt such a lot :)
thanks! learn a lot of useful shortcut and tips here
I cant get my roots and elephants feet to lok right i need help
this looks awesome and easy
Thanks very much for this easy to follow tutorial!!
http://mrbloop.deviantart.com/art/Surreal-scene-full-of-life-346099572?q=gallery%3Amrbloop&qo=0
when I go to the exposure everything turns black. What do I do?
its -0.25 not -25. i did the same thing
I can not thank you enough, the amount of things I've learnt in two hours is incredible, would usually take me a week of watching and reading tutorials, but nope, you've used many techniques that made my life easier! Thank you is not enough!
Great tutorial!But the mountain photo is missing :/Some extra help...
just do what i did ,
download the attached PSD from up there and take the mountain photo from there :D
@SalahKabbani Thank you for your response :)But how can I take it from the mountain layer
@SalahKabbani OK! Got it!I decided to replace the mountain photo with a desert one ^_^Thanks anyway :)
awsome tut
Thank you so much for this tutorial really great photo and great explanation love it.
but i have a problem with the mountain photo , the link of this photo doesn't work , can you please upload it again or give me another photo that could be good for the tutorial ?
thanks
Never mind i took it from the downloadable project :)
I like it.
Thank you for your awesome tutorial.
Very nice Job!
Thanks a lot dear ^^.
Hi Guilherme, From the start of your tutorial you say to go to lens correction and distort the image to + 25,00, it distorts the image considerably !, is that right, ?, by the way it is a great tutorial,
regards and respect johnny
Its ok, all i did was after the lens correction was used the free transform tool and adjusted the image to cover my canvas again lol, My bad..
Can I use CS3 for this creative tutorail.
Can I use CS3 for this creative tutorail.