

Turn any photo into a dot grid artwork with these Photoshop actions. You'll get great results with dots that change size. They get larger in brighter areas and smaller in darker areas. Free download available.

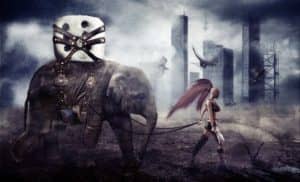
Step 7 - Adding the Elephant
Download the picture of elephant and cut out the background, then drag it into the manipulation. Press Ctrl + T and resize it to the proper size. Name the layer ELEPHANT and place it on top of the layers.
As you can see, the elephant looks saturated, too bright, and has strong shadows. Because the stock photo was taken under heavy sunlight, there is a large contrast between light and shadow. To make the light less visible, create new layer and select the Gradient Tool (G) and fill the layer with solid #808080 grey color. Set the Blending Mode to Overlay and create a Clipping Mask from this layer. To do this, right click on the layer in the Layers Palette and choose the option Create Clipping Mask. This way the layer affects only the layer below (ELEPHANT).
Select the Brush Tool (B), and choose a soft round brush. Pick a black color and paint over the highlights.

The bottom part of its legs is still lighter then the rest of the body. To fix this, add a new layer on the top and create a Clipping Mask from it. Select the Brush Tool (B) and choose a soft round brush. Lower the opacity to about 15% and pick a darker color of elephant. Now paint over the parts of the legs that are lighter. You can see how the layer should look below. I used a black color underneath so you can see it better.

The elephant should also be darker. Add new adjustment layer Levels (click on the button Create New Fill or Adjustment Layer is next to the button Create Vector Mask). Set the Input Levels on 0; 0,57; 255, and press OK. Create a clipping mask.

Now desaturate the elephant a little. Add a new adjustment layer Hue/Saturation and set the Saturation value to -40. Press OK and create a clipping mask. Increase the contrast in colors of the elephant by adding a new adjustment layer with a Gradient Map and select Black, White Gradient. Change the Blending Mode of this layer to Luminosity and create a clipping mask from the layer.

There are still some very dark shadows under the head and on one of the legs. To remove them, add a new layer on top of the layers and create a clipping mask from it. Select the Clone Stamp Tool (S) and clone some of the elephant’s skin over the black shadows. If you don’t know how to use this tool you can look at this tutorial. After all the adjustments your picture should be similar to the one below.
3 comments on “How to Create an Amazing Apocalyptic Photo Manipulation in Photoshop”
Thanks for the tutorial, I really enjoyed it.
sir, your works is very nice.....
sorif,
hello Jarka Hrncárková thank you so much for this tutorial I've try it and I'll teach it to my students also thank u so much... :)