

Make your artwork look like they're from an alternate universe. These Cyberpunk presets work with Photoshop (via the Camera Raw filter) and Lightroom. Download all 788 presets for 90% off.

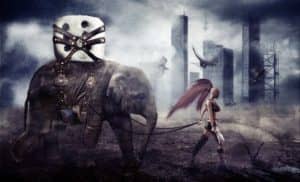
Step 8 - Adding the Shadow under the Elephant
In the picture above you will see that the elephant looks likes it’s levitating above the ground. This is because it has no shadow under its feet. Add new layer under ELEPHANT and name it ELEPHANT SHADOWS. Select the Brush Tool (B) and choose a soft round brush. Pick a black color and paint shadows as shown in the picture below. (I put white underneath so you can them better.)

The darker shadows are the shadows directly underneath the feet.

Step 9 - Adding the Cube
Download the picture of cube and drag it into the manipulation. Name the layer CUBE and place it on top of your layers. Add some shadow between the cube and the elephant. Create a new layer under CUBE and name it CUBE SHADOW. Select the Brush Tool (B), and choose a soft round brush. Pick a dark grey color and set the opacity to about 80%. Paint a narrow line under the cube. Lower the opacity of the brush to about 30% and paint a dropped shadow.

It’s very important to remember that every object you put into the scene should have some shadow. Make some minor color adjustments on the cube. First, lower the contrast by adding a new adjustment layer Levels above the CUBE and set the Input Levels on 0; 0,74; 255. Create a clipping mask from the layer. Then add the adjustment layer Hue/Saturation and set the value Saturation to -60. Create another clipping mask.
Step 10 - Adding the Belt
Download the picture of the belt and drag it into the manipulation. Put the layer on the top of all the layers and name it BELT. Go to Edit > Transform > Warp and then adjust the grid of the belt to fit the elephant’s body. If you’re not familiar with the Warp Tool you can take a look at this video tutorial. Press Enter when you’re satisfied with the shape of the belt.

Step 11 - Adding the Shadows under the Belt
As mentioned before, every object in the scene should have some shadow. The belt looks like it’s just sitting above the cube so you need to add some shadow to it as well. Create a new layer below BELT and name it BELT SHADOW. Ctrl + click on the thumbnail of the BELT which activates the mask of the belt.

Select the Brush Tool (B), pick a black color and paint the inside of the mask on the layer BELT SHADOW. Press Ctrl + D to deselect the mask. Select the Move Tool (V) and move the shadow slightly down to the left. Go to Filter > Blur > Gaussian Blur and set the value to about 0,2 px to blur the shadow gently. Press OK. You can see how the belt looks with and without the shadow below.
3 comments on “How to Create an Amazing Apocalyptic Photo Manipulation in Photoshop”
Thanks for the tutorial, I really enjoyed it.
sir, your works is very nice.....
sorif,
hello Jarka Hrncárková thank you so much for this tutorial I've try it and I'll teach it to my students also thank u so much... :)