

Make your artwork look like they're from an alternate universe. These Cyberpunk presets work with Photoshop (via the Camera Raw filter) and Lightroom. Download all 788 presets for 90% off.
![img(7)[3]](https://cdn.photoshoptutorials.ws/6a20526f3a0d_12CCA/img73.jpg?strip=all&lossy=1&quality=70&webp=70&avif=70&w=1920&ssl=1 "img(7)[3]")
Adjust the saturation using Hue/Saturation dialogue box. Press Ctrl+U to load the Dialogue box.
![img(8)[3]](https://cdn.photoshoptutorials.ws/6a20526f3a0d_12CCA/img83.jpg?strip=all&lossy=1&quality=70&webp=70&avif=70&w=1920&ssl=1 "img(8)[3]")
Drop in Sky2 just above the Sky1 layer. Squash the layer in both directions and re align just as you can see here.
![img(9)[3]](https://cdn.photoshoptutorials.ws/6a20526f3a0d_12CCA/img93.jpg?strip=all&lossy=1&quality=70&webp=70&avif=70&w=1920&ssl=1 "img(9)[3]")
Here I kept the portion of the layer I wanted and masked out remaining area using a Layer Mask. Pick a soft brush to paint inside the mask.
![img(10)[3]](https://cdn.photoshoptutorials.ws/6a20526f3a0d_12CCA/img103.jpg?strip=all&lossy=1&quality=70&webp=70&avif=70&w=1920&ssl=1 "img(10)[3]")
Mix it up with the sky below. Match the lighting and color using Curves and Hue/Saturation adjustments.
![img(11)[3]](https://cdn.photoshoptutorials.ws/6a20526f3a0d_12CCA/img113.jpg?strip=all&lossy=1&quality=70&webp=70&avif=70&w=1920&ssl=1 "img(11)[3]")
![img(12)[3]](https://cdn.photoshoptutorials.ws/6a20526f3a0d_12CCA/img123.jpg?strip=all&lossy=1&quality=70&webp=70&avif=70&w=1920&ssl=1 "img(12)[3]")
I sampled the color from the sky layer and painted to fill the gap.
![img(13)[3]](https://cdn.photoshoptutorials.ws/6a20526f3a0d_12CCA/img133.jpg?strip=all&lossy=1&quality=70&webp=70&avif=70&w=1920&ssl=1 "img(13)[3]")
Drop in the Sky3 into the Sky group. Reposition the sky. I wanted the top right portion of the image. So keeping it intact hide the remaining with a Mask.
![img(14)[3]](https://cdn.photoshoptutorials.ws/6a20526f3a0d_12CCA/img143.jpg?strip=all&lossy=1&quality=70&webp=70&avif=70&w=1920&ssl=1 "img(14)[3]")
Adjust the tone and lightness with Hue/Saturation box.
![img(15)[3]](https://cdn.photoshoptutorials.ws/6a20526f3a0d_12CCA/img153.jpg?strip=all&lossy=1&quality=70&webp=70&avif=70&w=1920&ssl=1 "img(15)[3]")
I Duplicated the background Layer. Disabled the mask, copied the portion that I wanted. Blended it using Layer Mask and Curves adjustments.
![img(16)[3]](https://cdn.photoshoptutorials.ws/6a20526f3a0d_12CCA/img163.jpg?strip=all&lossy=1&quality=70&webp=70&avif=70&w=1920&ssl=1 "img(16)[3]")
Step 4: Creating the Futuristic Building
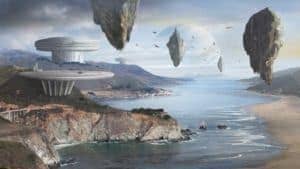
This is what we are going to create
![img(50)[5]](https://cdn.photoshoptutorials.ws/6a20526f3a0d_12CCA/img505.jpg?strip=all&lossy=1&quality=70&webp=70&avif=70&w=1920&ssl=1 "img(50)[5]")
So we have this idea of having a giant structure in the scene based on the sketch. To create the initial shape we will use Illustrator's 3D tools. Switch to Illustrator. Press Ctrl+N to create a new document. Draw the outline shape using the Pen Tool. Change the stroke color to #ffffff
![img(18)[3]](https://cdn.photoshoptutorials.ws/6a20526f3a0d_12CCA/img183.jpg?strip=all&lossy=1&quality=70&webp=70&avif=70&w=1920&ssl=1 "img(18)[3]")
After the shape is defined go to Effect > 3D > 3D Revolve.
![img(19)[3]](https://cdn.photoshoptutorials.ws/6a20526f3a0d_12CCA/img193.jpg?strip=all&lossy=1&quality=70&webp=70&avif=70&w=1920&ssl=1 "img(19)[3]")
Copy the object and paste it into our document as Smart Object. Place it above the mountain range in the middle ground. Create a new group for the object. For the sake of simplicity call it "Building". This is going to be the base layer that contains photo elements and details.
![img(20)[3]](https://cdn.photoshoptutorials.ws/6a20526f3a0d_12CCA/img203.jpg?strip=all&lossy=1&quality=70&webp=70&avif=70&w=1920&ssl=1 "img(20)[3]")
Yeah the shape is good but I wanted it to be a little bit wider. So I stretched it a little bit by pressing Ctrl+T. Add a Layer Mask to the base layer and hide the areas that are covering the trees in the background to make it look like it is behind the trees.
![img(21)[3]](https://cdn.photoshoptutorials.ws/6a20526f3a0d_12CCA/img213.jpg?strip=all&lossy=1&quality=70&webp=70&avif=70&w=1920&ssl=1 "img(21)[3]")
![img(22)[3]](https://cdn.photoshoptutorials.ws/6a20526f3a0d_12CCA/img223.jpg?strip=all&lossy=1&quality=70&webp=70&avif=70&w=1920&ssl=1 "img(22)[3]")
Recolor the building. Create a new layer above the base layer. Press Ctrl+Alt+G to clip the layer to the base layer. Create a new gradient in with similar values. Apply the gradient by dragging with the Gradient tool.
3 comments on “How to Create an Amazing Futuristic Matte Painting in Photoshop”
bhai or koie matte painting ka file send kar
its gud
its gggg,ooo,dddd.THANK U.