

Make your artwork look like they're from an alternate universe. These Cyberpunk presets work with Photoshop (via the Camera Raw filter) and Lightroom. Download all 788 presets for 90% off.
![img(23)[3]](https://cdn.photoshoptutorials.ws/6a20526f3a0d_12CCA/img233.jpg?strip=all&lossy=1&quality=70&webp=70&avif=70&w=1920&ssl=1 "img(23)[3]")
![img(24)[3]](https://cdn.photoshoptutorials.ws/6a20526f3a0d_12CCA/img243.jpg?strip=all&lossy=1&quality=70&webp=70&avif=70&w=1920&ssl=1 "img(24)[3]")
![img(25)[3]](https://cdn.photoshoptutorials.ws/6a20526f3a0d_12CCA/img253.jpg?strip=all&lossy=1&quality=70&webp=70&avif=70&w=1920&ssl=1 "img(25)[3]")
Lower the opacity of the layer to 50%.
![img(26)[3]](https://cdn.photoshoptutorials.ws/6a20526f3a0d_12CCA/img263.jpg?strip=all&lossy=1&quality=70&webp=70&avif=70&w=1920&ssl=1 "img(26)[3]")
Open the building stock and remove the sky using the Magic Wand Tool.
![img(27)[3]](https://cdn.photoshoptutorials.ws/6a20526f3a0d_12CCA/img273.jpg?strip=all&lossy=1&quality=70&webp=70&avif=70&w=1920&ssl=1 "img(27)[3]")
![img(28)[3]](https://cdn.photoshoptutorials.ws/6a20526f3a0d_12CCA/img283.jpg?strip=all&lossy=1&quality=70&webp=70&avif=70&w=1920&ssl=1 "img(28)[3]")
Set a vertical guide. Press Ctrl+T and rotate the building to align with the vertical guide. Make a selection, copy and paste into the main file.
![img(29)[3]](https://cdn.photoshoptutorials.ws/6a20526f3a0d_12CCA/img293.jpg?strip=all&lossy=1&quality=70&webp=70&avif=70&w=1920&ssl=1 "img(29)[3]")
![img(30)[3]](https://cdn.photoshoptutorials.ws/6a20526f3a0d_12CCA/img303.jpg?strip=all&lossy=1&quality=70&webp=70&avif=70&w=1920&ssl=1 "img(30)[3]")
![img(31)[3]](https://cdn.photoshoptutorials.ws/6a20526f3a0d_12CCA/img313.jpg?strip=all&lossy=1&quality=70&webp=70&avif=70&w=1920&ssl=1 "img(31)[3]")
Now clip the layer to the base layer. Flip the layer horizontally.
![img(32)[3]](https://cdn.photoshoptutorials.ws/6a20526f3a0d_12CCA/img323.jpg?strip=all&lossy=1&quality=70&webp=70&avif=70&w=1920&ssl=1 "img(32)[3]")
I stretched and squeezed the layer quite drastically. Try to get it right in one attempt. If you back and forth the image will loose data and blurs.
![img(33)[3]](https://cdn.photoshoptutorials.ws/6a20526f3a0d_12CCA/img333.jpg?strip=all&lossy=1&quality=70&webp=70&avif=70&w=1920&ssl=1 "img(33)[3]")
We will use the middle portion of the image. Hide remaining with a Layer Mask.
![img(34)[3]](https://cdn.photoshoptutorials.ws/6a20526f3a0d_12CCA/img343.jpg?strip=all&lossy=1&quality=70&webp=70&avif=70&w=1920&ssl=1 "img(34)[3]")
Adjust the colors and remove that green shades using Curves and Hue/Saturation.
![img(35)[3]](https://cdn.photoshoptutorials.ws/6a20526f3a0d_12CCA/img353.jpg?strip=all&lossy=1&quality=70&webp=70&avif=70&w=1920&ssl=1 "img(35)[3]")
![img(36)[3]](https://cdn.photoshoptutorials.ws/6a20526f3a0d_12CCA/img363.jpg?strip=all&lossy=1&quality=70&webp=70&avif=70&w=1920&ssl=1 "img(36)[3]")
The image is evenly lit. So paint a dark color on the shadow side of the building. Create a new layer above the current layer. Just sampled a dark tone from the background and painted with a large soft brush. The red color in the below image indicates the painted region.
![img(37)[3]](https://cdn.photoshoptutorials.ws/6a20526f3a0d_12CCA/img373.jpg?strip=all&lossy=1&quality=70&webp=70&avif=70&w=1920&ssl=1 "img(37)[3]")
Adjust the highlights slightly. Click back on the photo element, press "Q" to enter quick mask mode paint over the right edge with around 50% brush opacity. Press "Q" again to exit the quick mask mode. Invert the selection by pressing Ctrl+Shift+I, adjust the highlights slightly.
![img(38)[3]](https://cdn.photoshoptutorials.ws/6a20526f3a0d_12CCA/img383.jpg?strip=all&lossy=1&quality=70&webp=70&avif=70&w=1920&ssl=1 "img(38)[3]")
![img(39)[3]](https://cdn.photoshoptutorials.ws/6a20526f3a0d_12CCA/img393.jpg?strip=all&lossy=1&quality=70&webp=70&avif=70&w=1920&ssl=1 "img(39)[3]")
Deselect the selection. Reduce the saturation of the layer.
![img(40)[3]](https://cdn.photoshoptutorials.ws/6a20526f3a0d_12CCA/img403.jpg?strip=all&lossy=1&quality=70&webp=70&avif=70&w=1920&ssl=1 "img(40)[3]")
Create a new layer and paint a shadow. Clip to the base layer.
![img(41)[3]](https://cdn.photoshoptutorials.ws/6a20526f3a0d_12CCA/img413.jpg?strip=all&lossy=1&quality=70&webp=70&avif=70&w=1920&ssl=1 "img(41)[3]")
The lighting isn't strong enough. Paint a lighter color with a soft brush. I painted with 50% opacity setting.
![img(42)[3]](https://cdn.photoshoptutorials.ws/6a20526f3a0d_12CCA/img423.jpg?strip=all&lossy=1&quality=70&webp=70&avif=70&w=1920&ssl=1 "img(42)[3]")
Add fine details. I picked a 1 pixel brush to paint subtle highlights and shadows. Spend some time to get it right.
![img(43)[3]](https://cdn.photoshoptutorials.ws/6a20526f3a0d_12CCA/img433.jpg?strip=all&lossy=1&quality=70&webp=70&avif=70&w=1920&ssl=1 "img(43)[3]")
Paint structural details. Pick a small brush to paint details.
![img(44)[3]](https://cdn.photoshoptutorials.ws/6a20526f3a0d_12CCA/img443.jpg?strip=all&lossy=1&quality=70&webp=70&avif=70&w=1920&ssl=1 "img(44)[3]")
![img(45)[3]](https://cdn.photoshoptutorials.ws/6a20526f3a0d_12CCA/img453.jpg?strip=all&lossy=1&quality=70&webp=70&avif=70&w=1920&ssl=1 "img(45)[3]")
Continue to add more details.
![img(46)[3]](https://cdn.photoshoptutorials.ws/6a20526f3a0d_12CCA/img463.jpg?strip=all&lossy=1&quality=70&webp=70&avif=70&w=1920&ssl=1 "img(46)[3]")
Create a window shape using Polygonal Lasso Tool.
![img(47)[3]](https://cdn.photoshoptutorials.ws/6a20526f3a0d_12CCA/img473.jpg?strip=all&lossy=1&quality=70&webp=70&avif=70&w=1920&ssl=1 "img(47)[3]")
![img(48)[3]](https://cdn.photoshoptutorials.ws/6a20526f3a0d_12CCA/img483.jpg?strip=all&lossy=1&quality=70&webp=70&avif=70&w=1920&ssl=1 "img(48)[3]")
Duplicate it several times. Finally merge all the windows and pressing Ctrl+E.
![img(49)[3]](https://cdn.photoshoptutorials.ws/6a20526f3a0d_12CCA/img493.jpg?strip=all&lossy=1&quality=70&webp=70&avif=70&w=1920&ssl=1 "img(49)[3]")
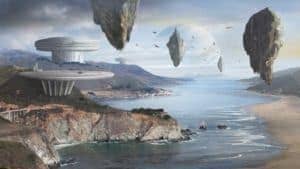
We are here so far.
![img(50)[6]](https://cdn.photoshoptutorials.ws/6a20526f3a0d_12CCA/img506.jpg?strip=all&lossy=1&quality=70&webp=70&avif=70&w=1920&ssl=1 "img(50)[6]")
Add some grain to the building to remove some of the smoothness of the brush strokes. Create a new layer and place it at top in the stack. Load selection from the base layer by Ctrl + clicking. Fill the selection.
![img(51)[3]](https://cdn.photoshoptutorials.ws/6a20526f3a0d_12CCA/img513.jpg?strip=all&lossy=1&quality=70&webp=70&avif=70&w=1920&ssl=1 "img(51)[3]")
Go to Filter > Artistic > Film Grain.
3 comments on “How to Create an Amazing Futuristic Matte Painting in Photoshop”
bhai or koie matte painting ka file send kar
its gud
its gggg,ooo,dddd.THANK U.