

Download Lightroom presets and LUTs, absolutely free. Use the presets to add creativity and style to your photos.
![img(147)[3]](https://cdn.photoshoptutorials.ws/6a20526f3a0d_12CCA/img1473.jpg?strip=all&lossy=1&quality=70&webp=70&avif=70&w=1920&ssl=1 "img(147)[3]")
![img(148)[3]](https://cdn.photoshoptutorials.ws/6a20526f3a0d_12CCA/img1483.jpg?strip=all&lossy=1&quality=70&webp=70&avif=70&w=1920&ssl=1 "img(148)[3]")
Rotate.
![img(149)[3]](https://cdn.photoshoptutorials.ws/6a20526f3a0d_12CCA/img1493.jpg?strip=all&lossy=1&quality=70&webp=70&avif=70&w=1920&ssl=1 "img(149)[3]")
Change the Blend Mode to Overlay.
![img(150)[3]](https://cdn.photoshoptutorials.ws/6a20526f3a0d_12CCA/img1503.jpg?strip=all&lossy=1&quality=70&webp=70&avif=70&w=1920&ssl=1 "img(150)[3]")
Use a mask to blend the planet into the environment.
![img(151)[3]](https://cdn.photoshoptutorials.ws/6a20526f3a0d_12CCA/img1513.jpg?strip=all&lossy=1&quality=70&webp=70&avif=70&w=1920&ssl=1 "img(151)[3]")
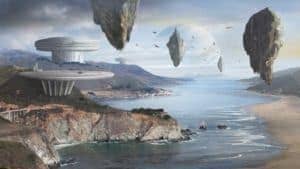
Step 9: Floating Rocks
Here what we are going to create. The floating mountains have become a striking example of a fantasy world with the advent of the popular Hollywood movie Avatar. Inspired by the concept we are going to create our own floating rocks. We use our initial sketch as a guide to create the rocks. In order to achieve the result we need to combine many different photo elements and color correct them to mix with the environment. Just as we have been doing all along. By now you are familiar with the color correction tools.
![img(152)[3]](https://cdn.photoshoptutorials.ws/6a20526f3a0d_12CCA/img1523.jpg?strip=all&lossy=1&quality=70&webp=70&avif=70&w=1920&ssl=1 "img(152)[3]")
Open up the Haylong Bay image. Copy one of the rocks and paste in the composition. Create a new layer called "rock1". Drag the layer into this group. I turned on the sketch layer. We will shape the photo elements into this shape.
![img(153)[3]](https://cdn.photoshoptutorials.ws/6a20526f3a0d_12CCA/img1533.jpg?strip=all&lossy=1&quality=70&webp=70&avif=70&w=1920&ssl=1 "img(153)[3]")
Paste into Photoshop. Flip the layer vertically and horizontally. Erase the portion outside of the sketch.
![img(154)[3]](https://cdn.photoshoptutorials.ws/6a20526f3a0d_12CCA/img1543.jpg?strip=all&lossy=1&quality=70&webp=70&avif=70&w=1920&ssl=1 "img(154)[3]")
![img(155)[3]](https://cdn.photoshoptutorials.ws/6a20526f3a0d_12CCA/img1553.jpg?strip=all&lossy=1&quality=70&webp=70&avif=70&w=1920&ssl=1 "img(155)[3]")
We need to create the other side of the mountain. Copy a another piece from the image. Rotate it and mask out excessive area forming the edge of the rock. This is the lighter side which is hit by the sun light.
![img(156)[3]](https://cdn.photoshoptutorials.ws/6a20526f3a0d_12CCA/img1563.jpg?strip=all&lossy=1&quality=70&webp=70&avif=70&w=1920&ssl=1 "img(156)[3]")
![img(157)[3]](https://cdn.photoshoptutorials.ws/6a20526f3a0d_12CCA/img1573.jpg?strip=all&lossy=1&quality=70&webp=70&avif=70&w=1920&ssl=1 "img(157)[3]")
Open up the Mountain3 stock. Copy the peak located at the center.
![img(158)[3]](https://cdn.photoshoptutorials.ws/6a20526f3a0d_12CCA/img1583.jpg?strip=all&lossy=1&quality=70&webp=70&avif=70&w=1920&ssl=1 "img(158)[3]")
Paste and rotate the peak. Resize it. Add a layer mask to blend it.
![img(159)[3]](https://cdn.photoshoptutorials.ws/6a20526f3a0d_12CCA/img1593.jpg?strip=all&lossy=1&quality=70&webp=70&avif=70&w=1920&ssl=1 "img(159)[3]")
Color correct the three layers.
![img(160)[3]](https://cdn.photoshoptutorials.ws/6a20526f3a0d_12CCA/img1603.jpg?strip=all&lossy=1&quality=70&webp=70&avif=70&w=1920&ssl=1 "img(160)[3]")
![img(161)[3]](https://cdn.photoshoptutorials.ws/6a20526f3a0d_12CCA/img1613.jpg?strip=all&lossy=1&quality=70&webp=70&avif=70&w=1920&ssl=1 "img(161)[3]")
I painted the remaining area. First painted with a medium chalk brush and move on to paint with a small brush to add fine details. Play around and have fun with it.
![img(162)[3]](https://cdn.photoshoptutorials.ws/6a20526f3a0d_12CCA/img1623.jpg?strip=all&lossy=1&quality=70&webp=70&avif=70&w=1920&ssl=1 "img(162)[3]")
Our image so far.
![img(163)[3]](https://cdn.photoshoptutorials.ws/6a20526f3a0d_12CCA/img1633.jpg?strip=all&lossy=1&quality=70&webp=70&avif=70&w=1920&ssl=1 "img(163)[3]")
We are now going to create another floating mountain. I have already blocked the shape. Create a new layer group called "Rock2". I separated the sketch and moved it into the group. We will use the shape as a guide and will clip the photo elements to it.
![img(164)[3]](https://cdn.photoshoptutorials.ws/6a20526f3a0d_12CCA/img1643.jpg?strip=all&lossy=1&quality=70&webp=70&avif=70&w=1920&ssl=1 "img(164)[3]")
Bring in the Machu Picchu image. I copied the mountain peak. Pasted it in the Mountain2 group, rotated and clipped to the base layer.
![img(165)[3]](https://cdn.photoshoptutorials.ws/6a20526f3a0d_12CCA/img1653.jpg?strip=all&lossy=1&quality=70&webp=70&avif=70&w=1920&ssl=1 "img(165)[3]")
Reduce saturation of the layer and adjust the colors.
![img(166)[3]](https://cdn.photoshoptutorials.ws/6a20526f3a0d_12CCA/img1663.jpg?strip=all&lossy=1&quality=70&webp=70&avif=70&w=1920&ssl=1 "img(166)[3]")
Apply color overlay
![img(167)[3]](https://cdn.photoshoptutorials.ws/6a20526f3a0d_12CCA/img1673.jpg?strip=all&lossy=1&quality=70&webp=70&avif=70&w=1920&ssl=1 "img(167)[3]")
Pick another bit of reference from the Mountain5 stock.
3 comments on “How to Create an Amazing Futuristic Matte Painting in Photoshop”
bhai or koie matte painting ka file send kar
its gud
its gggg,ooo,dddd.THANK U.