
Luminar AI lets you turn your ideas into reality with powerful, intelligent AI. Download the photo editor and see how you can completely transform your photos in a few clicks.
![image070[4]](https://cdn.photoshoptutorials.ws/images/stories/b4481e59d74b_10CA/image0704.png?strip=all&lossy=1&quality=70&webp=70&avif=70&w=1920&ssl=1 "image070[4]")
Once you're done, open "Dragon Stock T1P1". This stock image is a PNG file so when it opens you'd see four dragons on a transparent background, which means you, can just select a dragon and move it to our canvas. Now, to begin, activate the Polygonal Lasso Tool (L). See image below:
![image071[4]](https://cdn.photoshoptutorials.ws/images/stories/b4481e59d74b_10CA/image0714.png?strip=all&lossy=1&quality=70&webp=70&avif=70&w=1920&ssl=1 "image071[4]")
Now, to select the dragon, use the Polygonal Lasso Tool (L) to create a selection area around the dragon shown on the image below:
![image072[4]](https://cdn.photoshoptutorials.ws/images/stories/b4481e59d74b_10CA/image0724.png?strip=all&lossy=1&quality=70&webp=70&avif=70&w=1920&ssl=1 "image072[4]")
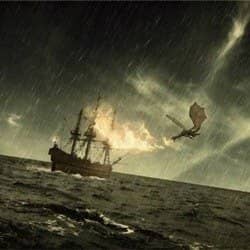
Once you've done that, activate the Move tool (V) and move the dragon to our canvas. After moving, rename it to "Dragon 1". Now, activate the Transform tool (Ctrl/Cmd + T) to resize the dragon as shown on the image below:
![image073[4]](https://cdn.photoshoptutorials.ws/images/stories/b4481e59d74b_10CA/image0734.png?strip=all&lossy=1&quality=70&webp=70&avif=70&w=1920&ssl=1 "image073[4]")
After that, rotate the dragon using the Transform tool (Ctrl + T). See image below:
![image074[4]](https://cdn.photoshoptutorials.ws/images/stories/b4481e59d74b_10CA/image0744.png?strip=all&lossy=1&quality=70&webp=70&avif=70&w=1920&ssl=1 "image074[4]")
![image075[4]](https://cdn.photoshoptutorials.ws/images/stories/b4481e59d74b_10CA/image0754.png?strip=all&lossy=1&quality=70&webp=70&avif=70&w=1920&ssl=1 "image075[4]")
For the dragon to blend in with the rest of the images, we will now edit its Brightness/Contrast. Go to Image > Adjustments > Brightness/Contrast while the "Dragon 1" layer is active. Input the following:
- Brightness: -30
- Contrast: -50
The result should be like this:
![image076[4]](https://cdn.photoshoptutorials.ws/images/stories/b4481e59d74b_10CA/image0764.png?strip=all&lossy=1&quality=70&webp=70&avif=70&w=1920&ssl=1 "image076[4]")
Step 8: Create the Dragon's Fiery-breath
With the dragons done, let us now create the flames from the mouth of "Dragon 1". To start, first create a new layer (Ctrl/Cmd + Shift + N) on top of the dragon layer and name it "fire 1". After that, activate the Brush tool (B) and load the SS-flames brush set (Flames Fire Photoshop Brushes). Once you have the brushes loaded, activate the Brush tool (B) again and choose the following brush:
![image077[4]](https://cdn.photoshoptutorials.ws/images/stories/b4481e59d74b_10CA/image0774.png?strip=all&lossy=1&quality=70&webp=70&avif=70&w=1920&ssl=1 "image077[4]")
Now, that your cursor has now changed to that brush, you may now input the following:
- Brush size: 400px
- Hardness: 0%
- Opacity: 100%
- Flow: 100%
- #: deec5e
Apply the brush on the position shown on the image below:
![image078[4]](https://cdn.photoshoptutorials.ws/images/stories/b4481e59d74b_10CA/image0784.png?strip=all&lossy=1&quality=70&webp=70&avif=70&w=1920&ssl=1 "image078[4]")
When you're done, activate the Transform tool (Ctrl + T) and rotate "fire 1" as shown on the image below:
![image079[4]](https://cdn.photoshoptutorials.ws/images/stories/b4481e59d74b_10CA/image0794.png?strip=all&lossy=1&quality=70&webp=70&avif=70&w=1920&ssl=1 "image079[4]")
The result:
![image080[4]](https://cdn.photoshoptutorials.ws/images/stories/b4481e59d74b_10CA/image0804.png?strip=all&lossy=1&quality=70&webp=70&avif=70&w=1920&ssl=1 "image080[4]")
Now, we're going to edit its Blending Style to give this fire a glow. To start, right click on the "fire 1" layer to open the contextual menu; once open, click on "Blending Options".
![image081[4]](https://cdn.photoshoptutorials.ws/images/stories/b4481e59d74b_10CA/image0814.png?strip=all&lossy=1&quality=70&webp=70&avif=70&w=1920&ssl=1 "image081[4]")
Once the Blending Options menu opens, input the following:
Blending Styles:
- Styles: Outer Gow
- Blend Mode: Lighten
- Opacity: 50%
- Noise: 0%
- #: ff6000
Elements:
- Technique: Softer
- Spread: 0%
- Size: 70px
- Quality: DEFAULT
See image below:
![image082[4]](https://cdn.photoshoptutorials.ws/images/stories/b4481e59d74b_10CA/image0824.png?strip=all&lossy=1&quality=70&webp=70&avif=70&w=1920&ssl=1 "image082[4]")
![image083[4]](https://cdn.photoshoptutorials.ws/images/stories/b4481e59d74b_10CA/image0834.png?strip=all&lossy=1&quality=70&webp=70&avif=70&w=1920&ssl=1 "image083[4]")
Now to amplify the light of the fire, create a new layer and name it: "Fire Light". Activate the Brush tool (B), right click on the canvas, click the drop-side button and click on Reset Brushes. Once you've reset it, input the following:
9 comments on “How to Create an Out of This World, Medieval-Fantasy Themed Photo Manipulation”
omg thnaks ur a genius!
The url for the dragon stuff no longer exists...
Hey,
None of the resource links work for me...
Please upload the rest files somewhere else that we can also use it.
very appealing and outstanding
Maybe this http://browse.deviantart.com/art/E-S-Dragon-III-Sky-145874452
or this
http://th04.deviantart.net/fs11/PRE/i/2006/170/d/3/Dragon_Stock_T1P1_by_Shoofly_Stock.jpg
Outstanding piece of work :) Thank you for this tutorial :)
hi
the dragon stock is missing.. can sombody give me the other working ling for this stock?
here is my picture, thankyou for this great tutorial. greetings from indonesia
thankyou, very useful tutorial. kewl.