
Download Lightroom presets and LUTs, absolutely free. Use the presets to add creativity and style to your photos.
Follow the example below:

Burn the shadows on the hands, especially over the wrinkles following the direction of the shadows.

Also burn over the hairline and inside the eyes.

Step 17
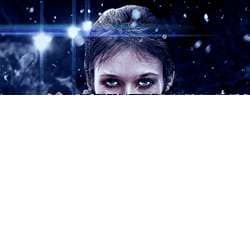
Switch to the Dodge tool (You can also hold shift while using the Burn tool) then change the range to "Highlights" and exposure to 9%. The brush size and hardness should be the same. We're going to do the same we did with the Burn tool except this time we'll be dodging over the brightest highlights in the image to give them more punch.

Here's the before and after comparison of this dodge/burn technique..

Step 18
Now we're going to increase the vibrancy and brighten the eyes. To do this, select the Brush tool (B) then switch to "Quick Mask Mode". Brush over the eyes then turn Quick Mask Mode off by clicking on the quick mask button again. You'll get a selection of the eyes. Invert the selection (Ctrl/Cmd+Shift+I or Select > Invert).

Step 19
Use the Hue/Saturation tool (Ctrl/Cmd+U or Image > Adjustments > Hue/Saturation) to change the color of the pupil to a vibrant blue.

Step 20
Use the Brightness/Contrast tool (Image > Adjustments > Brightness/Contrast) to brighten the pupils.

Step 21
Switch back to the Dodge tool and dodge the eyes to make them brighter.

Step 22
Create a new layer on top of the model and clip mask them together.(Click between the layer thumbs while holding Alt):

Step 23
Change this new layer's blending mode to "Overlay" we are going to paint some Shading and light to match the background on the model. Select the Brush tool with a brush of about 500 pixels wide and 0% hardness with the opacity set to 25% and change your foreground color to black.Now softly brush over the right side to shade it.Brush over as many times needed to get the result like shown below.Once you are done with this,Change your color to white and add some light to the right side of the model:

Clip mask another new layer if necessary on top of the model to further increase the shading.

Step 24
Create a new Brightness and Contrast Adjustment layer on top of the shading layers and clip mask it to them.Use the next values to increase the contrast on the model:
One comment on “How to Create This Freezing Cold Portrait Photo Manipulation in Photoshop”
Great, thanks for all the helpful info!