
Make your artwork look like they're from an alternate universe. These Cyberpunk presets work with Photoshop (via the Camera Raw filter) and Lightroom. Download all 788 presets for 90% off.
![step-016[28]](https://cdn.photoshoptutorials.ws/images/stories/4f403d312465_1519/step-01628.jpg?strip=all&lossy=1&quality=70&webp=70&avif=70&w=1920&ssl=1 "step-016[28]")
Step 17
Still in the same layer, go to Edit > Transform > Warp then warp the image following the 3D model side curve. See image below for more details.
![step-017[28]](https://cdn.photoshoptutorials.ws/images/stories/4f403d312465_1519/step-01728.jpg?strip=all&lossy=1&quality=70&webp=70&avif=70&w=1920&ssl=1 "step-017[28]")
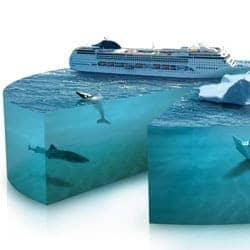
Step 18
Duplicate the wave copy layer, then place each image on top of left and right layer. After that, make each one of them ( wave copy layer ) as a layer clipping mask. Result of this steps can be seen in the image below.
![step-018[28]](https://cdn.photoshoptutorials.ws/images/stories/4f403d312465_1519/step-01828.jpg?strip=all&lossy=1&quality=70&webp=70&avif=70&w=1920&ssl=1 "step-018[28]")
Step 19
Select the wave copy 2 layer (the one on top of right shape layer) then change the blend mode to Multiply. Make it blur by going to Filter > Blur > Gaussian Blur menu, adjust Radius value to 5px then click OK.
![step-019[28]](https://cdn.photoshoptutorials.ws/images/stories/4f403d312465_1519/step-01928.jpg?strip=all&lossy=1&quality=70&webp=70&avif=70&w=1920&ssl=1 "step-019[28]")
Step 20
Repeat previous step for the other wave image placed on top of left shape layer. To apply the same Gaussian Blur filter, simply press Ctrl+F. When you're done, select the left shape layer's and reduce the opacity to 70%. This will make the left shape become transparent.
![step-020[28]](https://cdn.photoshoptutorials.ws/images/stories/4f403d312465_1519/step-02028.jpg?strip=all&lossy=1&quality=70&webp=70&avif=70&w=1920&ssl=1 "step-020[28]")
Step 21
Go back to right shape layer's, we need to tweak this layer so it look transparent as the left shape. Reducing the layer opacity will simply work, but I didn't want the entire right shape became transparent. So I decide to add a layer mask, then use a black-soft round-Brush tool with low opacity (around 10-20%) to mask some areas so the transparency is applied only on certain parts (i assume you already knew how to do masking with brush tool).
![step-021[29]](https://cdn.photoshoptutorials.ws/images/stories/4f403d312465_1519/step-02129.jpg?strip=all&lossy=1&quality=70&webp=70&avif=70&w=1920&ssl=1 "step-021[29]")
Step 22
Copy-paste the water texture image once again, don't forget to decrease its size. Make sure you place this new water texture layer on top of inside's shape layer, then create a selection using Rectangular marquee tool. Now Inverse (press Shift+Ctrl+I) the selection, delete the selected area then deselect ( press Ctrl+D ). Still in the same layer, make it as clipping mask (press Ctrl+Alt+G) and then go to Edit > Transform > Distort. Distort the water texture until it the perspective's feel right. Press Enter when you're done.
![step-022[29]](https://cdn.photoshoptutorials.ws/images/stories/4f403d312465_1519/step-02229.jpg?strip=all&lossy=1&quality=70&webp=70&avif=70&w=1920&ssl=1 "step-022[29]")
Step 23
Same as previous step, change layer blend mode to Multiply then apply Gaussian Blur filter. Later on, reduce the "inside" shape layer opacity to 70%.
![step-023[29]](https://cdn.photoshoptutorials.ws/images/stories/4f403d312465_1519/step-02329.jpg?strip=all&lossy=1&quality=70&webp=70&avif=70&w=1920&ssl=1 "step-023[29]")
Step 24
Open and copy-paste the sand texture image into our working document. Place it on top of 'bottom' shape layer then decrease its size using the free transform command.
14 comments on “"Piece of the Arctic” Pie Chart Photo Manipulation”
awesome work...congrats
Learning so much with this tutorial. Thanks...
thanks, loved him!
hi,
i couldnt find 3d tool in photoshop cs6.. please help
Great Work... Thank you Dear For sharing us this tutorial. :)
It's spelled arctic with a C. Get it right people.
nice work ty C:
A really big thanks for the tips
Was a nice tut until step10...
brilliant
A lot to learn.. great work dude..
excellent
Thank you so much for this, it was really helpful.
Wow Amazing....