
Make skin look perfect in one-click with these AI-powered Photoshop actions.
Go to Filter > Render > Lens Flare and set the window which appears as it's shown below.

'To blend the lens flare with the rest of the image properly change the Blending Mode of this layer from Normal to Screen. To make the flare more natural looking lower the Opacity of the layer on about 50%.
The brightest spot of the flare is too bright and it doesn't look well.

To fix the brightness add layer mask to LENS FLARE layer. Grab the Brush Tool (B), select some soft round brush, lower the Opacity on about 40% and paint with black over that bright spot.
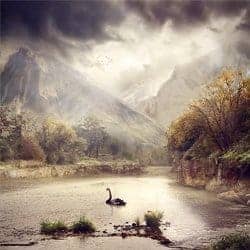
On the following picture you can see how the manipulation looks so far.

Step 16 - Lights and Shadows
In previous step you changed the global light settings of the picture. Now you need to adapt lights and shadows of the whole picture. The main light source is more dramatic which means that there should be bigger difference between lights and shadows than it's now.
Add new layer on the top of all layers and name it e.g. LIGHTS. Grab the Gradient Tool (G) and fill the layer with solid #808080 grey color. Change the Blending Mode on Overlay. The grey dissapears.
Grab the Brush Tool (B), lower the Opacity on about 40% and start painting over the areas where the light rays hit. Then pick black color and paint on the opposite side where shadows should be.
It would be better to show it on the picture than describe it. On the first picture you can see how the layer LIGHTS should look if the Blending Mode of it is set on Normal and on the second there is shown the same layer with Blending Mode on Overlay.

As you may notice from previous picture I painted not only on the bottom part of the picture but also on sky to increase the contrast between the areas where rays hit and shadows to create bit more drama. You can try it too.
Step 17 - Lights on Right Mountain
There is another problem with lighting which has to be fixed. Lights and shadows on the right mountain don't fit to the rest of the picture. On the stock photo light source was stronger than in your manipulation which create sharp transition between lights and shadows.
9 comments on “Serene Fantasy Photo Manipulation”
👏
I enjoyed this and my pic turned out great. Thank you!!!
I enjoyed this and my pic turned out great thank you!!
thanks a lot..................
Sorry guys figured it out. I pressed the mask button while i was still in the channels tab. Clicking layers and clicking on the image followed by pressing masks fixed it ;)
When removing the sky the sky turns darker, it doesn't disappear. I tried using a white brush to see if it changes but it doesn't. I am using CS6, can someone help. Thanks
Wow, I can't thank you enough for making this tutorial of which I just completed. I made a couple of mistakes but I still love the final result. I have been using Photoshop and following many tutorials for over a year and did not learn as much as I did today with your one tutorial. Thank you, thank you, thank you : )
Very Nice!
very very good