

Turn any photo into a dot grid artwork with these Photoshop actions. You'll get great results with dots that change size. They get larger in brighter areas and smaller in darker areas. Free download available.
![image035[6]](https://cdn.photoshoptutorials.ws/wp-content/uploads/migrated-images/49d5c6feaab3_14854/image0356.jpg?strip=all&lossy=1&quality=70&webp=70&avif=70&w=1920&ssl=1 "image035[6]")
Right-click the canvas while a layer is selected and while the Brush tool (B) is activated and then click on the button highlighted below:
![image036[6]](https://cdn.photoshoptutorials.ws/wp-content/uploads/migrated-images/49d5c6feaab3_14854/image0366.jpg?strip=all&lossy=1&quality=70&webp=70&avif=70&w=1920&ssl=1 "image036[6]")
Then click on "Reset Brushes" from the contextual menu.
![image037[6]](https://cdn.photoshoptutorials.ws/wp-content/uploads/migrated-images/49d5c6feaab3_14854/image0376.jpg?strip=all&lossy=1&quality=70&webp=70&avif=70&w=1920&ssl=1 "image037[6]")
Now, that that is done input the following settings for our Brush tool (B):
- Brush size: 200px
- Hardness: 0%
- Opacity: 15%
- Flow: 100%
- #: 000000
![image038[6]](https://cdn.photoshoptutorials.ws/wp-content/uploads/migrated-images/49d5c6feaab3_14854/image0386.jpg?strip=all&lossy=1&quality=70&webp=70&avif=70&w=1920&ssl=1 "image038[6]")
Note: The "#" means the color of the brush. 000000 is the color black, but to make sure that you will be using that brush color, follow the steps below:
![image039[6]](https://cdn.photoshoptutorials.ws/wp-content/uploads/migrated-images/49d5c6feaab3_14854/image0396.jpg?strip=all&lossy=1&quality=70&webp=70&avif=70&w=1920&ssl=1 "image039[6]")
After clicking the Foreground tool, the Color Picker box would open. Once open, input the following on the # space:
![image041[6]](https://cdn.photoshoptutorials.ws/wp-content/uploads/migrated-images/49d5c6feaab3_14854/image0416.jpg?strip=all&lossy=1&quality=70&webp=70&avif=70&w=1920&ssl=1 "image041[6]")
Your brush now has the black color; so now, let's get ready to paint.
Now that that's done, we are now set to paint!
On the "darken 1" layer, paint this out using the brush settings:
![image043[6]](https://cdn.photoshoptutorials.ws/wp-content/uploads/migrated-images/49d5c6feaab3_14854/image0436.jpg?strip=all&lossy=1&quality=70&webp=70&avif=70&w=1920&ssl=1 "image043[6]")
The result of that should be similar to this:
![image045[6]](https://cdn.photoshoptutorials.ws/wp-content/uploads/migrated-images/49d5c6feaab3_14854/image0456.jpg?strip=all&lossy=1&quality=70&webp=70&avif=70&w=1920&ssl=1 "image045[6]")
Next, create a new layer (Ctrl/Cmd + Shift + N) and name it "Darken 2". Activate the Brush tool (B) and input the following settings:
- Brush size: 400px
- Hardness: 0%
- Opacity: 15%
- Flow: 100%
- #: 000000
When that's done, get ready to paint.
![image047[6]](https://cdn.photoshoptutorials.ws/wp-content/uploads/migrated-images/49d5c6feaab3_14854/image0476.jpg?strip=all&lossy=1&quality=70&webp=70&avif=70&w=1920&ssl=1 "image047[6]")
![image049[6]](https://cdn.photoshoptutorials.ws/wp-content/uploads/migrated-images/49d5c6feaab3_14854/image0496.jpg?strip=all&lossy=1&quality=70&webp=70&avif=70&w=1920&ssl=1 "image049[6]")
The result of that should be like this:
![image051[6]](https://cdn.photoshoptutorials.ws/wp-content/uploads/migrated-images/49d5c6feaab3_14854/image0516.jpg?strip=all&lossy=1&quality=70&webp=70&avif=70&w=1920&ssl=1 "image051[6]")
Create another layer again (Ctrl/Cmd + Shift + N) and name this layer: "Darken 3".
Activate the Brush tool (B) and input the following settings:
- Brush size: 1200px
- Hardness: 0%
- Opacity: 25%
- Flow: 100%
- #: 000000
Now let's start painting:
![image053[6]](https://cdn.photoshoptutorials.ws/wp-content/uploads/migrated-images/49d5c6feaab3_14854/image0536.jpg?strip=all&lossy=1&quality=70&webp=70&avif=70&w=1920&ssl=1 "image053[6]")
The result of that should be similar to this:
![image055[5]](https://cdn.photoshoptutorials.ws/wp-content/uploads/migrated-images/49d5c6feaab3_14854/image0555.jpg?strip=all&lossy=1&quality=70&webp=70&avif=70&w=1920&ssl=1 "image055[5]")
Now, let's create another layer (Ctrl/Cmd + Shift + N) and name it: "Darken 4".
Next, activate the Brush tool (B) and input the following settings:
- Brush size: 800px
- Hardness: 0%
- Opacity: 15%
- Flow: 100%
- #: 000000
Let's start painting, then!
![image056[5]](https://cdn.photoshoptutorials.ws/wp-content/uploads/migrated-images/49d5c6feaab3_14854/image0565.jpg?strip=all&lossy=1&quality=70&webp=70&avif=70&w=1920&ssl=1 "image056[5]")
The result of that should be similar to this:
![image058[5]](https://cdn.photoshoptutorials.ws/wp-content/uploads/migrated-images/49d5c6feaab3_14854/image0585.jpg?strip=all&lossy=1&quality=70&webp=70&avif=70&w=1920&ssl=1 "image058[5]")
Now that that's done, we'll now proceed on fixing the light of the sky.
To start, create a new layer (Ctrl/Cmd + Shift + N) and put this layer above the "sky" layer, name this layer to "Light 1".
Once that's done, activate the Brush tool (B) and input the following settings:
- Brush size: 200px
- Hardness: 0%
- Opacity: 15%
- Flow: 100%
- #: fffedd
![image059[5]](https://cdn.photoshoptutorials.ws/wp-content/uploads/migrated-images/49d5c6feaab3_14854/image0595.jpg?strip=all&lossy=1&quality=70&webp=70&avif=70&w=1920&ssl=1 "image059[5]")
We're all set now, so let's start painting:
![image061[5]](https://cdn.photoshoptutorials.ws/wp-content/uploads/migrated-images/49d5c6feaab3_14854/image0615.jpg?strip=all&lossy=1&quality=70&webp=70&avif=70&w=1920&ssl=1 "image061[5]")
The result of that should be like this:
![image063[5]](https://cdn.photoshoptutorials.ws/wp-content/uploads/migrated-images/49d5c6feaab3_14854/image0635.jpg?strip=all&lossy=1&quality=70&webp=70&avif=70&w=1920&ssl=1 "image063[5]")
Create another layer again (Ctrl/Cmd + Shift + N) and then name it "Light 2".
Activate the Brush tool (B) and then input the following:
- Brush size: 80px
- Hardness: 0%
- Opacity: 15%
- Flow: 100%
- #: fffedd
Let's paint:
![image065[5]](https://cdn.photoshoptutorials.ws/wp-content/uploads/migrated-images/49d5c6feaab3_14854/image0655.jpg?strip=all&lossy=1&quality=70&webp=70&avif=70&w=1920&ssl=1 "image065[5]")
The result:
![image067[5]](https://cdn.photoshoptutorials.ws/wp-content/uploads/migrated-images/49d5c6feaab3_14854/image0675.jpg?strip=all&lossy=1&quality=70&webp=70&avif=70&w=1920&ssl=1 "image067[5]")
Once you're done, create a new layer again (Ctrl/Cmd + Shift + N) and name it "Light 3".
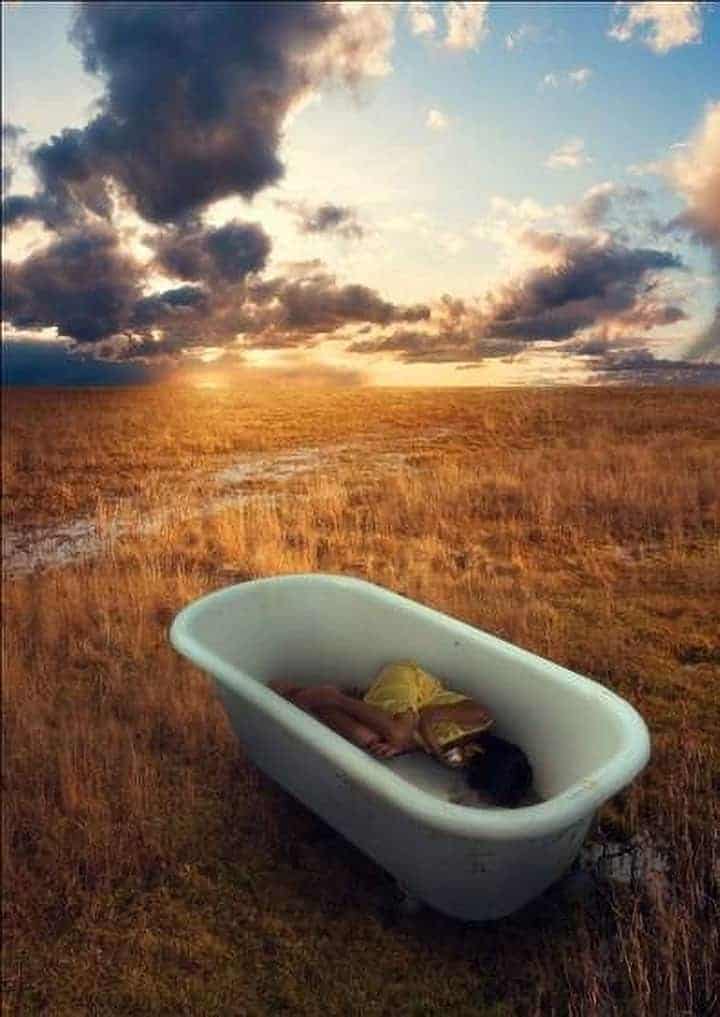
One comment on ““Sleeping Girl in Tub” Photo Manipulation”
Great work.