
Luminar AI lets you turn your ideas into reality with powerful, intelligent AI. Download the photo editor and see how you can completely transform your photos in a few clicks.

Step 39
Create a New Layer and add 2 little drops at the bottom as below using one of the splatter brushes, then erase off the unwanted splatters. Resize and rotate (Transform Tool) them to fit the design.

Step 40
Take a step back and add the finishing touches. To balance off the red drips on top, I've added some splatters on her left shoulder. Create a New Layer, use the same brush in Step 36. Position and rotate (Transform Tool) the drips.

Step 41
Add some black splatters to her right shoulder.

Step 42
Lastly move the flower piece and drips slightly to the left and bottom as it is hiding one of our fairies. We are done!

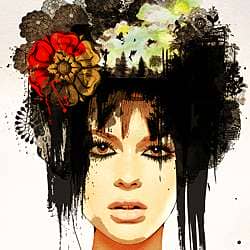
Final Version
![stylish-portrait[1]](https://cdn.photoshoptutorials.ws/images/stories/StylishSurrealPortrait_FC52/stylishportrait1.jpg?strip=all&lossy=1&quality=70&webp=70&avif=70&w=1920&ssl=1 "stylish-portrait[1]")
Download the PSD
stylish-portrait.zip (scaled down to A5 because of file size)
About the Author
Carine Ma has a background in traditional art and multimedia design. She has been designing as a multimedia designer for over 6 years and is currently available for freelance work. You can view her portfolio and blog at Caramel Ink.
3 comments on “Stylish Surreal Portrait”
Thanks for this. I took my own model shot and worked my way through the tutorial. Great fun. Learnt a lot.
Thank you for this Tutorial :) I like it a lot :)
that's beautiful :) thanks for the tutorial :)