
Turn any photo into a dot grid artwork with these Photoshop actions. You'll get great results with dots that change size. They get larger in brighter areas and smaller in darker areas. Free download available.
In today's tutorial we will combine surrealism and fashion effortlessly to create a state of art portrait. I'll show you how to achieve this essentially through a combination of photos, filters and brushes. You can then translate these techniques into your designs to add an artistic edge to them!
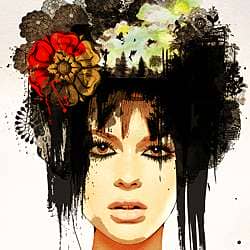
Preview of Final Results

Stylish Surreal Portrait Photoshop Tutorial
Tutorial Details
- Program: Photoshop Cs3
- Difficulty: Beginner/Intermediate
- Estimated Completion Time: 1 hour +
Resources
- Woman Stock Image
- Japanese Flowers Brushes by Melemel
- Victorian Floral Brushes by MouritsaDA-Stock
- Eyelashes Brushes by Obsidiandawn
- Splatters Brushes by Go Media
- Beautiful Flowers Brushes by Coolwing
- Colored Paper Texture by Lost and Taken
- Watercolor Splatters Brushes by Denny Tang
- Watercolor Texture by cgarofani
- Trees Brushes by Falln-stock
- Fairy Silhouette Brushes by joannastar
- Fairy Brushes by lenawargo
- Butterflies Brushes by mouritsada
- Super Crazy Splatter Brushes by Whirlwindzor
Step 1 - Brainstorm
I love the concept behind surrealism. Surrealism is a style of art that uses visual imagery from the subconscious mind to create art without the intention of logical comprehensibility.- Surrealism.com. Let's not limit our creativity to logic and let's design a portrait that will be a fusion of spunk, futuristic and Victorian!
Gather some inspiration to get your creative juices started. For this type of design I find it best to put my idea to paper before going into Photoshop to create the artwork. Right now it's just a rough sketch to help you visualize your concept. It doesn't matter if the end result is far from your original sketch. I drew a head overflowing with flowers and butterflies.

Step 2 - Set up
Create an A4 size canvas with a decent print quality of 200dpi (optimal is 300dpi). Let's start off by working on the woman to give her a fashionable look. Open the woman image and place it at the center, bottom of the page.

Step 3
Duplicate the woman image and apply a Black & White adjustment ( Image > Adjustments > Black & White) on it. Adjust the values for the different colors until you get a sharp black & white image with high contrasts. In a fashion portrait, the focus is usually on the woman's eyes and hair. Additionally I want her face contours to be more defined as I'm planning to extract her face from the image later.


Step 4
Make a second copy of the woman's image and apply a Poster Edges Filter (Filter > Artistic > Poster Edges) with a maximum edge thickness of 10 and the bring the rest of the settings to 0. This gives us a highly stylized image and a beautiful glowing skin.


Step 5
The “poster edge” layer should be on top of the “black & white” and it's Opacity should be set to 90%.
3 comments on “Stylish Surreal Portrait”
Thanks for this. I took my own model shot and worked my way through the tutorial. Great fun. Learnt a lot.
Thank you for this Tutorial :) I like it a lot :)
that's beautiful :) thanks for the tutorial :)