
Luminar AI lets you turn your ideas into reality with powerful, intelligent AI. Download the photo editor and see how you can completely transform your photos in a few clicks.

Merge all layers with animals in a group and name it "Bugs" (Select the desired layers + Cmd/Ctrl + G). I combine all to groups, because then it is necessary apply the adjustment layers, which should flow to animals.
Step 26
Create a new group by clicking on the icon in the group at the bottom of the Layers panel. Then add a layer mask to it. Move the group "Mushrooms" and "Bugs" in this group.

Take a Brush Tool (B) with there settings: Size: 70px, Hardness: 0%, Opacity: 45%, flow: 100%.

Remove on the layer mask a little stipe, to make it look realistic. In some places I have changed Opacity: 70% to enhance the effect.

Step 27
Now you need to create realistic shadows on mushrooms. To do this, create a new layer use the short keys Cmd /Ctrl+ Shift + N. Note that this layer is applied only to a group rather than to the entire document.

Use the Dodge Tool (O) for make light and Burn Tool (O) for shadow. Set the following settings.

Draw light and shade as shown in Figure. Pay attention to animals. Draw a shadow on the back of the frog and the shells so they look realistic. Shadow paint in accordance with the light from the background.

Step 28
When we finished with light and shadow, then you have to adjust the saturation of all fungi, to make it look authentic and natural. We will add two adjustment layers. The first is Curves to give a correct saturation and gamma. Go to Layer > New Adjustment Layer > Curves... or icon New Adjustment Layer > Curves...

Second adjustment layer is Hue/Saturation. It needed to do a bit of dark color that closer to reality.

Here I have made such mushrooms. Not much darken them and do not do much hard light and dark tones. Otherwise, your work will not look realistic and too overexposed. I combined all the adjustment layers with groups into one group and named it "mushrooms and bugs".

Step 29
Now add some spider webs. For this I used a brushes "Spider_Webs_1_by_frozenstocks". If you do not know how to load them, you can see it in my other tutorials, or use the search :). I have three different layers with different spider webs in different places.

Let's start with the bottom layer! Create a new layer and take a Brush Tool (B). Brush name "Spider_web_5" Size: 400px, Opacity: 100%. Color to all webs - #cacaca. I specifically took not white, because that will look more natural. Place the web of between mushrooms, but that the center was in the middle. Also make sure that the edges of the web concerned fungi.

Second layer. Brush name "Spider_web_11" (Blue), "Spider_web_12" (Red), Size: 300px.

Third layer. Brush name "Spider_web_4" (Blue), Size: 256px.

But last web need a little change. Go to Brush Presets and change the settings as shown in Figure. Brush name "Spider_web_3" (Blue), Size: 200px. Because the web on different layers, created volume and light game.

Step 30
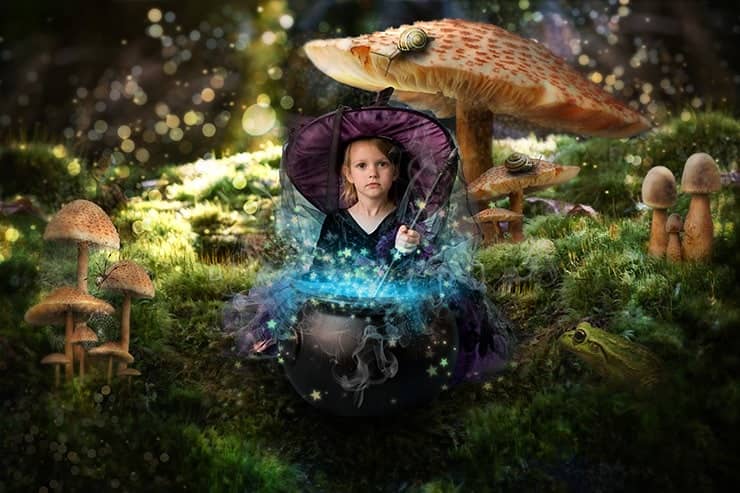
Now let's pay attention to the model! And add it to start :). Go to File > Place. Image "Little_Witch_3_by_deathbycanon_stock". Place the model in the center of the image on a piece of wood. Reduce its size little.

Use the Quick Selection Tool (W) to select a model. Be sure to circle and every part of dresses and hats. Do not worry that background emerges through the fabric pattern, then we remove it. When you select a model, go to Refine Edge...
23 comments on “Turn Baby Photo into a Fairy Tale "Queen of Fungi" Composite”
did phone until I got to the star brush tutorial - that was it, the instructions were not in line with photoshop at all
Great tutorial!
Thank you for all your hard work and the wisdom you shared.
Thank you for all you hard work and the wisdom you shared :)
Why isn't this tut visible? Post is two days ago but the comments dates are from 2014?
laborious lesson.It takes many time and a lot of effort to achieve a good result. Thanks for lesson
wove
Nice technique. Really useful…thanks for the post…
I like the idea of this tutorial, it’s very creative and the result looks great
Very creative and professional design.
Thank you very much! I do it.
спасибо за красивые уроки!!!!!!!!!!!!
Спасибо большое! Так приятно знать, что они понравились и ,надеюсь, полезны. Уже прочитали их? :) Скоро будут новые уроки! Если у вас будут вопросы, то пишите мне и я с радостью помогу вам.
Thank you for sharing this great tutorial well explained and I liked perform:
http://cartes-mireilled.eklablog.com/photomontage-magique-reine-des-champignons-a108935666
Thank you very much! I am very pleased! I tried :) I really appreciate it! :D Unfortunately your link does not open. I would be happy to look your work!
Nice job
Thank you very much! I really appreciate it! :D
Really Nice.Thanks to share this Tutorial.
Thank you very much! I really appreciate it!
очень красивый урок!!!!!!!!
Спасибо большое! Мне очень приятно!:)
nice
Thank you very much!