
Turn any photo into a dot grid artwork with these Photoshop actions. You'll get great results with dots that change size. They get larger in brighter areas and smaller in darker areas. Free download available.

To this layer set Opacity: 65%, Blend Mode: Linear Dodge (Add).

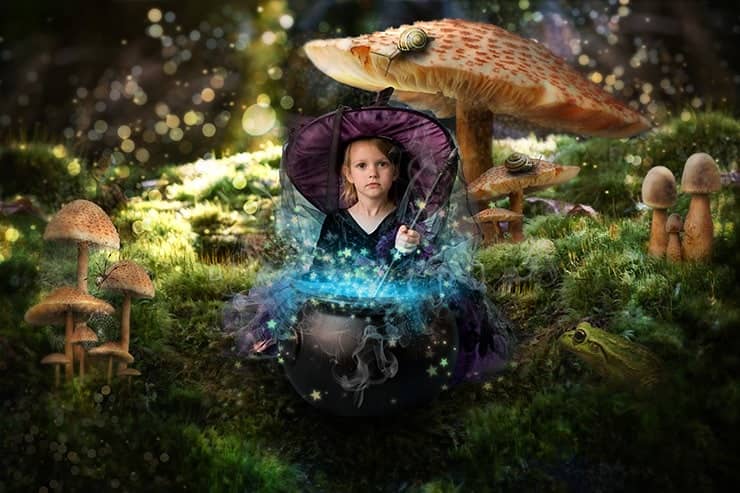
Create a new layer. Reduce the size of the brush (Size: 500px) and put a point as shown in Figure.

Set Opacity: 70%, Blend Mode: Screen. Now you can deselect (Cmd/Ctrl + D).

Step 36
Now create a new layer and place it the top. Change Blend Mode to Color, Opacity: 55%.

Take a Brush Tool (B) (Size: 125px, Hardness: 0%, Opacity: 100%, flow: 100%, Color - # 00bffc). Draw glow from the kettle to a model, on kettle edge and fabric. Try not to draw on the model's face, because it is not very nice.

Create a New Layer. Take a Brush Tool (Size: 100px, Hardness: 0%, Opacity: 30%, flow: 100%, Color - # 00bffc), make small steam eruption. Opacity to this layer - 58%.

Note the location of the layers! You should be too.

Step 37
We proceed to the stars. Create a New Layer. Select your star brush. Settings Size: 25 and 15px, Hardness: 0%, Opacity: 100%, flow: 100%, Color - # 00bffc. In the settings of the brush uncheck "Color Dynamics" to draw only one color. This layer must be above the layer with "Linear Dodge (Add)".

Create a New Layer. Brush Settings: Size: 30px, Hardness: 0%, Opacity: 100%, flow: 100%, Color - # ffbb03. In the settings of the brush turn "Color Dynamics" to become stars with different colors and shades. Opacity to this layer - 40%. Each subsequent layer to be under previous.

Now we give the stars neon effect. For this layer add a style Inner Glow... and Outer Glow... Make the settings for each as shown in Figure.

This style makes the outer glow. So you can make the effect of light or energy from object.

This style makes the inner glow. This gives the effect of neon stars and makes them view the baby and toy.

Create a New Layer. Brush Settings: Size: 40px, Hardness: 0%, Opacity: 100%, flow: 100%, Color - # ffbb03. Opacity to this layer - 100%. Duplicate the layer style from the previous.

Step 39
Create a New Layer. Brush Settings: Size: 15px, Hardness: 0%, Opacity: 100%, flow: 100%, Color - # ffe000. Opacity to this layer - 75%. I decided to add gold stars and textured. For this layer add a style Bevel & Emboss... Color Overlay... Outer Glow... Make the settings as shown in Figure.

Bevel & Emboss... This gives the texture of the stars.

Color Overlay... colors in the color you want.


Step 40
Remained the last layer. It is the latest and contains smoke. Create a new layer and load in Photoshop smoke brushes. Try different brush. Here are some basic brushes, which I used. Set Opacity to this layer 45%.


I combined all the layers with the glow of the stars and in the same group and named it "Star". Check the location of all the layers. You must be in the same way as me.

Step 41
Now let's add bokeh to the picture to make the atmosphere more colorful and magical. Go to File> Place and select file "Light_texture_05_by_xnienke".

Reduce the image and duplicate it 2 times, place two images on the top and one near the fungi. I added to layers with bokeh in group "Interior" layer mask and removed the water mark.
23 comments on “Turn Baby Photo into a Fairy Tale "Queen of Fungi" Composite”
did phone until I got to the star brush tutorial - that was it, the instructions were not in line with photoshop at all
Great tutorial!
Thank you for all your hard work and the wisdom you shared.
Thank you for all you hard work and the wisdom you shared :)
Why isn't this tut visible? Post is two days ago but the comments dates are from 2014?
laborious lesson.It takes many time and a lot of effort to achieve a good result. Thanks for lesson
wove
Nice technique. Really useful…thanks for the post…
I like the idea of this tutorial, it’s very creative and the result looks great
Very creative and professional design.
Thank you very much! I do it.
спасибо за красивые уроки!!!!!!!!!!!!
Спасибо большое! Так приятно знать, что они понравились и ,надеюсь, полезны. Уже прочитали их? :) Скоро будут новые уроки! Если у вас будут вопросы, то пишите мне и я с радостью помогу вам.
Thank you for sharing this great tutorial well explained and I liked perform:
http://cartes-mireilled.eklablog.com/photomontage-magique-reine-des-champignons-a108935666
Thank you very much! I am very pleased! I tried :) I really appreciate it! :D Unfortunately your link does not open. I would be happy to look your work!
Nice job
Thank you very much! I really appreciate it! :D
Really Nice.Thanks to share this Tutorial.
Thank you very much! I really appreciate it!
очень красивый урок!!!!!!!!
Спасибо большое! Мне очень приятно!:)
nice
Thank you very much!