
Luminar AI lets you turn your ideas into reality with powerful, intelligent AI. Download the photo editor and see how you can completely transform your photos in a few clicks.

Step 3 - Set the Goal for this Image
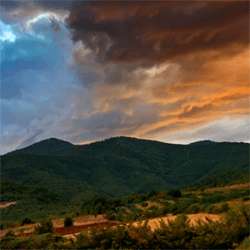
So what we are about to do in this tutorial is bring the image dynamics so that all elements of this picture keep a high dynamic range. Does high dynamic range ring a bell? Yes, it is HDR, but it's manual. The process we are about to make is a better alternative to HDR images, a more natural looking and friendly to the eye one at least. HDR has a great wow effect, but in the long term, it is not a method that will create those astonishing landscape shots like National Geographic. This method is not 100% National Geographic quality wise, but is surely closer to it than a plain HDR tone mapping. This tutorial will provide an HDR example of this exact same image for you to compare later on.
So we will begin with the two basic tools in ACR, Recovery and Fill Light. Those two are the initial steps in order to bring the sky and ground closer exposure wise. Bringing both Recovery and Fill Light values to 100 shows in the histogram that exposure of sky and ground comes towards the middle, blending both in the same exposure range. But 100 is for both an extreme value, and result is like a bad washed out pseudo HDR. Also, using Recovery and Fill light in extreme combination creates some grey outlines around the details in the image, which is bad. So we are going to take little steps, in order to bring those two a bit closer.

Step 4 - Initial Adobe Camera Raw Adjustments
An initial recovery of 40 and fill light of 20 is ok. We need cute little steps in order to enhance this picture, as a few big ones will only prove destructive in our result. Photoshop is only great when working in little steps and that is a basic rule for all forms of use!

Step 5 - Adobe Camera Raw Graduated Filters
It's time for the first cool trick! I have been mumbling about the difference in exposures between the sky and ground. So it's the point to start. The tool to use is a graduated exposure filter in ACR. This way we will imitate all the proper landscape photographers that use polarizing and graduated exposure filters when taking pictures and not all us unfortunate enough not to have one. So select graduated filter, set it to -1.00 exposure and draw the line from top to bottom.
10 comments on “Amazing Landscapes using Adobe Camera Raw and Adobe Photoshop”
Wow, this one seems real easy. I am going to save this for future photos that I am editing.
I am having the same problem as Josh in step 20. Can this be achieved without shortcuts? Perhaps they have changed with new versions (I am using CS6 on Windows)
The selection must be active when you press the backspace, otherwise the fill button appear. (I've cc 2014 and work great)
........also you must work on a new\copy layer, and not with the background layer.
On step 20, when I hit the backspace button, I get the fill menu. It does not darken the greyscale. What exactly should the backspace button do in this instance. Is this function somewhere else in PS that backspace is just a shortcut to?
helpful one .. thanks :)
Why don't I get the options "Fill light" and "Recovery"?
I'v gotten lost on the masking process, i followed your steps meticulously, but achieved a big fail. I need a more dumbed-down instruction for the masking, something is missing here.`
Up until step 21 I was going great, I'm using Photoshop CS5 and every time I try to "select Channel Alpha 2 to create a levels 2" i get "Warning: No pixels are more than 50% selected. The selection edges will not be visible."
I was having this problem too, but I FINALLY figured it out. The key is in Step 20: "With the selection still loaded, select Channel Alpha 2 and press
Backspace once. Select Channel Alpha 3 and press Backspace twice then
select Channel Alpha 4 and press Backspace 3 times. When you are done,
your created Alpha channels should look like this, every next one a
little bit lighter that the previous one."
Once I read that and noticed my Alpha channels were getting DARKER with each deletion, I double-checked my foreground and background color. You'll want black as foreground and white as background. Hope this helps!