
Download Lightroom presets and LUTs, absolutely free. Use the presets to add creativity and style to your photos.
Step 32
Done. But there are some white space isn't selected so they are not deleted.

Step 33
If you have CS5 , cool! You have a magical tool here : Magic Eraser Tool. Just use it to delete all the leftover.

Step 34
A little time and you will have this clean image!

Step 35
Then just copy it to our file, then name the layer "LEAF".

Step 36
Please make the back up by duplicate ( CTRL + J ) the layer.
We will need a lot of back ups this time. I will show you later.

Step 37
Next , open Flor_Frames (3).jpg in new file. And delete the background just like above.( color range then use Magic Eraser Tool )

Step 38
... And you have this!

Step 39
Do the same thing as above. Paste it in our file , then name it LEAF 2 , and also make back up - lots of it .

Step 40
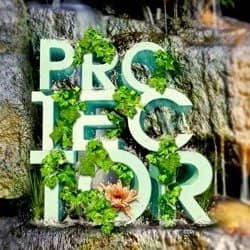
Now we come to the important part. We will make leaves grow around the text.
Pick a layer LEAF 2 (you must already have a couple back ups of this layer )
Then use CTRL + T to transform , scale , rotate , move your leaves until you find the part compatible with the scene. These actions need lots of your imagination so try hard.
For example in the image below I found the part (in red circle) of LEAF 2 seem to be fit with "O" letter. So I adjust it with "O" letter, then I use ERASER TOOL ( E ) to get rid of all leaves that won't work anymore.

Step 41
And I'm think these leaves are not so perfect so I pick STAMP TOOL and set Sample: Current Layer.
With STAMP TOOL, Alt + Click at some nice leaf in the image , then click to imperfect part of the leaves image , STAMP TOOL will fill a nice leaf in for you. Cool tool, huh?

Step 42
Keep doing all these steps with another LEAF layer, remember to always have a back up before you transform and delete a layer.

Step 43
I'll do it again, this time I found the part in red circle is quite good with "R".

Step 44
So I transform it to fit "R" letter, then delete all of the others. After that I'll use Stamp tool if it's needed

Step 45
Keep doing it again and again with maybe 8 - 9 leaves layers. I use 10 layers below.
Now you could choose 1 of 2 ways to manage a dozen of leaves layers.
1/ You can choose all the leaves layer, and press CTRL+ E , and they will merge into only one layer.
I also do this way. It's not a great way to manage your layers all the time, but It helps keep your file not so heavy, and this way make next steps be easier.
2/ You can make a group folder and name it LEAF like I do below. Then choose all your leaves layers and drag them into the LEAF group.

Step 46
Now with all the leaves on one layer, I use Stamp tool again to complete all parts. I also add some details that come underneath the text to make a depth.

7 comments on “Create a Nature Text Effect Poster in Photoshop”
Hello There,
Thanks for taking out your time and create this awesome step by step tutorial of Natural Poster.
Definitely good to use your tips in my new poster design
How to restore image after fixed?
Chomir Ali I want delete sun image what to be made by effect
Thanks for this tutorials...really helpful
niceeee
WOW....
thanks