

Luminar AI lets you turn your ideas into reality with powerful, intelligent AI. Download the photo editor and see how you can completely transform your photos in a few clicks.

Step 12
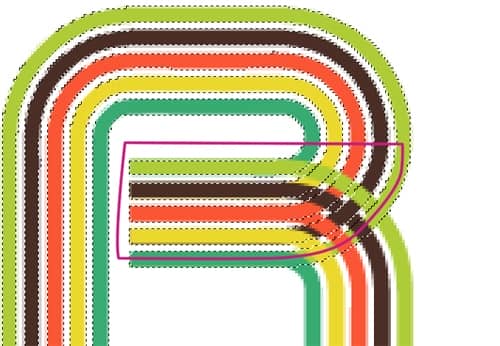
Ctrl+click on T1 to make a selection around it. There is a few steps that aren't required for the text I used but you may need to do all steps If you are doing this to a different shape or size of text so I'll show you all the steps then you can work out the shortcuts if you want. Select the polygonal lasso tool then hold Shift to change it to add mode, this will add to the selection we already have. Now draw around the parts of T2 that you want to hide (purple line), one letter at a time. So here I've made this selection which will keep the same curve at the right part of the R by staying within this line then drawing round everything else. The resulting selection is shown below that.
Step 13
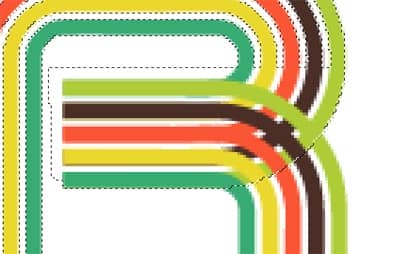
Next, with the either the polygonal lasso or the marquee, hold Alt+Shift to change it to intersect mode which will select only the parts included in both selections. Now draw round the part of T2 which you want removed, there's no need to be neat, just draw a box like the one shown in purple. This is so that when we remove it it will only apply to this one letter then we can go on and do the other letters after. Again I've shown the resulting selection below.

Step 14
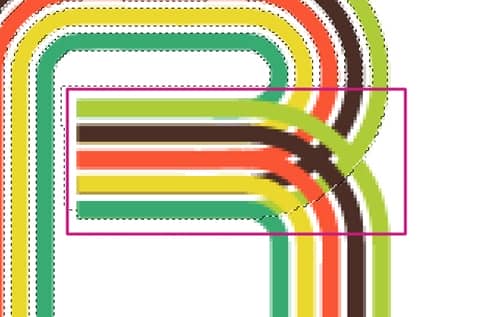
Now go select>modify>expand and choose 3px as the value. Select the T2 layer and hold Alt and click on the add layer mask button in the layers panel, this will create a layer mask then fill the selection in black, if we were to just click on the layer mask button we would get everything except the selection filled black. Below is what your letter should now look like.

Step 15
Do this for any other letters that have two layers so for mine I had to do it to E.T, Note that after you've refined the selection you don't want want to make another mask so instead select the mask then hit D to reset the foreground and background colors then hit Alt+Backspace to fill the selection black. Alt+Backspace is a shortcut for filling something with the foreground color and is quicker than going edit>fill or Shift+F5.

Step 16
Now you can move certain parts of your text to get the spacing right. Lastly select T2 and hit Ctrl+E to merge it with T1 then right click and convert to a smart object. Below I've shown the finalized text.
5 comments on “Retro Text”
This is a great post for inspiration and tutorials, you can use in soo many ways..... Thanks
I like text.
Finally got it. Wasn't the easiest but I recommend it just for the fact that it teaches you how to make a vector.
Is there a chance you can make a template for this project? Im new to this stuff :$
whaaaaaaaaaaaaaaattttttttttttttttttttttt?????????????????????