
Luminar AI lets you turn your ideas into reality with powerful, intelligent AI. Download the photo editor and see how you can completely transform your photos in a few clicks.
Step 17
This next part shows how I created the background and is optional as I'm sure you can think of much more creative thing to use for a background. Well firstly I pasted in an Image of cardboard then desaturated it.
Step 18
Next I made a very dark radial gradient then set it to 75% multiply.

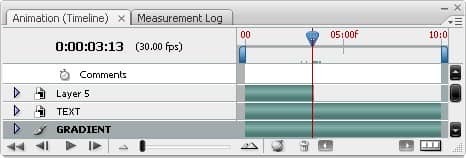
Step 19
Now go layer>video layer>new video layer from file and choose one of the videos you downloaded. Now go window>animation to bring up the animation panel. You will now have what looks like a histogram of the time, all except one of the layers should have an infinite time, the one that doesn't is your video layer and should be at the top. Move the time slider to the end of this layer, see the image below for reference. You will see that the animation will move, the reason we moved the slider to the end was because if you watch it you will see that the last 10 seconds include every part of the animation.
Step 20
Now hit Ctrl+T to enter free transform mode, a warning should pop up just press convert and it should change to a smart object. Next move, rotate and scle it then put it above part of your text, here I put it above the first R.
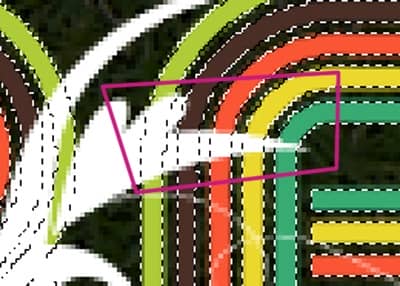
Step 21
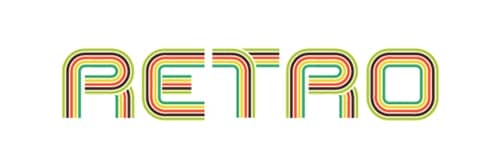
Now we are going to mask it, I used similar techniques to what we used when masking the letters. Note that when you mask a video layer it does this in every frame. Ctrl+click on the text layer to make a selection then get the polygonal lasso tool out, hold Alt+Shift to go to intersect mode then draw roughly round the part you want to hide behind the letters like shown below; the purple line being the selection I made.
Step 22
Now mask the video layer in exactly the same way as in step 14 and 15. Do this for some other parts of the animation.
Step 23
Right click on the video layer then go blending options, that's right you can add layer styles to a video. Use the settings shown below. Make sure that 'Layer Mask Hides Effects' is checked as this will make the shadow more accurate because the shadow won't follow the layer mask at all. For the color overlay, just select the color that the animation merges into with the eyedropper, so here mine merged into the green line.
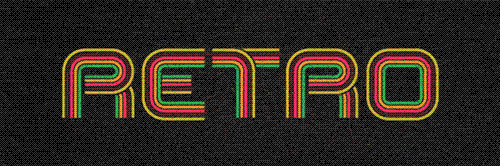
5 comments on “Retro Text”
This is a great post for inspiration and tutorials, you can use in soo many ways..... Thanks
I like text.
Finally got it. Wasn't the easiest but I recommend it just for the fact that it teaches you how to make a vector.
Is there a chance you can make a template for this project? Im new to this stuff :$
whaaaaaaaaaaaaaaattttttttttttttttttttttt?????????????????????