
Download Lightroom presets and LUTs, absolutely free. Use the presets to add creativity and style to your photos.

While you're on the red shape layer, hit Ctrl+Alt+G for clipping mask. Then add a layer mask and using soft black brush erase the top right area (so you get only a touch of red light on the bottom).
Then use Pen Tool (P) and draw a play symbol shape.

Select the play shape, rightclick on it and pick Paste Layer Styles again. Use clipping mask (Ctrl+Alt+G).

Now go back to one of the buttons you made earlier, duplicate the gloss layer and drag it to our play button. Use clipping mask (Ctrl+Alt+G) to make it bounded by the inner black circle.

Then hold Ctrl and rightclick on the black shape layer's thumbnail. When the selection appears, rightclick and select Stroke. Pick 1 px stroke and inside the selection.

Use Eraser Tool (E) and erase the bottom line of the stroke as indicated. You might also lower the opacity of that stroke a bit.

Now got to the white circle that we made in the beginning of this step, add a layer mask to it and using soft black brush erase the top part of the white so that the bottom left gets a nice edge light.

Step 67
Duplicate the play button 2 times (Ctrl+J), but get rid of the color shape layer and change the symbol in the center. Use Pen Tool (P) or Rounded Rectangle Tool (U) to do this.

Step 68
Duplicate one of the black and white round buttons and simply change the symbol inside, everything else stays the same. Again Pen Tool (P) or Rounded Rectangle Tool (U) to do this. You can also use Custom Shape Tool (U) and find already created shape to fit in your button.
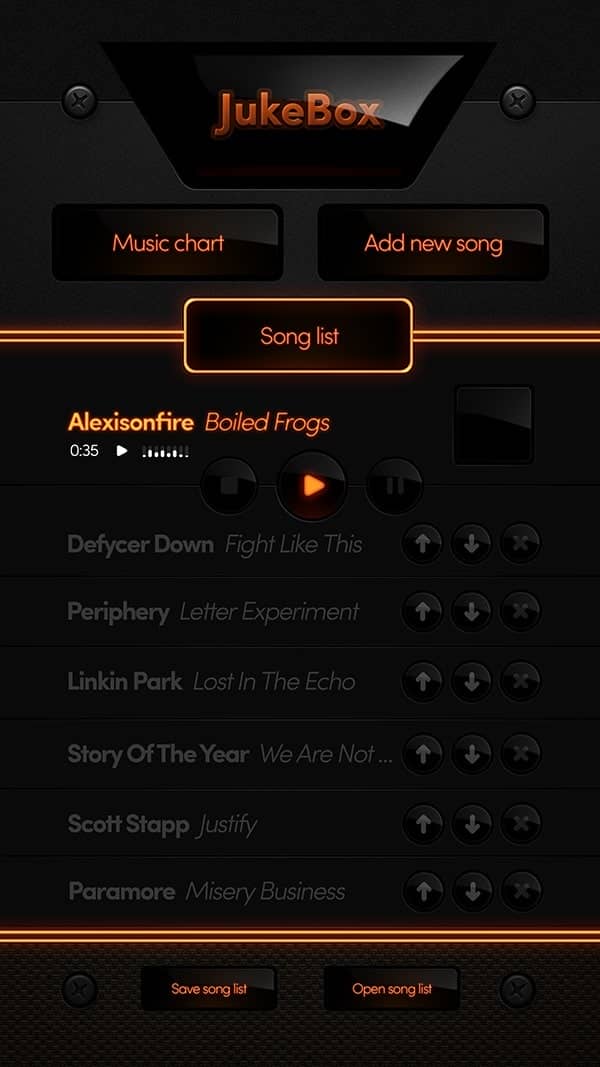
The final result is totally up to you now. I've duplcated the track names, rotation buttons and the gap lines to make a full list of songs - as it's displayed in the final outcome.

Final Results
![final[1]](https://cdn.photoshoptutorials.ws/wp-content/uploads/2013/10/final11.jpg?strip=all&lossy=1&quality=70&webp=70&avif=70&w=1920&ssl=1 "final[1]")
![final-1[1]](https://cdn.photoshoptutorials.ws/wp-content/uploads/2013/10/final111.jpg?strip=all&lossy=1&quality=70&webp=70&avif=70&w=1920&ssl=1 "final-1[1]")
Tutorial by Wojciech Pijecki
Thanks for reading the tutorial all the way til the end. I hope you learned some good and useful techniques that will help you now creating some outstanding music interface designs of your own!
- Wojciech
14 comments on “How to Create a Beautiful Audio App User Interface”
The instructional exercise was extremely useful… Here I figured out how to make a UI of an applications. I'm extremely grateful to you.
Sensacional
Great
This tutorial was really helpful... Here I learned how to make an user interface of an apps. I'm really thankful to you.
Helo Wojciech,
Great. Only with elements of Photoshop this strong statement. And--an insane fleiss work.
alexisonfire YEAH!
this is cool
Nice technique. Really useful…thanks for the post…
Great job! Interesting process, love to make it.!
good job but it dificult for me
i want to learn photoshop so that i can also share it with others
can you plz send me some ps shortcuts on my email id.
I want to learn Photoshop and wave page dissing. I am very happy to see your system.
I want learn all posses of Photoshop. If you share with me by bangla language, I will very pleased.I also want to learn wave page dissing