

Luminar AI lets you turn your ideas into reality with powerful, intelligent AI. Download the photo editor and see how you can completely transform your photos in a few clicks.

After cutting out the part, place the cut out above the lower cloth layer and make sure to give this cut out layer a clipping mask. Scale and alter its shape by warping. Duplicate the cut out some times as needed. Make sure to give all the duplicate layers clipping masks. Arrange, position and alter their shapes as needed to cover the lower cloth:


Step 11 (Adjustments on the lower cloth)
Now create another new layer above all the duplicate layer and fill this layer with 50% gray color. Set this layer to overlay blending at 100% opacity.

On this new layer give the cloth some shadow and highlight. We do this by applying dodge tool for the highlight and burn tool for the shadow. Here is the result I created will look like in normal blending.

Here is the one in overlay blending.

Finally, we will give some adjustment layer to this layer: level. Make sure to give this adjustment layer a clipping mask.


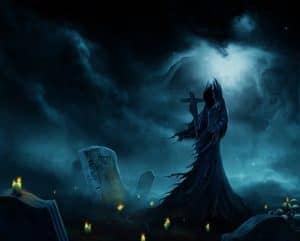
Step 12 (Final)
Merge all layers (Shift+Ctrl+Alt+E). This will create a new single layer . Give this layer high pass filter by going to filter > others > high pass. Set the value to 1-2 radius pixels. Set this to overlay to sharpen the image..


Here is the final result I created after adding some more torn on the lower cloth.

Step 13 (Document for the main scene)
This time we will create a new document for the main scene. Hit Ctrl+N and set the size as following.

Next, we fill the document with linear gradient. To do this, firstly activate the gradient tool in the tool panel. Make sure to choose radial gradient in the option bar. Set the foreground color to #000002 and the background to #0d101c. Fill the document by hold-clicking the mouse right in the top center of the document and drag to the direction indicated by the red arrow in the screenshot.:

Step 14 (Adding smoke)
We create background for the scene. Firstly we will add smoke. We will use this stock image for the smoke texture.

Attention please….!! It will be painful to create exactly the same result as the one I created not because that it involved sophisticated tricky techniques. On contrary, in this step, we will just use very simple common techniques like masking, filter and transforming. The tricky part is that it is really experimental so what I created here is only example for your inspiration to create similar one but not exactly the same one. Let’s start. Place the smoke image in the main document previously have been created. Scale and position it like below:
16 comments on “Create an Eerie Photoshop Manipulation of a Dark Queen in a Cemetery”
Assume this assume that
===ASS OUT YOU AND ME
so good
Important Info
HIIIII!! there is a huge problem.... the first four images --I think the free image website ones are not available could you please make the stock image available and let me know when you've done that. I need this for a business project!!!!! VERRRRRYYYY IMPORTANTTTTTT!!!!!!!
Hi Taylor,
Unfortunately broken links are a common issue with free images. We recommend searching for other similar images.
Beautiful, creative and acutely enjoy able!
brilliant tutorial, time consuming but well worth it.
好厉害
Wow amazing and Professional tutorial,It's relay nice.
awesome
the Best Professional tutorial for Photoshop
Its simply owesome man keep it up.
I just love the statue transformation starting from step 3!
weldone
Wow great tutorial. I am too a Photoshop artist, but i am only 17 years old and don't have so much skills. On my Website are projects from me (jan.leibacher.ch) its on german, but it have possibilty to translate the site :)
AWESOME!!! Good job mate