

Download Lightroom presets and LUTs, absolutely free. Use the presets to add creativity and style to your photos.

Step 18 (Light from above)
Next, we will add main light source for the scene. We will use the other nebula image for this purpose. Place the image in the main document. Scale its size and arrange its position in the upper left part. Make sure the position of this layer is below the two hue/saturation layers.

Set its blending to screen at about 80% opacity.

Mask unneeded part of this layer.

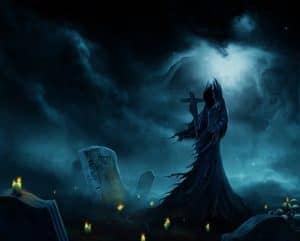
Step 19 (Adding the figure)
Finally add the figure to the main background. Place the image in the main document. Locate it above the hue/saturation layers. Scale and position it under the light source.

Step 20 (Preparing tombs)
The background we have created is supposed to be a dark cemetery so we need some tombs on it. In this step we will create tomb for the scene. Open the tomb image and cut it out.

With the cut out selected, hit Ctrl+T to activate free transform tool. Right click on the canvas to show the transform option and choose distort.

Alter the shape of the cut out by distorting it. Click one of the transforming point (circled in red) and drag to the direction where needed.

After finding the best result, duplicate the cut out 2 or 3 time. Arrange the duplicate to make the tomb thicker. Finally, select all the tomb layers and merge them into a single layer.

Step 21 (adding tombs and other objects to the main scene)
Now add the tomb to the main scene. Duplicate the layer and place them as the foreground objects for the scene.

Add the original cut out

More tombs

I think we will agree if we add some skeleton……

Make sure that we have downloaded the candle image. Cut out the candle and place the cut out to the main scene. Arrange and locate the candles where needed. Here is the scene will look so far…….

Step 22 (Adjustments to the objects in the scene)
Foreground Tombs
Firstly, we will do adjustment to the foreground tomb. Go and select again the right foreground tomb layer to be active on it. Then give this layer two adjustment layers with clipping masks : hue/saturation and photo filter.

Create a new layer above the two adjustment layer with a clipping mask filled with 50% gray and set its blending to overlay at 100% opacity. Take the dodge tool and choose a very soft round brush to paint some highlight on the tomb pointed by the red arrows.
16 comments on “Create an Eerie Photoshop Manipulation of a Dark Queen in a Cemetery”
Assume this assume that
===ASS OUT YOU AND ME
so good
Important Info
HIIIII!! there is a huge problem.... the first four images --I think the free image website ones are not available could you please make the stock image available and let me know when you've done that. I need this for a business project!!!!! VERRRRRYYYY IMPORTANTTTTTT!!!!!!!
Hi Taylor,
Unfortunately broken links are a common issue with free images. We recommend searching for other similar images.
Beautiful, creative and acutely enjoy able!
brilliant tutorial, time consuming but well worth it.
好厉害
Wow amazing and Professional tutorial,It's relay nice.
awesome
the Best Professional tutorial for Photoshop
Its simply owesome man keep it up.
I just love the statue transformation starting from step 3!
weldone
Wow great tutorial. I am too a Photoshop artist, but i am only 17 years old and don't have so much skills. On my Website are projects from me (jan.leibacher.ch) its on german, but it have possibilty to translate the site :)
AWESOME!!! Good job mate