

Turn any photo into a dot grid artwork with these Photoshop actions. You'll get great results with dots that change size. They get larger in brighter areas and smaller in darker areas. Free download available.

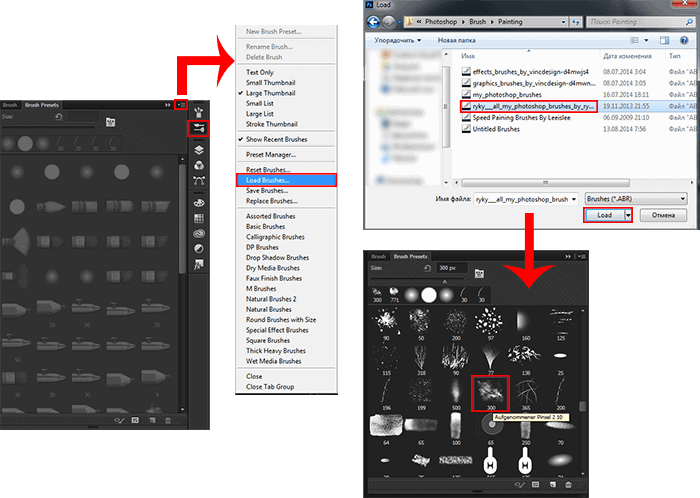
Load brush pack "ryky___all_my_photoshop_brushes_by_ryky-d6lsedy" in Photoshop. Select brush "Aufgenommener Pinsel 2 10" (Size: 600px, Opacity: 20%) and on a new layer above leopard, using white color draw a smoke around model and leopard
Step 24
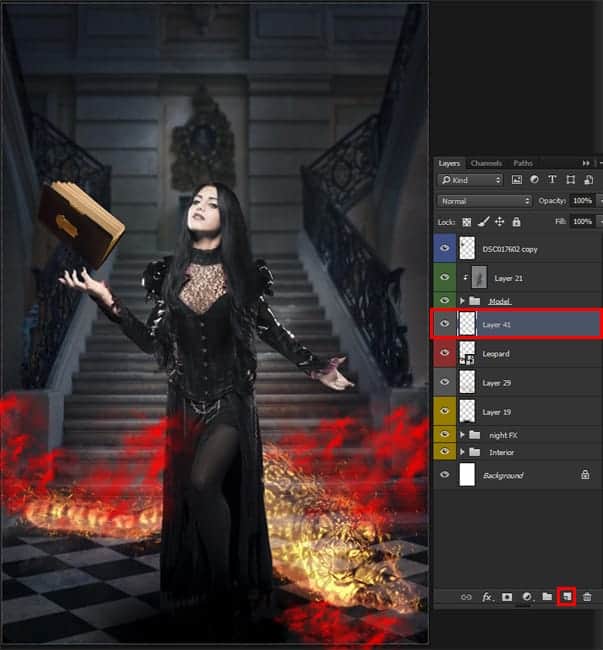
We proceed to a model. I think it necessary to make lighting now, then to make it easier to add other effects. All of the following, I will write on its own layer and with different blending modes. Be careful and accurate to achieve good results. So create a new layer and make it as Clipping Mask (Cmd/Ctrl + Opt/Alt + G), that layer contents acted to the group with the model) to model's group. Use soft round brush (B) (Size: 250px, Opacity: 100%, Color: #e16640) and draw a light spot on model's leg and hand, that are closer to the leopard. Layer Blending Mode "Soft Light", Opacity: 80%.

Do the same with the next layer of light but using color #ffff84 and drawing closer to the edge of the contour to amplify light. Layer Blending Mode "Soft Light", Opacity: 57%. In this part of the tutorial we will draw a lot :)
Step 25
Now do the bright glow of the fire. Select Brush Tool (B) (Size: 35px, Opacity: 100%, Color: #f1a73c) and very carefully, on a new layer make a more detailed edges of folds and on dress, on the leg the model make a small reflection of the fire. Layer Blending Mode "Overlay", Opacity: 36%.

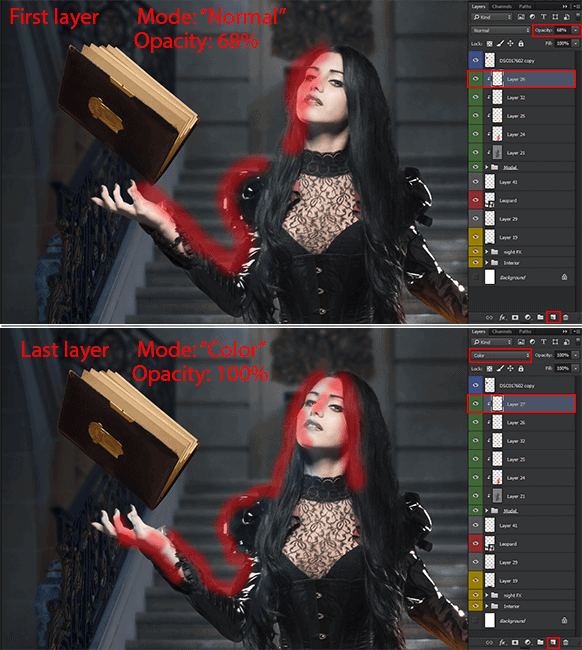
Create glow from the book on hand and hair model. I understand that it is a little early, but be much better to create one it is now, that then you do not get confused. The scheme remains the same: New layer - Brush Tool (B) (Size: 100px, Opacity: 100%, Color: #64ccf4) - Layer Blending Mode "Normal", Opacity: 68%. Gently apply the basic tone of the face, hair and hand model. The second layer is the same, but now I stepped distribution of color on hair and face with the other side and changed layer Blending Mode to "Color", Opacity: 100%.
Step 26
Now add effects to a book. First, you need to make the right lighting for a book. Create a new Overlay-neutral color layer (Cmd/Ctrl + Shift + N and set Mode: "Overlay" and checkbox on "Fill with Overlay-neutral color), set it as Clipping Mask (Cmd/Ctrl + Opt/Alt + G) to book layer. Dodge pages and darken the lower part of the book (settings for Burn Tool (O) Dodge Tool (O) in Step 12 and Size: 150px). Set Opacity: 70% to this layer.
25 comments on “Create This Charming Magician with Enchanting Effects in Photoshop”
Awesome!!!!
Amazing tutorial, though some images just won't load.
love this tutorial... thanks!
Excellent tutorial. Thanks!
wowwww magnificent work its really coooool i love it can u upload PSD file
This looks better than in some of the games.
Good work
PTS please tell me, thanks.I enjoyed it.
Why not have the psd file
The "Fire stock" image is deleted from deviantart :(
please give the PSD to me,thanks.I very like it.
Awesome !!
how can i get the full materials, the pictures the exact one
Yw
Thank you! :)
Thank you very much!
actually I‘m a Chinese, I think it's a pretty good tutorial, and unfortunately, as a Chinese I can't download the materials, thanks a lot. (sob~sob~)
Very Impressive
Good
Thank you!
Nice
In love with it <3 <3
Thank you very much! I am very pleased!
amazing magical effect....totally awesome
Thank you sooo much! I´m really glad you like it!!
wclm...dear