

Luminar AI lets you turn your ideas into reality with powerful, intelligent AI. Download the photo editor and see how you can completely transform your photos in a few clicks.

Step 26
As you can see, armor have floral ornaments. Add new layer. By using small, soft brush and white beige (#eceae5) color draw on the edges of ornaments. Try to avoid shadowed fragments. I also used some brown strokes, for better look.

With the same settings draw contour on arms. Then, change blending mode to Screen and opacity to 69% (^^).

Step 27
On new layer I added also contour of the gown, arms and hair.

Step 28
It's time to make hair. You can use brush or whole stock to make it. But! Why no both? I used stock and pen tablet to make hair.


Step 29
Back below layer with the model. Place smoke stock as is shown.

Step 30
Then add adjustment layer with Hue/Saturation. You will make it brighter. Set it as shown. Make it clippy by RMB > Create clipping mask.

Step 31
By holding ctrl choose smoke and adjustment layer. Duplicate it. Next, by clicking Ctrl + T flip it horizontally.

Step 32
Create new layer - above smoke, below model. Choose gradient tool. Set it white - transparent and fill it as is shown:

Set blending mode to Soft light and opacity to 65%.

Step 33
Place to your file particles stock (below model, above gradient layer). Change blending mode to Screen and opacity to 69%.

Step 34
Repeat this step. I used three particles layers on background (with the same settings).

Step 35
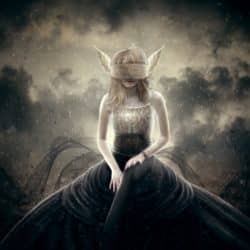
If everything is clear, it's time to make a mask. Place stock into the file. Isolate part of it as is shown (by masking).

Step 36
Add adjustment layer with Curves. Make it clippy. It gives unitary tone for the whole stock.

Step 37
Next, add clipping adjustment layer with Hue/Saturation. It will give better possibility to adjust everything to background and model.

Step 38
On this adjustment layer add mask. With gray, soft brush erase some places. Leave only top of the prop.

Step 39
Add again clipping Hue/Saturation layer.

Step 40
Create new clipping layer. Pick soft, dark-brown brush and draw on the centre of her mask. Use brush with dynamic opacity for making shadows and lights.

Step 41
Change blending mode of drawn layer to Multiply and Opacity to 70% - If you used lesser opacity of brush, place will be lighter and vice versa.
14 comments on “Create a Fantasy Photo Manipulation of Valkyrie”
Not sure about the mask, but everything else is pretty.
Where's the tutorial? I can see only a picture!
If you are using an ad or script blocker, please try using something else like uBlock Origin or temporarily turning it off. A couple ad blockers out there (including AdBlock Plus) incorrectly block parts of our website.
Cool Technique <3
Your photograph is perfect for Marie's clipping mask . . . beautiful.
Obrigado pelo turorial! foi um pouco demorado mas foi gratificante! ^^
ai está o meu trabalho: http://marloaugusto.deviantart.com/art/Gothic-Fantasy-by-Marlo-484732440
Nice technique. Really useful…thanks for the post…
good very nice
i need the black cloth plzzz
very nice
i need the black cloth plzzzz
gorgeous
Amazing tut! Thank you! :)
v nice monika