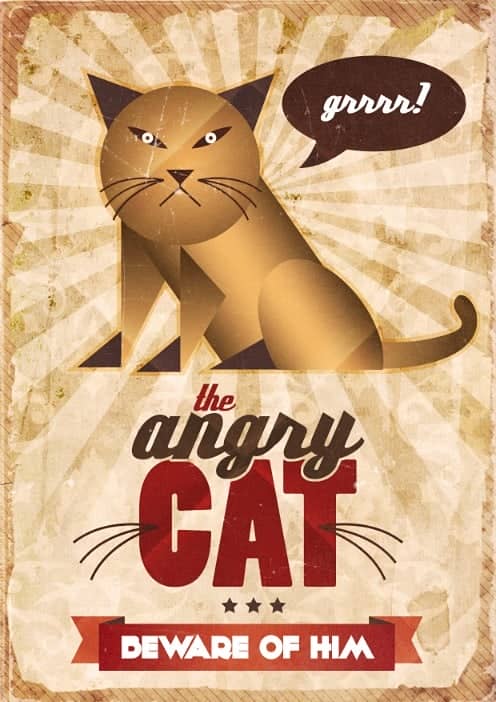

Turn any photo into a dot grid artwork with these Photoshop actions. You'll get great results with dots that change size. They get larger in brighter areas and smaller in darker areas. Free download available.

Step 25
Scale up the shape. You can enter the values in the options bar above.

Step 26
Move the starburst slightly toward the upper half of the document.

Step 27
Set the starburst belnding mode to "Color Burn". Clip the starburst to the vintage pattern layer.

Step 28
I would like to hide the bottom of the starburst. Add mask to the layer first.

Step 30
Select the Gradient Tool, pick the black to white gradient and draw over the desired area like in the below image.

Step 31
The background has been prepped. Now we will start drawing the cat character. Lets start by creating the head. Select the Ellipse Tool and draw a circle shape like below.

Step 32
Develop the eyes from the ellipse shape. Use the ellipse tool to draw shape you see in the below image.

Step 33
Grab the Direct Selection Tool and select the middle left anchor point.

Step 34
Select the Convert Point Tool and click on the above anchor point to convert the rounded edge into a crisp one.

Step 35
Repeat the same thing with the middle right anchor point too.

Step 36
Hit Ctrl+T and rotate the eye at an angle to a degree that looks appropriate.

Step 37
Duplicate eye shape. Flip it horizontally.

Step 38
Draw the eyeballs using the Ellipse Tool.

Step 39
Now we apply gradient to the head base layer. Double click on the layer to load the Layer Style dialog box, create the below gradient and apply.

Step 40
Set the eye color to #4e2419.

Step 41
Draw the nose shape using the Polygon Tool

Step 42
Continue to construct the mouth shape. Use the Rectangle Tool to draw the below shape.

Step 43
Draw this shape further.

Step 44
Rotate the shape.

Step 45
Duplicate the layer.

Step 46
Press Ctrl+T, right click on the shape and choose Flip Horizontal.

Step 47
Your image should look like this so far.

Step 48
Now we draw the whiskers in Illustrator. Draw a curved line with the Pen tool. After drawing the initial path make a couple of copies.

Step 49
Select all the 3 shapes and create a copy of it by dragging while holding Alt key.

Step 50
Copy the both shapes from illustrator and paste into the main working document.

Step 51
Apply color overlay to match the color.

Step 52
Draw the ear shape with the Pen tool.

Step 53
Duplicate the shape and rotate.

Step 54
Now draw the body with Pen tool.

Step 55
Apply gradient to the body shape. Create the below gradient in the Layer Style palette and apply.

Step 56
We will draw the leg shape.

Step 57
Duplicate the shape and place above the body layer.

Step 58
Apply gradient to the leg shape.

Step 59
Apply the same gradient to the other leg as well.

Step 60
Draw the feet like in the below image.

Step 61
We are done with the front legs. Now we will create the back leg, draw the shape like in the below image.

Step 62
Now add the same gradient we applied to the body.

Step 63
Draw the feet.

Step 64
The character is almost ready except the tail. Draw the tail shape with the Pen Tool. Apply the gradient that is applied to the front legs.
27 comments on “Create a Vintage Style Poster in Photoshop”
Really loved the vintage posters. surely going to follow your tutorial and going to make a vintage poster.
Great tutorial. I learnt many new things by making this poster.
Thnanks
Thank you
Hello Kitty :) Joking aside, great tutorial Niranth!
Pikachu Cecilia!
yooooo
This is really neat. I like to make posters and your tuts have been very helpful!
what about the thin lines along the border. how does one do that
thanks, very nice
Download link doesn't work. :(
Link fixed thanks for letting me know!
Thanks, actually turned out a good look......cheers !!
took a month to understand
This tutorial was very confusing. It was a very unenjoyable experience.
I can't express how confusing this is.
Thanks for posting the tutorial about this layout. I like the fact that it looks totally vintage in the end result.
very good tutorial....very useful for beginners...
Lets have a popsicle
my name is Jwana Jesus Lopez
hello kids
Camila
Adorei os pôsteres :)))
Great tutorial! Can be very useful for any purpose poster.
TEACHER
copycat of eminem... just less... you know... good
THANK U FOR ALL THE POSTS
Very cool looking cat! Took me a bit to realise you have to do the survey on every page, otherwise it seems like the page isn't loading :) There are more free old paper textures here too http://www.myfreetextures.com/45-free-old-paper-textures-and-parchment-paper-backgrounds/