
Make your artwork look like they're from an alternate universe. These Cyberpunk presets work with Photoshop (via the Camera Raw filter) and Lightroom. Download all 788 presets for 90% off.

Step 65
Draw an outline shape around the character using the Pen Tool, which will work as a stroke. With this step we have finished building the character.

Step 66
Lets move on to creating the type. Download and install the "Deftone Stylus" and "Poplar Std" fonts. Start with "the" set the font to "Deftone Stylus".

Step 67
Create the second line and set the size and position similar to the below instruction image.

Step 68
Type out the "CAT" and set the font to the "Poplar Std".

Step 69
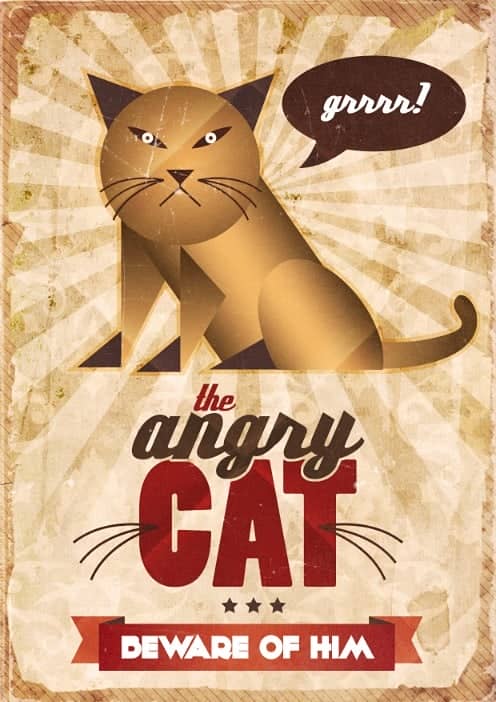
Your image should look like this.

Step 70
As you can see, the second line is overlapping the "CAT" layer, We will accommodate "angry" layer by subtracting the overlapped areas of the "CAT" layer. Hold "Ctrl" button and click on the "angry" layer to load selection.

Step 71
Expand the selection. Go to Select > Modify > Expand.

Step 72
Select the "CAT" type layer and click on the "Add a mask" button.

Step 73
Lets create the Ribbon shape using the Rectangle tool. Make sure "Shape" option is selected. Draw a horizontal bar like below.

Step 74
Draw the ribbon fold and tweak the top right corner using the "Direct Selection Tool".

Step 75
Duplicate and flip the shape for the other side as well.

Step 76
Draw another shape and place it behind the other 2 layers.

Step 77
Now add a cut to ribbon. Add an anchor point to the left edge of the shape using the "Add Anchor Point Tool".

Step 78
Select the anchor point we just added using the "Direct Selection Tool".

Step 79
Move the point inwards from its actual position. You can use arrow keys on keyboard to nudge it.

Step 80
Lets straighten the "Convert Point Tool".

Step 81
Duplicate the shape and use it for the other side.

Step 82
Apply gradient to the the center shape of the ribbon.

Step 83
Add type and set the font to "KiloGram".

Step 84
Now we will create a speech bubble shape with the Ellipse Tool.

Step 85
Draw the tip of the speech bubble.

Step 86
Add type above the speech bubble, set the font colour to white.

Step 87
I have duplicated the whiskers from above and resized, place it above the "CAT" layer, just to give a bit of symbolic treatment.

Step 88
Select star shape from the custom shapes palette. Draw stars between the Cat and the ribbon layer.

Step 89
Open up the the folded paper texture. Select all (Ctrl+A) and copy the whole texture.

Step 90
Paste into the working document.

Step 91
Adjust the brightness using the Curves command.

Step 92
Set the layer blending mode to "Overlay"

Step 97
Open the "emerald_green_scratch_paper_texture".

Step 98
Copy and paste the scratch paper texture into he main document.

Step 100
Resize the scratch paper texture to fit the canvas nicely.

Step 101
Desaturate the texture (CTRL + Shift + U).

Step 102
Darken the texture using the Curves command.

Step 103
Change the layer blending mode to "Screen".

Step 104
Add Curves adjustment layer to the scratch texture layer.

Step 105
Add "Photo Filter" adjustment layer.

Step 106
Finally we will add some noise to the artwork. Create a new above all the layers and fill it with black.

Step 107
Add noise to the layer. Filter > Noise > Add Noise. Change the layer blending mode to "Screen".
27 comments on “Create a Vintage Style Poster in Photoshop”
Really loved the vintage posters. surely going to follow your tutorial and going to make a vintage poster.
Great tutorial. I learnt many new things by making this poster.
Thnanks
Thank you
Hello Kitty :) Joking aside, great tutorial Niranth!
Pikachu Cecilia!
yooooo
This is really neat. I like to make posters and your tuts have been very helpful!
what about the thin lines along the border. how does one do that
thanks, very nice
Download link doesn't work. :(
Link fixed thanks for letting me know!
Thanks, actually turned out a good look......cheers !!
took a month to understand
This tutorial was very confusing. It was a very unenjoyable experience.
I can't express how confusing this is.
Thanks for posting the tutorial about this layout. I like the fact that it looks totally vintage in the end result.
very good tutorial....very useful for beginners...
Lets have a popsicle
my name is Jwana Jesus Lopez
hello kids
Camila
Adorei os pôsteres :)))
Great tutorial! Can be very useful for any purpose poster.
TEACHER
copycat of eminem... just less... you know... good
THANK U FOR ALL THE POSTS
Very cool looking cat! Took me a bit to realise you have to do the survey on every page, otherwise it seems like the page isn't loading :) There are more free old paper textures here too http://www.myfreetextures.com/45-free-old-paper-textures-and-parchment-paper-backgrounds/