
Make your artwork look like they're from an alternate universe. These Cyberpunk presets work with Photoshop (via the Camera Raw filter) and Lightroom. Download all 788 presets for 90% off.


Pick up the following color #ab6622 and fill the selection. That’s how it looks by now:

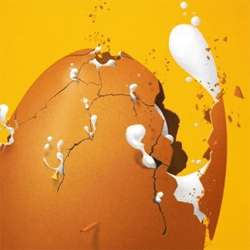
Step 31
Now we will use polygonal marquee tool to stylize the inner part of the eggshell. Make a selection as below and then hit [Delete] to clear selection.


Step 32
Then select the layer with inner eggshell and with arrows keys move the selection a bit to the right.

Make a new layer and place it underneath previous one so it is actually on the very bottom. Grab the brush tool with color #553413 and paint where it is needed to achieve a 3d look.

Step 33
Get back to our base layer of inner eggshell. Make a selection of it and then create a new clipping layer.

Grab the gradient tool, choose pretty dark color, could be even one from step 32- #553413- and make some gradients here and there to make a depth.


Now you can move the gradient few pixels down and right:

Create new clipping layer...

...and pick some light color like #e7e4e2. Then choose brush tool and paint areas on the eggshell where you think light should reflect.

Select some marquee tool and move the selection a bit down, then just press [Delete] key.


If it looks better, you can set the blending mode of newly created layer to overlay.

Step 34a
So we have done our first hole. What I will show you now is nothing more, but duplication previous steps. I will use exactly same techniques to achieve another hole. I will place it somewhere in this part of the egg:

This demonstration will be faster, because it is nonsense to explain everything again. I will just show you what I am making and you must choose right parameters and tools by yourself. Believe me- it is good for you. Thanks to this you will learn to use your own brain rather than duplicating flat tutorial. Most of you have ambitions to create impressive works in future that aren’t based on any tutorial. So here is beginning.
Step 34b
Select egg’s layer. Create a selection and hit [Delete] key so you will have initiation of second hole.


Try to modify some parts of eggshell by selecting it and transforming.


Step 34c
Now we will add some 3d look to our crust. You know how I did it before, so here you have just images of progress. And for this try to not look back.
12 comments on “How to Break an Egg in Photoshop”
Grrrrreat! I applied these and thank you!
Thank you so much for this tutorial, I managed to do something really nice by modifying it a bit :)
I need more ! :D
What a design tutorial. but very difficult. I want to video tutorial.
Awesome & nice tuts
Nice work. I did find the initial coloring and clipping mask steps could have used some screen shots of the layers palette. I find this makes it a little easier to follow along.
Otherwise, very cool effect.
Hats off!
thank you so much! it is people like you who make it possible for the rest of us to learn and grow! I can't thank you enough!
very nice
Loved the tutorial! I'm an ass.. I read it all!! :D
This tut taught me a lot of things at the same time it also made me recall the tricks I used to use but forgot with the time passing..Kudos. \m/
Sir Masiej Kwas.. Respect to you...
Also, I was looking for some kinda tut which could teach me the way to turn a red apple into a golden one, or can say an apple covered with shiny golden foil.. If you can gimme a link of such a tut, if it's already on internet, or post a tut on that, that would be really cool and generous of you guys..
Appreciate the hard work done by people behind this website.. :)
Wow! This is by far the most amazing photoshop tutorial I have seen. I realy mean it. Looking forward to trying it out sometimes. - Respect!
very niceeeeeeeeeee
wow great work