

Make skin look perfect in one-click with these AI-powered Photoshop actions.
")
")
")
")
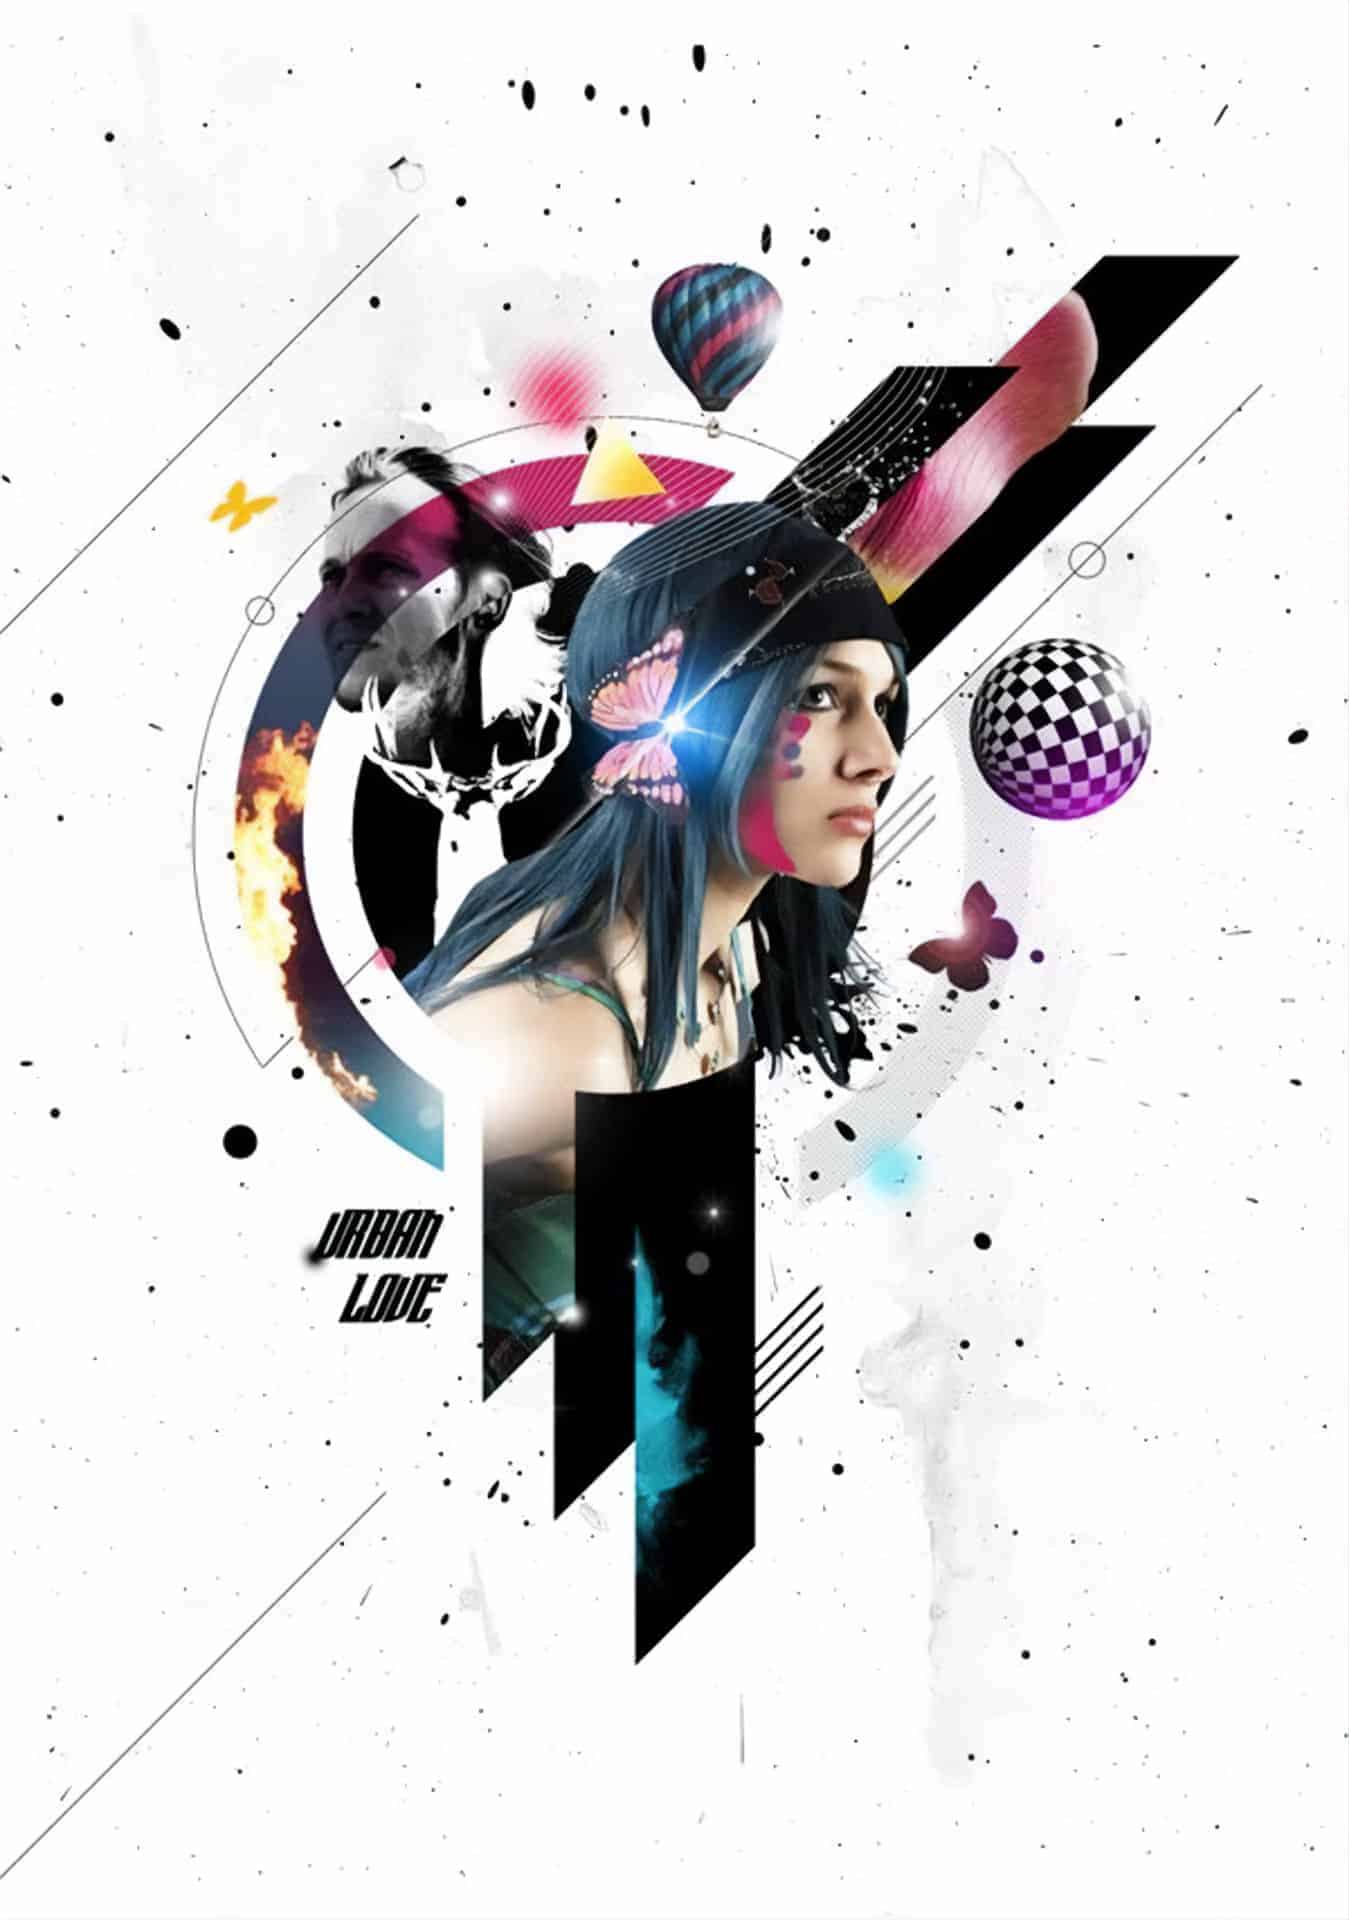
Step 7
Load the stag ( img035 ) into Photoshop. You need to change the image mode to RGB from Index. Choose Image > Mode > RGB. Then drag it into the design. Invert the image ( Ctrl+I)")
")
Step 8
Open up the male head stock. Desaturate the image. Adjust brightness and contrast using the Curves command.")
")
")
")
")
")
Step 9
Load the flames stock image. Copy the below one and paste above the outer circle.")
")
")
")
Step 10
We now going to clip different graphic elements to the shape layers. First Load the petals stock into Photoshop. Select a petal using any selection tool. Copy and paste into main document.")
")
")
")
")
")
Step 11
Add more elements. Add a sphere from the pack.")
")
")
")
")
")
")
Step 12
Drop in the splatter stock image into the composition to give organic feel. Place it below the shape layers. Size down the splatter to fit the document.")
Step 13
Add some more enhancements. Load the star brushes into the brushes palette. Pick a brush and adjust the parameters.")
")
")
")
")
")
")
")
")
")
")
29 comments on “How to Create an Amazing Mixed Media Poster in Photoshop”
This is cool looking but i hate the ones that got no downloads.
Thank you for this tutorials. I get some problems in step 8. I change the blend mode to Multiply and duplicate the head layer and invert it. But it't not work. It becomes draker. I try many ways. But it dosn't show like that.
I really enjoyed this tutorial.thanks
thank'ssssssssssssss
It's always helps when I visit your site and I always learn some new stuffs from you. Thanks a lot
man this is really cool
good job ,, thanks
I loved this tutorial. Some parts were hard to understand but searching for the answer got me more familiar with Photoshop. The only thing i really didn't like was the section where you make a blend in Illustrator. I don't know enough about the program to know how to do that. I had to leave it out because I couldn't figure it out. A little more detail on that part would really help. Other than that, great job. Thank you
A very smart approach to explain the things,like your step by step tutorial.
Amazing! I am a beginner in photoshop and I was able to create an exact look alike thanks to your tutorial!
Thank you for this tutorials.
**** you for this this is so badly written!
bruh
nice...welldone
Thanks 4 this amazing tutorial, if u leave dl sorce link it was very good:d
SUCH! an interesting and informal tutorial, I know so much more now and first thing tomorrow will design my own version of this and try and expand upon techniques. Brilliant! Thanks for all your effort in preparing this.
excellent...........i love it
THANKS ^^
I enjoyed your tutorial. A few of the steps were confusing as I am learning some of the tools. A few things were not explained, like having to take off the multiply blend mode from the second male head so the invert worked. All in all very nice job!
getting a lil bit of problems in step four but i'll get it
Great tutorial. Thanks.
Love it. This website always has the best tuts
https://www.facebook.com/photo.php?fbid=10201138425681956&set=a.4294894569778.186305.1208980994&type=1&theater
Omg, thank you so much for this tutorial. How awesome! I love it. :D
your welcome
y
This actually isnt that bad.
Like
Niceeeeeeeee!