
Make your artwork look like they're from an alternate universe. These Cyberpunk presets work with Photoshop (via the Camera Raw filter) and Lightroom. Download all 788 presets for 90% off.
![step-0025[8]](https://cdn.photoshoptutorials.ws/images/stories/b6c33ab10576_146E1/step-00258.png?strip=all&lossy=1&quality=70&webp=70&avif=70&w=1920&ssl=1 "step-0025[8]")
![step-0025a[8]](https://cdn.photoshoptutorials.ws/images/stories/b6c33ab10576_146E1/step-0025a8.png?strip=all&lossy=1&quality=70&webp=70&avif=70&w=1920&ssl=1 "step-0025a[8]")
Step 26
Now duplicate this group 4 times and resize the groups so that it looks like the image below.
![step-0026[8]](https://cdn.photoshoptutorials.ws/images/stories/b6c33ab10576_146E1/step-00268.png?strip=all&lossy=1&quality=70&webp=70&avif=70&w=1920&ssl=1 "step-0026[8]")
![step-0026a[8]](https://cdn.photoshoptutorials.ws/images/stories/b6c33ab10576_146E1/step-0026a8.png?strip=all&lossy=1&quality=70&webp=70&avif=70&w=1920&ssl=1 "step-0026a[8]")
![step-0026b[8]](https://cdn.photoshoptutorials.ws/images/stories/b6c33ab10576_146E1/step-0026b8.png?strip=all&lossy=1&quality=70&webp=70&avif=70&w=1920&ssl=1 "step-0026b[8]")
Step 27
Now we will add a drop shadow to the 'Petals' layer of each group except the last group. Apply these settings
![step-0027[8]](https://cdn.photoshoptutorials.ws/images/stories/b6c33ab10576_146E1/step-00278.png?strip=all&lossy=1&quality=70&webp=70&avif=70&w=1920&ssl=1 "step-0027[8]")
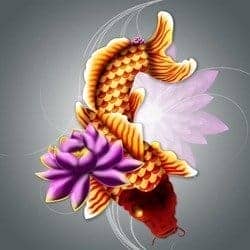
Step 28
This is how it should look
![step-0028[8]](https://cdn.photoshoptutorials.ws/images/stories/b6c33ab10576_146E1/step-00288.png?strip=all&lossy=1&quality=70&webp=70&avif=70&w=1920&ssl=1 "step-0028[8]")
Step 29 Part 3 - Koi Fish
Create a new document. My canvas is 1000px x 1000px.
![step-0029[8]](https://cdn.photoshoptutorials.ws/images/stories/b6c33ab10576_146E1/step-00298.png?strip=all&lossy=1&quality=70&webp=70&avif=70&w=1920&ssl=1 "step-0029[8]")
Step 30 - Add a gradient to this background layer
Type your instructions here.
![step-0030[8]](https://cdn.photoshoptutorials.ws/images/stories/b6c33ab10576_146E1/step-00308.png?strip=all&lossy=1&quality=70&webp=70&avif=70&w=1920&ssl=1 "step-0030[8]")
Step 31
Next we will create the body of the fish. I used Adobe Illustrator to create my fish since for me it's easier to control the pen tool. Fire up Illustrator with the same size canvas 1000px x 1000px
![step-0031[8]](https://cdn.photoshoptutorials.ws/images/stories/b6c33ab10576_146E1/step-00318.png?strip=all&lossy=1&quality=70&webp=70&avif=70&w=1920&ssl=1 "step-0031[8]")
Step 32
Start creating the different parts of the fish like I did in the following images.
![step-0032[8]](https://cdn.photoshoptutorials.ws/images/stories/b6c33ab10576_146E1/step-00328.png?strip=all&lossy=1&quality=70&webp=70&avif=70&w=1920&ssl=1 "step-0032[8]")
![step-0032a[8]](https://cdn.photoshoptutorials.ws/images/stories/b6c33ab10576_146E1/step-0032a8.png?strip=all&lossy=1&quality=70&webp=70&avif=70&w=1920&ssl=1 "step-0032a[8]")
![step-0032b[8]](https://cdn.photoshoptutorials.ws/images/stories/b6c33ab10576_146E1/step-0032b8.png?strip=all&lossy=1&quality=70&webp=70&avif=70&w=1920&ssl=1 "step-0032b[8]")
![step-0032c[8]](https://cdn.photoshoptutorials.ws/images/stories/b6c33ab10576_146E1/step-0032c8.png?strip=all&lossy=1&quality=70&webp=70&avif=70&w=1920&ssl=1 "step-0032c[8]")
![step-0032d[8]](https://cdn.photoshoptutorials.ws/images/stories/b6c33ab10576_146E1/step-0032d8.png?strip=all&lossy=1&quality=70&webp=70&avif=70&w=1920&ssl=1 "step-0032d[8]")
![step-0032e[8]](https://cdn.photoshoptutorials.ws/images/stories/b6c33ab10576_146E1/step-0032e8.png?strip=all&lossy=1&quality=70&webp=70&avif=70&w=1920&ssl=1 "step-0032e[8]")
![step-0032f[8]](https://cdn.photoshoptutorials.ws/images/stories/b6c33ab10576_146E1/step-0032f8.png?strip=all&lossy=1&quality=70&webp=70&avif=70&w=1920&ssl=1 "step-0032f[8]")
![step-0032g[8]](https://cdn.photoshoptutorials.ws/images/stories/b6c33ab10576_146E1/step-0032g8.png?strip=all&lossy=1&quality=70&webp=70&avif=70&w=1920&ssl=1 "step-0032g[8]")
Step 33
Now 'drag and drop' the fish parts you made and arrange them like so in photoshop. Note: I have outlined the parts to show where I have placed them (no need for you to do this.)
![step-0033[8]](https://cdn.photoshoptutorials.ws/images/stories/b6c33ab10576_146E1/step-00338.png?strip=all&lossy=1&quality=70&webp=70&avif=70&w=1920&ssl=1 "step-0033[8]")
Step 34 Back Fin
Now that all of your layers are in Photoshop makes sure to name the layers acording to the parts of a fish (i.e. head, body, back fin, etc). First we will start off with the 'Back Fin'. Also whatever layers I'm not working on I make them invisivle by clicking the 'eye' icon. On your 'Back Fin' layer grab your burn tool (61px soft round brush, Range: Highlights Exposure: 73&) and burn the area like in the image below
![step-0034[8]](https://cdn.photoshoptutorials.ws/images/stories/b6c33ab10576_146E1/step-00348.png?strip=all&lossy=1&quality=70&webp=70&avif=70&w=1920&ssl=1 "step-0034[8]")
Step 35
Make a New layer and grab paint brush tool and make some wavy lines on the fin. I used a 5px hard round brush #d43911.
![step-0035[7]](https://cdn.photoshoptutorials.ws/images/stories/b6c33ab10576_146E1/step-00357.png?strip=all&lossy=1&quality=70&webp=70&avif=70&w=1920&ssl=1 "step-0035[7]")
Step 36
Now we will smudge these wavy lines. Grab your smudge tool (22px, strength: 36%) and smooth out the lines
![step-0036[6]](https://cdn.photoshoptutorials.ws/images/stories/b6c33ab10576_146E1/step-00366.png?strip=all&lossy=1&quality=70&webp=70&avif=70&w=1920&ssl=1 "step-0036[6]")
Change the layer to Linear Burn
![step-0036a[6]](https://cdn.photoshoptutorials.ws/images/stories/b6c33ab10576_146E1/step-0036a6.png?strip=all&lossy=1&quality=70&webp=70&avif=70&w=1920&ssl=1 "step-0036a[6]")
Step 37
Create a New Layer and grab your paint brush tool (59px soft round brush #9b733f) Paint in the area at the place where the fin connects to the body.
![step-0037[6]](https://cdn.photoshoptutorials.ws/images/stories/b6c33ab10576_146E1/step-00376.png?strip=all&lossy=1&quality=70&webp=70&avif=70&w=1920&ssl=1 "step-0037[6]")
Change this layer to Color Burn with an Opacity of 68%
![step-0037a[6]](https://cdn.photoshoptutorials.ws/images/stories/b6c33ab10576_146E1/step-0037a6.png?strip=all&lossy=1&quality=70&webp=70&avif=70&w=1920&ssl=1 "step-0037a[6]")
Step 38 Fin Highlights
Now we will add some highlights to the fin. Create a New layer and name it 'Highlight 1'. With your paint brush tool (#FFFFFF, 46px soft round brush) create some highlights at the tip of the fin. Change this layer to Overlay and an Opacity of 63%
![step-0038[6]](https://cdn.photoshoptutorials.ws/images/stories/b6c33ab10576_146E1/step-00386.png?strip=all&lossy=1&quality=70&webp=70&avif=70&w=1920&ssl=1 "step-0038[6]")
Step 39
Repeat that last step but keep the layer at Normal with an Opacity of 100%. Take all of the layers pertainning to the 'Back Fin' and place it in a group (the folder icon below the layers).
One comment on “How to Draw a Koi Fish in Photoshop”
Where do you get your brushes?