
Make your artwork look like they're from an alternate universe. These Cyberpunk presets work with Photoshop (via the Camera Raw filter) and Lightroom. Download all 788 presets for 90% off.
![fantastic_tree_029[6]](https://cdn.photoshoptutorials.ws/images/stories/f05ef7888ab8_14BD5/fantastic_tree_0296.jpg?strip=all&lossy=1&quality=70&webp=70&avif=70&w=1920&ssl=1 "fantastic_tree_029[6]")
Your painting should now look like this.
![fantastic_tree_030[6]](https://cdn.photoshoptutorials.ws/images/stories/f05ef7888ab8_14BD5/fantastic_tree_0306.jpg?strip=all&lossy=1&quality=70&webp=70&avif=70&w=1920&ssl=1 "fantastic_tree_030[6]")
Step 17 – Painting the animal character
If you deleted the “squirrel_sketch” layer and saved it in another file, now is the time to bring it back. Add it to your Layer palette.

Create a new layer labelled “squirrel_colour” and start painting over it. You may need to change colours and delete strokes as you go.

Step 18 – Adding foreground
To make the squirrel appear to be in the midst of the grass, I changed the canvas size again. I increased the height of the canvas by adding extra space to the bottom of the painting. Create a new layer and label it “black.” Give it a dark brown colour.

Use the Brush Tool to add some grass to this layer or copy the “grass” layer and paste it on top of the “squirrel_colour” layer.

Step 19 – Detailing the squirrel
Give the squirrel some more details and paint it white. Use the Smudge Tool to smooth the squirrel out. Use the Burn Tool to add some shadows.

The drawing actually looks more like rabbit, so rename everything that says “squirrel” to “rabbit.” Move the rabbit over to the left, as it looks better in that position. I also repositioned the “sky_colour” layer.

Your painting should now look like this.

Step 20 – Backing up a copy
Save a copy of your painting as a psd file. Merge the files and save as another copy.
![fantastic_tree_031[6]](https://cdn.photoshoptutorials.ws/images/stories/f05ef7888ab8_14BD5/fantastic_tree_0316.jpg?strip=all&lossy=1&quality=70&webp=70&avif=70&w=1920&ssl=1 "fantastic_tree_031[6]")
Step 21 – Finishing touches
Right click the layer and choose Duplicate Layer.
![fantastic_tree_032[6]](https://cdn.photoshoptutorials.ws/images/stories/f05ef7888ab8_14BD5/fantastic_tree_0326.jpg?strip=all&lossy=1&quality=70&webp=70&avif=70&w=1920&ssl=1 "fantastic_tree_032[6]")
![fantastic_tree_033[6]](https://cdn.photoshoptutorials.ws/images/stories/f05ef7888ab8_14BD5/fantastic_tree_0336.jpg?strip=all&lossy=1&quality=70&webp=70&avif=70&w=1920&ssl=1 "fantastic_tree_033[6]")
Working on the “copy” layer, blur (Filter > Blur > Gaussian Blur) and set the Blur Radius to 9.5.
![fantastic_tree_034[6]](https://cdn.photoshoptutorials.ws/images/stories/f05ef7888ab8_14BD5/fantastic_tree_0346.jpg?strip=all&lossy=1&quality=70&webp=70&avif=70&w=1920&ssl=1 "fantastic_tree_034[6]")
![fantastic_tree_035[6]](https://cdn.photoshoptutorials.ws/images/stories/f05ef7888ab8_14BD5/fantastic_tree_0356.jpg?strip=all&lossy=1&quality=70&webp=70&avif=70&w=1920&ssl=1 "fantastic_tree_035[6]")
Now use Fade Gaussian Blur (Edit > Fade Gaussian Blur). Set the Opacity to 47% and the Mode to “Screen.”
![fantastic_tree_036[6]](https://cdn.photoshoptutorials.ws/images/stories/f05ef7888ab8_14BD5/fantastic_tree_0366.jpg?strip=all&lossy=1&quality=70&webp=70&avif=70&w=1920&ssl=1 "fantastic_tree_036[6]")
![fantastic_tree_038[6]](https://cdn.photoshoptutorials.ws/images/stories/f05ef7888ab8_14BD5/fantastic_tree_0386.jpg?strip=all&lossy=1&quality=70&webp=70&avif=70&w=1920&ssl=1 "fantastic_tree_038[6]")
In the Layers palette, still working on the “copy” layer, use the following settings:
- Opacity: 57%
- Fill: 100%
![fantastic_tree_039[6]](https://cdn.photoshoptutorials.ws/images/stories/f05ef7888ab8_14BD5/fantastic_tree_0396.jpg?strip=all&lossy=1&quality=70&webp=70&avif=70&w=1920&ssl=1 "fantastic_tree_039[6]")
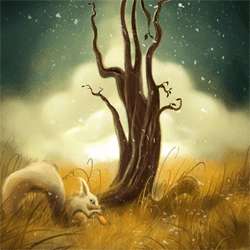
Final Results
![final-results[3]](https://cdn.photoshoptutorials.ws/images/stories/f05ef7888ab8_14BD5/finalresults3_3.png?strip=all&lossy=1&quality=70&webp=70&avif=70&w=1920&ssl=1 "final-results[3]")
3 comments on “How to Paint a Surreal Scene in Photoshop”
Hello There!
I agree with Jakub. The draw is awesome. But you dont tell anything how you do that, example the tree. The tree awesome realistic but you dont tell what brush or which technique you use for it. Anyway, i read all of it and do my first digital draw and I think it is quite good enought, so THANK YOU!! :)
quite a poor tutorial. don't get me wrong, your art is awesome, but you don't explain anything. all you say is 'set your brush to that' and then you say "paint clouds", "paint highlights". no tips whatsoever how to achieve an effect similar to yours. and then your tree changes dramatically from one step to another without saying how you did that. your highlights suddenly changed to white.
in one abbreviated word - wtf...
MY FAVORITE STYLE I LOVED IT, I ADORE THIS COLORING STYLE BUT I THINK U USED A GLOWING EFFECT SOMEWHERE IN THE BACKGROUND AND U FORGOT TO SAY SO, U R A REAL ARTIST ,THANX ALOT :)