
Turn any photo into a dot grid artwork with these Photoshop actions. You'll get great results with dots that change size. They get larger in brighter areas and smaller in darker areas. Free download available.

TIP: I also always try not to zoom in until the end of the painting. I always paint at 25% or 35% at these first Steps. Generally if you zoom in and paint something very closely and then when you zoom out it will look weird.
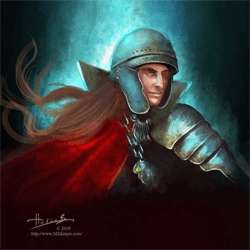
Step 4 - Adding Details
Now that I have decided upon the colors, now I can start to add details. In this Step I started with coloring hair of my character. First select the hair color layer and began begin adding the hair colors.

Now second Step select the face color layer and began begin adding the face colors.

By the way I forget to say you must always put the sky layer at the bottom of the panel. And you must not add any other colors on this layer for example if you want to add any detail on the face you must select the "face color" after that you must begin to coloring the layer. And you must always keep open take the layer panel and so that you can see what you are doing. And you can open an another layer if you want to add some other extra details for your image.

TIP: Ah by the way I forget to mention about. You must remember to save your files two or three times! in this way if your file deleted you will have a backup. Saving your files like this really takes up a lot of memory, but really believe me it is worth it. I remember the time when I was painting one of my character, a very high detailed character I delete the file mistakenly and after that I never never forget to save my projects two times (ah and I never forget that project ).
The light is from the right side. I'll now begin to detail the character. You don't have too over detail everything for now. I just add some basic detail for my character at this Step. Here as you see I have opened another layers but I haven't name them yet. Those layers are for the iron chain. You can name your own as "iron chain."

And also I begin do add some strokes with the smudge tool.

And also I do add some strokes with the Dodge tool too. I use this because I want to add some slight light areas on the cloth.

And here with that tool see what can you do. You must do some try for to understand the tip.