

Turn any photo into a dot grid artwork with these Photoshop actions. You'll get great results with dots that change size. They get larger in brighter areas and smaller in darker areas. Free download available.

Step 12
Now you know how to make the edge highlight, which are very important in a design like this. They will now appear everywhere you want to insert a gap. So go ahead and using this knowledge let's make gap for our interface logo.
Grab Pen Tool and draw a black shape layer as you see below. If you're not quite familiar with drawing advanced shapes with Pen Tool, you can use simple Rounded Rectangle Tool (U) filled with black color or draw a sharp edged shape trapezoid.

Once you're done refer to steps 9, 10, 11 (creating edge highlight) and add a nice highlight on the bottom of the shape along with the direction set by red arrows. Keep in mind that now you will be basing on the selection of the trapezoid (to call its selection simply hold Ctrl and leftclick on the tarpezoid layer's thumbnail, then follow the mentioned steps: 9, 10, 11). The process is identical.

Step 13
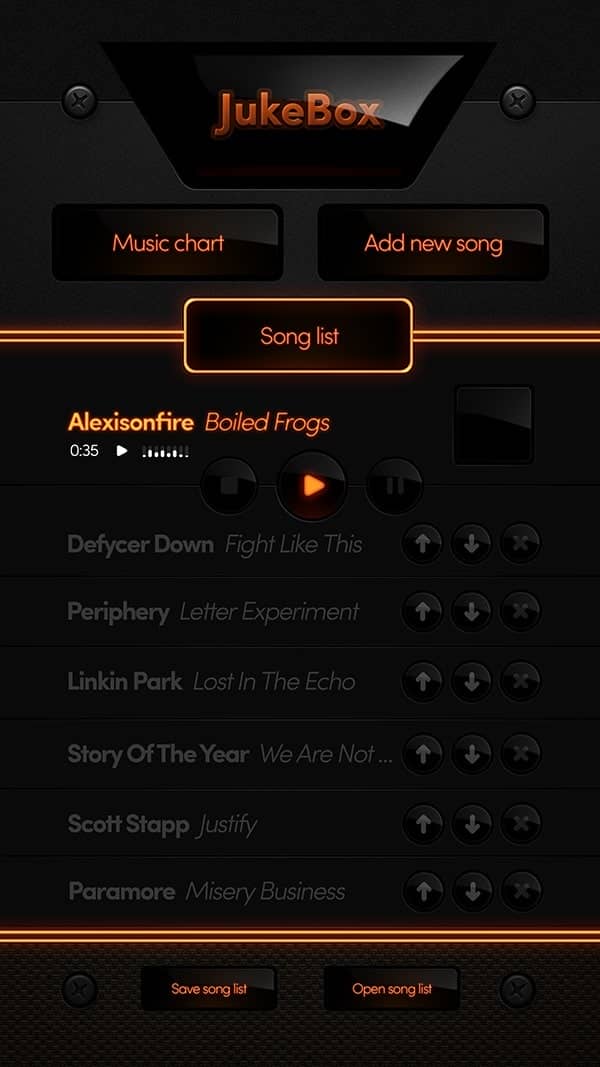
Now we will make the interface logo/name. I've used Sofia Pro font here, set to Bold, 80pt. You can use similar font like Futura or Century Gothic etc, even good old Helvetica will do the job, it's just up to perosnal taste. After the font is set, position it in the center of the shape and change its color to orange #dd5316.

Go to Bleding Options (Layer Style) of that type layer and check Stroke. Set it as shown below.
Also make sure you lower layer's Fill down to 0% in Layers Palette, so it becomes transparent.

Step 14
Next, duplicate that type layer (Ctrl+J). Bring the Fill back to 100% and uncheck the Stroke option in Blending Options (Layer Style). Basically undo the previous step, so the layer is a simple orange text.

Step 15
Duplicate that text layer again (the orange type). Pick Move Tool (V) and use keyboard arrows to move it 1 pixel down and 2 pixels to the right (1 hit down arrow, 2 hits right arrow). Then go to Bleding Options again and set Gradient Overlay and Drop Shadow as indicated below.


When you're done - again go to the Layers Palette and turn this text Fill off by decreasing it to 0%. The result should look similar to the one below. As can see the layer styles gave a nice shading to the bottom the text, while the move made with keyboard resulted an awesome crisp edge highlight on the top left side of the text.

Step 16
Now again duplicate the latest text layer, go to Blending Options and set it as shown below.
Again the Fill should be set to 0%.


Step 17 (Creating Gloss)
OK, next grab Pen Tool (P), make sure it's set to drawing Shape. Then try to create a similar shape to mine. Make sure you change its color to white.
When you're done with the shape, then the most important thing here is to go to layer Properties and set the Feather of the shape to 2,0 px - this will give the shape edges a great soft feel. If you don't see the Properties, go to main Photoshop bar on the top and choose Window > Properties.

Step 18 (Creating Gloss)
Now go to Layers Palette and create a layer mask for this white shape layer. Grab black brush (settings: Opacity to 100%, Flow to 5% and Hardness to 0%) and paint on layer mask to create a subtle transition. Do it slowly with precision. The whole point is to make it kind of irregular. Start from the left side (make it less visible there) to the right side (make it more visible there).
14 comments on “How to Create a Beautiful Audio App User Interface”
The instructional exercise was extremely useful… Here I figured out how to make a UI of an applications. I'm extremely grateful to you.
Sensacional
Great
This tutorial was really helpful... Here I learned how to make an user interface of an apps. I'm really thankful to you.
Helo Wojciech,
Great. Only with elements of Photoshop this strong statement. And--an insane fleiss work.
alexisonfire YEAH!
this is cool
Nice technique. Really useful…thanks for the post…
Great job! Interesting process, love to make it.!
good job but it dificult for me
i want to learn photoshop so that i can also share it with others
can you plz send me some ps shortcuts on my email id.
I want to learn Photoshop and wave page dissing. I am very happy to see your system.
I want learn all posses of Photoshop. If you share with me by bangla language, I will very pleased.I also want to learn wave page dissing