

Make skin look perfect in one-click with these AI-powered Photoshop actions.
I've changed its color to white so we know better what's going on there.

Step 55
Hit Ctrl+T and resize the white shape down. Make sure it's around 3 pixles smaller.

Step 56
Recale the white shape's selection (Ctrl+leftclick on layer's thumbnail).

Go to Select > Modify > Contract and contract it by around 6 pixels.

Make sure you have the white shape selected, then in Layers Palette click on add layer mask button.

Step 57
Next go to the white shape layer's Blending Options and set it as shown below.

Step 58
Rightclick on that glow layer and select Copy Layer Styles.
Next grab Rectangle Tool (U) and draw a thick horizontal black line under the Song list button.

Zoom up the black stripe and create two white horizontal lines inside, around 6 pixels width each.

Step 59
Now rightclick on each of those lines and select Paste Layer Styles.

Duplicate (Ctrl+J) all these 3 stipes (1 black, 2 glowing ones) and postion it below, in the end of the background shape layer.

Step 60
Now let's fill up the content. First we're gonna make a button alike element that's meant for displaying graphics of current track. So this is basically the same thing as creating button. The only thing that's different is that the shape is more square right now. Simply refer to step 20, 21, 22 and follow previous instructions on how to create the button. Just ditch the part when we used color to fill the center, do it black and white.

Step 61
As being said in the beginning, most of the stuff here works on repetitions. Now we need to add some some gaps to the solid shape in the background. To do this use Rectangle Tool (U) and draw a tiny 2-3 pixel black horizontal line (shape layer).

Step 62
Now repeat the same thing, but this time add 1 pixel horizontal grey line. Use Line Tool (U) or Rectangle Tool (U). Move that line downwards so it's sticks to the black shape edge.
The view below is zoomed.

Step 63
Add a layer mask to this grey line and use soft black brash to erase the line fro mthe sides a bit.

Step 64
Next use Rounded Rectangle Tool (U) and draw 1 rounded stripe shape. Duplicate it 7 times, so you get 8 of them. Place them next to each other and merge them (Ctrl+E). Make sure they're all dark grey.

Now duplicate this merged shape layer, change its color to white and hit Ctrl+Alt+G for clipping mask, so the white shape cannot go out of grey shape bounds. Now use Path Selection Tool (A) and move each shape so they make a various movement (move one down, one up, and so on).


Step 65
Next type some song name, rightlclick on that text layer (in layers palette) and select Paste Layer Styles again.

Step 66
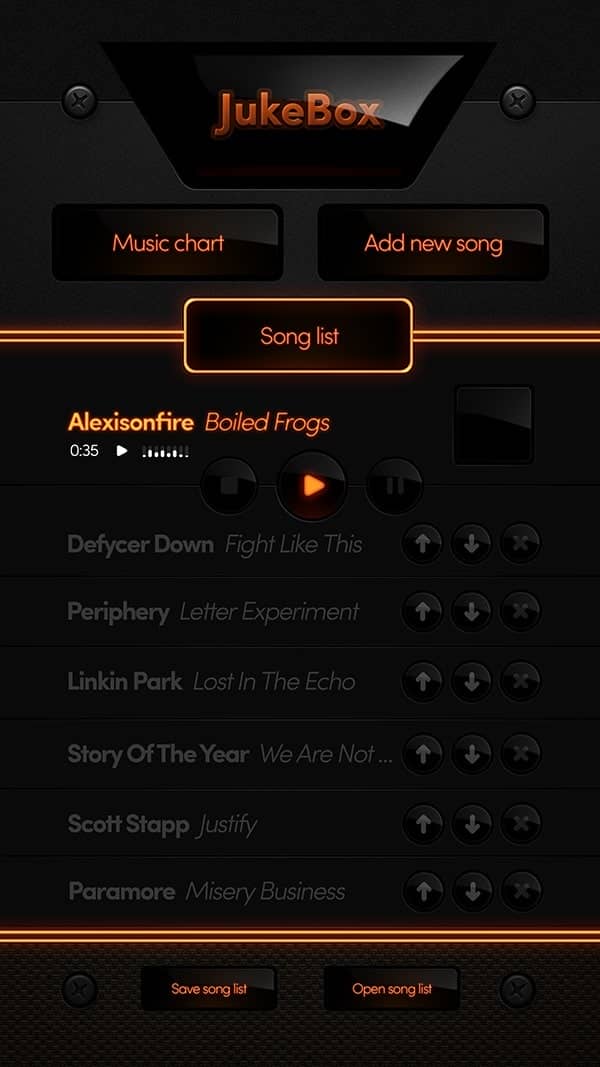
What we need now is a rounded play / stop / pause button. In order to make it grab Ellipse Tool (U) and draw a perfect circle. Make sure the shape layer is white and set the Feather to 2,8px.

Next create another circle (you can duplicate the first one but remember to make the properties values default). Set the color to black.

Duplicate the black shape 2 times now (so you get 3 black circles). And resize these 2 new duplicates a bit down. Change the top ones color to #2d0600.
14 comments on “How to Create a Beautiful Audio App User Interface”
The instructional exercise was extremely useful… Here I figured out how to make a UI of an applications. I'm extremely grateful to you.
Sensacional
Great
This tutorial was really helpful... Here I learned how to make an user interface of an apps. I'm really thankful to you.
Helo Wojciech,
Great. Only with elements of Photoshop this strong statement. And--an insane fleiss work.
alexisonfire YEAH!
this is cool
Nice technique. Really useful…thanks for the post…
Great job! Interesting process, love to make it.!
good job but it dificult for me
i want to learn photoshop so that i can also share it with others
can you plz send me some ps shortcuts on my email id.
I want to learn Photoshop and wave page dissing. I am very happy to see your system.
I want learn all posses of Photoshop. If you share with me by bangla language, I will very pleased.I also want to learn wave page dissing