
Turn any photo into a dot grid artwork with these Photoshop actions. You'll get great results with dots that change size. They get larger in brighter areas and smaller in darker areas. Free download available.

Click the Add layer mask button and we have this result:

Step 21
To add a glow effect to this red window, double click this layer, choose Outer Glow:


Step 22
Create a new layer and use the same color for a soft brush (#ff0000) with the opacity lowered to 30-35% to paint the red light under the window and on the grass:

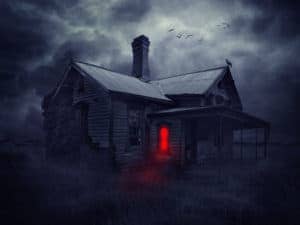
Final Results
![haunted22-final[1]](https://cdn.photoshoptutorials.ws/wp-content/uploads/2020/06/Haunted.jpg?strip=all&lossy=1&quality=70&webp=70&avif=70&ssl=1 "haunted22-final[1]")
Download the PSD
Haunted.zip| 48.7 MB
6 comments on “22 Easy Steps to Create This Haunted House Scene”
tried it , works nice adds to my tools for photo manipulation
This was a great tutorial! Thanks so much for sharing this
this tutorial was so easy to follow and very fun to make!! thank you :)
The red light isn't realistic...projections (wall) and reflections (windows) aren't repected...
But the athmosphere is great !
your awesome, simple yet easy to follow and understand...i find it very useful thanks...keep it up!!!
This is one of the coolest tutorials that I have ever seen for photoshop. Even as a new user, I feel like I could follow your instructions beginning to end.