

Make skin look perfect in one-click with these AI-powered Photoshop actions.


Step 14
Add new layer with shadow. Use big, soft, gray brush and draw something like triangle.

Step 15
Night isn't ready yet. You should add night colors to your image. To create this effect, add adjustment layer with Color/Balance (marked shortcut or Layer > New Adjustment Layer > Color/Balance).
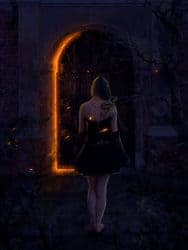
Step 16
Add new layer (Shift+Ctrl+N, Layer > New > Layer... or marked shortcut). Pick big, orange brush. Draw glow of your light source. Door's line will guide you! :).
Step 17
It should be glow, not something solid. To fix that, choose from top menu Filter > Blur > Gaussian blur. Set it as shown.

Step 18
Add new layer (Shift+Ctrl+N, Layer > New > Layer..., or shortcut). Now you should create true light source. In my vision behind doors is fire. And whole room is burning. I used 7px hard round brush (#f9d77b color, pressure size) for drawing it.

Step 19
Cool! For make created layer more realistic click on it with RMB. Then, choose blending mode from menu. Go to "Outer glow" settings.

Step 20
Duplicate created layer. Choose and drag it on new layer symbol. Then, set "Fill" to 0%. If you decrease "Fill" like here, layer will be transparent, but her effects (here: Outer glow) will be still visible.
Step 21
Now from top menu choose Filter > Blur > Gaussian blur. Set it as is shown.
Step 22
Create new layer (Shift+Ctrl+N, Layer > New > Layer..., or shortcut). Pick 1px soft round orange brush. Draw lights on branches. Just follow its line.
Step 23
Light also goes on doors and column at left side. You should mark it. Add new layer (Shift+Ctrl+N, Layer > New > Layer..., or shortcut). Pick 17 px soft brush. Use the same color as before.
Step 24
Add mask to created layer. Pick bigger brush and mask unwanted lights.
Step 25
Again create new layer. With the same brush settings as in step 22 draw lights on doors and column. Follow the edges of those things.
Step 26
Now you'll make sparks. Just add new layer and draw randomly dots near the light source. Also, for this, you can use any kind of "debris" or "dust" brushes, or just use preset brush from Photoshop - as shown.
Step 27
If you like effect, you created, click with RMB on this layer. From menu choose Blending options. Go to "Outer glow".
Step 28
For creating hair, add new layer. Pick 1 px soft brush and draw hair strands. Try to flow with your image. I used colors from light orange (right side) to light blue (left side).
Step 29
Drag and place to your file crack texture. From transform menu (top bar) click on "Warp mode". Transform it as shown.

16 comments on “Born of the Dragon - Create this Symbolic Gothic Composite in Photoshop”
Hi, this tutorial helped me learn things, and was cool. The only 3 things about it made me frustrated.
1. You only used one specific color code and the rest of the colors were hard to get right.
2. The 1px soft brush for the hair strands did not work for me. It was too big and pixelated and I wasn't sure what effects you used..? Maybe I missed it.
3. I couldn't use trees. it was hard to follow the tutorial properly. I use a different door. One you used not available.
thank you for this tuorial and keep up the good work.
This tutorial was cool, but frustrating for me because it was hard to find the exact colors, because you only gave one specific color code. Also I'm not sure exactly how you did the hair, mine wasn't working well at all. I was using a soft round 1px brush and it was too pix-elated and it was too big . Here is what I came up with . I didn't use the trees because It didn't go well
with the door (because the one you used wasn't available) . Thank you for making this tutorial. Keep it up.
Amazing tutorial!
Great tutorial, I tried to make Something like that. Thanks
nice tut, just lost a bit in translation, if you know what i mean.
But thanks anyway !!!!
This is really fantastic. The unlimited access makes it even better
Great tutorial. Thanks!
Looks amazing. Thank you, I want to try this and have read through the tutorial. Can you please tell me what you mean by click RMB. I know all the tools in Photoshop (using CS5) but RMB is new to me. thank you.
RMB = right mouse button
I think RMB = right mouse button :)
Great tutorial, thank you. I tried it, but I got some trouble with the orange color, it isn't like yours. Can you tell me the color-code? It looks really dark and it is not "shining" on my manipulation.
Thank you for this tut :)
very nice
(y) Thanks
Very nice article. I will learn from this a huge resource. Thanks for share.
lel
so nice thanq i learned a lot of the tutorial love al your work on this site
so cool.Thanks for your tutorials