
Download Lightroom presets and LUTs, absolutely free. Use the presets to add creativity and style to your photos.
Step 8
Open signpost picture. Cut it out , resize and place it beside the road that leads to the hill.

Apply Gassian Blur with 2 px as this signpost is set in a blurred background ( the road).

Add layer mask for this signpost and use soft black brush to hide its bottom to get a look it's put in the ground:

Make a new layer under signpost one. Hold Cmd/Ctrl while clicking the thumbnail of signpost to load its selection:

Fill this selection with black then go to Edit-Transform-Flip Vertical. Move it under the bottom of signpost and transform it as shown below:

Lower opacity to 40% and apply Gassian Blur with 2 px for it:

Add layer mask for it and use soft black brush with opacity and flow about 50% to blur the top of this shadow:

Step 9
I add some adjustment layers ( Clipping Mask) for this signpost to change its color.
Hue/Saturation:

Levels:

On the mask of Levels layer use soft black brush to clear arrow part as I think it should be a bit darker.

Create a new layer and use soft white brush to paint on the parts which meet the light from sky. Change the mode to Soft Light 100%:


New layer again and use soft brush with color #888362 and paint at the bottom of this signpost. Put the mode as Multipy 50%:

Step 10
Open stock with three carrots. Extract them from background then take two of them to place on the right side, make them blurred with Gassian Blur with 2 px as done with signpost:


Then I duplicate one of them and move it to the left, resize and transform it to be a bit smaller. Apply Flip Horizontal:

Place these carrorts layers under signpost one.
Add layer mask for these carrots and clear their bottom:

Make shadow for these carrots as done in step 8:

To brighten these carrots, I make a new layer above carrots and their shadow ones. Use soft white brush with opacity 50% to paint on their left side and change the mode to Soft Light 100%:


Step 11
Make a new layer above carrots ones. Press T to active Text Tool and set foreground to white. I use Arial font with size 19 pt to type "BUNNY HOUSE" on the arrow of signpost and transform it a bit as the images below shows:

I use a Layer Style for this text to make a carved look. Right click text layer, choose Blending Options:

We have result:

Right click text layer again, choose Rasterize Type. By this way we can apply filters for this text. Now go to Filter-Blur-Gassian Blur and choose radius as 2 :

Step 12
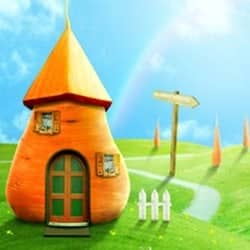
Open stock with big carrot. Extract this part and place it on the hill, use transform tool to make bit bigger on the width. Place this layer on the top of layers.


Use Warp Tool to make it look more porportioned:

Now add layer mask for this carrot house. Open brush menu and choose Reset Brushes. Then your brushes will come back to default.

Choose Grass brush, lower the size ( about 30 px) and erase the bottom of carrot house. Do it until you feel ok. Here is my result:


Step 13
Make shadow for this carrot house as we usually did but I change opacity to 30% and apply Gassian Blur of 6 px. Use layer mask to blur shadow bottom.

I think the bottom of this house needs to be darker. So I make a new layer and place it under carrot house and its shadow ones. Use a similar green (#738452) with grass and paint along the bottom. Put the mode to Multipy 80%:


21 comments on “Create a Cute Bunny House in Photoshop”
Thank you very much for your beautiful explanations!!!
Absolutely fab and so creative. Thanks so much for sharing!
awesome and unique collection of sequence photography i love it.
Thank for sharing.
can i have the psd version plz :)
No, This is a photoshop tutorial you are suppose to make it not take a simple picture of it
Thank you for this very entertaining tutorial!
My realization: http://www.chez-mireilled.com/article-la-maison-des-lapins-avec-photoshop-118297519.html
That is perfect like my girlfriend Chelsea
Hallo!
You know, you remind me about Telletubies! :D
I like your simple technics but can make so many differences!
Super Good Tuts! :D
Keep Up your GOod Work!
I am waiting for your next tuts!
Yours truly,
Wanda
Thanks for the tutorial!
signal page too Loading long,,, fast plz beacause i leave or else
Thank you for this tutorial. As a beginner I appreciate the step-by-step instructions. It's easy to follow.
Amazing....i liked it very much. thanx for sharing.
Why isn't the whole tutorial posted?
Hi Abby! You can click on the "Next Page" button to go to the next page. Or if you prefer to see it in a single page, click on the single page link.
Here's the link to the single page: https://www.photoshoptutorials.ws/photoshop-tutorials/photo-manipulation/create-a-cute-bunny-house-in-photoshop/?singlepage=1
I like how you warmed the grass into hills. Amazing!!
When I press R I get a pop up that says could not complete your request because it only works with opengl enabled document windows.
Go to Photoshop/Edit > Preferences > Performance. Enable the "Use Graphics Processor" option then click on Advance Settings to ensure it is enabled in there too.
If this option is grayed out, it could be because you need newer graphics drivers (download from Nvidia/AMD's website) or because your video card isn't supported.
awesome!!
Cute :)
your cute
Nice tuts.