
Make your artwork look like they're from an alternate universe. These Cyberpunk presets work with Photoshop (via the Camera Raw filter) and Lightroom. Download all 788 presets for 90% off.
It should appear like this:
![image064[3]](https://cdn.photoshoptutorials.ws/images/stories/adbb194b9a45_135BA/image0643.jpg?strip=all&lossy=1&quality=70&webp=70&avif=70&w=1920&ssl=1 "image064[3]")
Next, activate the Brush tool (B) and then input the following:
- Brush size:900 px
- Hardness: 0%
- Opacity: 15%
- Flow: 100%
- #: 000000
- Zoom level: 200%
Now, let's paint!
![image065[3]](https://cdn.photoshoptutorials.ws/images/stories/adbb194b9a45_135BA/image0653.jpg?strip=all&lossy=1&quality=70&webp=70&avif=70&w=1920&ssl=1 "image065[3]")
The result of that should be like this:
![image066[3]](https://cdn.photoshoptutorials.ws/images/stories/adbb194b9a45_135BA/image0663.jpg?strip=all&lossy=1&quality=70&webp=70&avif=70&w=1920&ssl=1 "image066[3]")
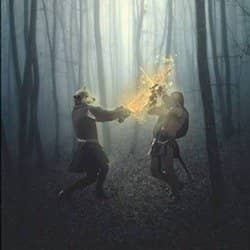
Step 6: Create the Flaming Sword
In this step, we will add flames to the sword of the werewolf warrior. To start, create a new layer (Ctrl/Cmd + Shift + N) on top of all the layers that we've created. Name this layer: "Fire 1" and then activate the Brush tool (B) - input the following settings for this tool:
Brush size: 70px
- Hardness: 0%
- Opacity: 50%
- Flow: 100%
- #: ffffe9
Let's start painting then!
![image067[3]](https://cdn.photoshoptutorials.ws/images/stories/adbb194b9a45_135BA/image0673.jpg?strip=all&lossy=1&quality=70&webp=70&avif=70&w=1920&ssl=1 "image067[3]")
The result of the first fire brush should be similar to this:
![image068[3]](https://cdn.photoshoptutorials.ws/images/stories/adbb194b9a45_135BA/image0683.jpg?strip=all&lossy=1&quality=70&webp=70&avif=70&w=1920&ssl=1 "image068[3]")
Next, let's create a new layer (Ctrl/Cmd + Shift + N) and then name it "Fire 2". Activate the Brush tool (B) and then open the Brush set: "Flame brushes" by sugar breezy. To open that brush set, simply follow the instructions below:
![image022[6]](https://cdn.photoshoptutorials.ws/images/stories/adbb194b9a45_135BA/image0226.jpg?strip=all&lossy=1&quality=70&webp=70&avif=70&w=1920&ssl=1 "image022[6]")
After that click on Load brushes:
![image069[3]](https://cdn.photoshoptutorials.ws/images/stories/adbb194b9a45_135BA/image0693.jpg?strip=all&lossy=1&quality=70&webp=70&avif=70&w=1920&ssl=1 "image069[3]")
Make sure that you've downloaded the brush set on this folder: Adobe > Adobe Photoshop CS2/3/4/5 > Presets > Brushes.
Once the brushes have been loaded, choose the following brush:
![image070[3]](https://cdn.photoshoptutorials.ws/images/stories/adbb194b9a45_135BA/image0703.jpg?strip=all&lossy=1&quality=70&webp=70&avif=70&w=1920&ssl=1 "image070[3]")
Now, your brush is shaped like a flame or flame pattern. Let us now input the following settings for the Brush tool (B):
- Brush size: 400px
- Hardness: Default
- Opacity: 100%
- Flow: 100%
- #: fffebd
Then, let's now start painting:
![image071[3]](https://cdn.photoshoptutorials.ws/images/stories/adbb194b9a45_135BA/image0713.jpg?strip=all&lossy=1&quality=70&webp=70&avif=70&w=1920&ssl=1 "image071[3]")
The flame's position is a bit awkward so activate the Transform tool (Ctrl/Cmd + T) and then rotate "Fire 2" on the angle as shown on the image below:
![image072[3]](https://cdn.photoshoptutorials.ws/images/stories/adbb194b9a45_135BA/image0723.jpg?strip=all&lossy=1&quality=70&webp=70&avif=70&w=1920&ssl=1 "image072[3]")
The result of that should be like this:
![image073[3]](https://cdn.photoshoptutorials.ws/images/stories/adbb194b9a45_135BA/image0733.jpg?strip=all&lossy=1&quality=70&webp=70&avif=70&w=1920&ssl=1 "image073[3]")
Next, create another layer (Ctrl/Cmd + Shift + N) and name it "Fire 3". Use the following brush from the "Flame brushes" brush set:
![image074[3]](https://cdn.photoshoptutorials.ws/images/stories/adbb194b9a45_135BA/image0743.jpg?strip=all&lossy=1&quality=70&webp=70&avif=70&w=1920&ssl=1 "image074[3]")
Activate the Brush tool (B) and input the following:
- Brush size: 300px
- Hardness: Default
- Opacity: 100%
- Flow: 100%
- #: fffdcb
Now, let's paint!
![image075[3]](https://cdn.photoshoptutorials.ws/images/stories/adbb194b9a45_135BA/image0753.jpg?strip=all&lossy=1&quality=70&webp=70&avif=70&w=1920&ssl=1 "image075[3]")
The result:
![image076[3]](https://cdn.photoshoptutorials.ws/images/stories/adbb194b9a45_135BA/image0763.jpg?strip=all&lossy=1&quality=70&webp=70&avif=70&w=1920&ssl=1 "image076[3]")
Next, create another layer (Ctrl/Cmd + Shift + N) and then name it "Fire 4". Activate the Brush tool (B) and then choose the following flame brush:
![image077[3]](https://cdn.photoshoptutorials.ws/images/stories/adbb194b9a45_135BA/image0773.jpg?strip=all&lossy=1&quality=70&webp=70&avif=70&w=1920&ssl=1 "image077[3]")
Now, input the following for the Brush tool (B):
- Brush size: 250px
- Hardness: Default
- Opacity: 75%
- Flow: 100%
- #: ff9f6b
Let's paint:
![image078[3]](https://cdn.photoshoptutorials.ws/images/stories/adbb194b9a45_135BA/image0783.jpg?strip=all&lossy=1&quality=70&webp=70&avif=70&w=1920&ssl=1 "image078[3]")
Next, activate the Transform tool (Ctrl/Cmd + T) and then resize "Fire 4" as shown on the image below:
![image079[3]](https://cdn.photoshoptutorials.ws/images/stories/adbb194b9a45_135BA/image0793.jpg?strip=all&lossy=1&quality=70&webp=70&avif=70&w=1920&ssl=1 "image079[3]")
Activate the Transform tool (Ctrl/Cmd + T) and then rotate it as shown on the image below:
![image080[3]](https://cdn.photoshoptutorials.ws/images/stories/adbb194b9a45_135BA/image0803.jpg?strip=all&lossy=1&quality=70&webp=70&avif=70&w=1920&ssl=1 "image080[3]")
The result:
![image081[3]](https://cdn.photoshoptutorials.ws/images/stories/adbb194b9a45_135BA/image0813.jpg?strip=all&lossy=1&quality=70&webp=70&avif=70&w=1920&ssl=1 "image081[3]")
Create a new layer again (Ctrl/Cmd + Shift + N) and then name it: "Fire 5". Next, activate the Brush tool (B) and then choose this flame brush: