
Luminar AI lets you turn your ideas into reality with powerful, intelligent AI. Download the photo editor and see how you can completely transform your photos in a few clicks.

Change the Blending Mode of this layer from Normal to Color for better effect.

Now you make the image bit darker. Add another adjustment layer Curves on the top of the layers and set it as on the following picture.

On the following image you can see the adjustments you've made in this step.

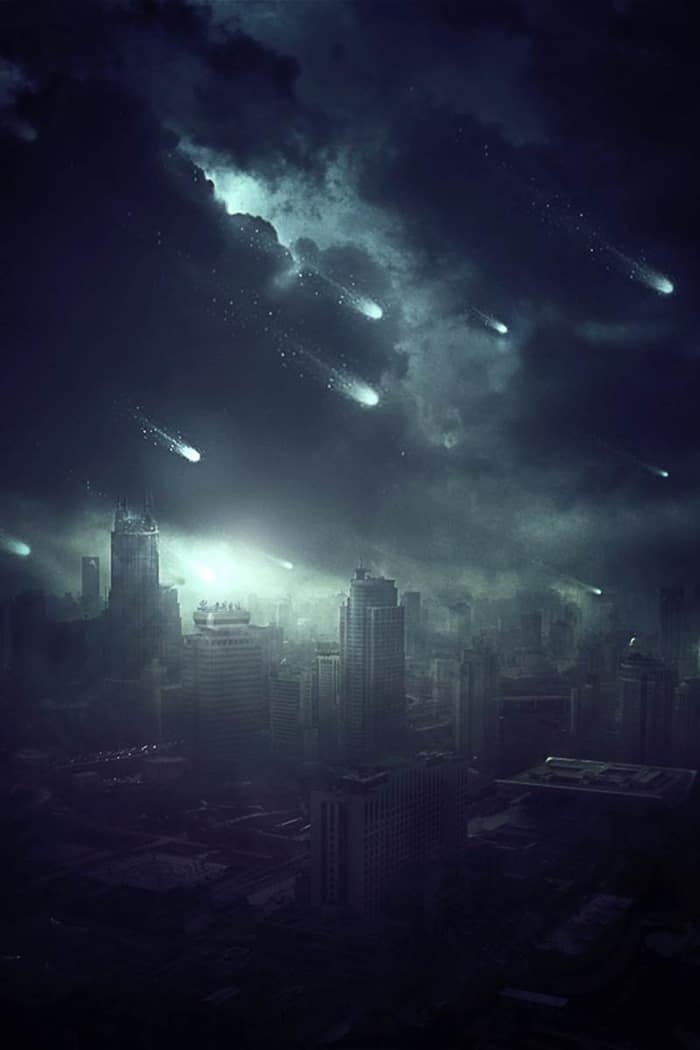
Step 8 - Darkening the Sky
Sky on the image should be bit more darker to create more balanced feel. To fix that add new adjustment layer Curves and set it as on the following image.

You want to adjust only the upper part of the image. To do that first you need to grab the Paint Bucket Tool (G), pick black color and fill the layer mask of this adjustment layer with it.

Grab the Gradient Tool (G), pick white color and select Linear Gradient.

Fill the upper part of layer mask with this gradient. You can get the idea where to use the gradient on the following image. I highlighted it with red color.

Step 9 - Adding Smog
Another color that comes in hand with pollution (according to me at least) is green. In this step you'll add green smog on the horizon to add even more atmosphere. Add new empty layer on the top of all layers and name it SMOG. Grab the Gradient Tool (G) and this time select Reflected Gradient.

Pick some green color (I used #6c7345) and create gradient as on the picture below.

To blend it well with the rest of the image change its Blending Mode from Normal to Overlay and lower its Opacity on about 65%.

On the following photo you can see how your photo manipulation should look like so far.

Step 10 - Red Cars
I believe that the the bottom part of the image where streets of the city are is quite uninteresting right now. You'll add interest by creating red lights around the roads. It would look like there is lots of traffic down there. Add new empty layer on the top of all layers and name it CARS. Grab the Brush Tool (B), pick some soft round brush and lower its Opacity on about 40%. Pick some reddish colors and start painting over the roads. Look at the following picture to get the idea where you should paint.

To blend it with the rest of the image change Blend Mode of this layer from Normal to Overlay.

Step 11 - Darker Sky
Sky should be even more darker. You'll change it in this step. Add new adjustment layer Curves on the top of all layers and set it as on the following picture.

To adjust only sky and not the rest of the image grab the Paint Bucket Tool (B) and fill the the layer mask of this adjustment layer with solid black color. Grab the Gradient Tool (G), pick white color and make linear gradient from the upper part of the image to horizon similarly as you did in one of the previous steps. You can see where to put gradient on the following photo. That area is highlighted with red color.

After this step your photo manipulation should look similar as the picture below.

Step 12 - Lighter Center
In this step you'll make the center of the image lighter. It will create more dimension and drama in your photo manipulation. Human eye first looks at the bright parts of the image. You can use this fact to lead viewer's eye on the parts of the image you want. Add new adjustment layer Levels and set the Input Levels on 0; 1,00; 175.
33 comments on “How to Create an Apocalyptic Sci-Fi Photo Manipulation in Photoshop”
Love it
it sux no images
hi bro
thank you , I am teaclother you have explained the tutorial thanks a lot.
thank you , I am teaclother you have explained the tutorial thanks a
It is very helpful tutorial and great idea for this tutorial....thanks a lot
Interesting tutos and very well explained ! Congratulations!
But how can I get your stock (resources) pictures in Pelleron-Art?
Very Nice
I did your tutorial in the past, here: http://annewipf.deviantart.com/art/TMM-A3P2-Apocalyptic-Sci-Fi-Photomanipulation-408652475
But it seem we cannot see the tutorials published on photoshop-tutorials anymore. :(
I tried to contact photoshop-tutorial, but it doesn’t work. :(
Could you tell me if there is something to pay now, or what we can do? Thank you.
Please re uploaded PSD file because when i click on download showing 404 error, this is best work for me i want check how did you do this
Absolutely beautiful works.. This is what called “Creativity”.
Great, thanks for all the helpful info!
It's an okay tutorial... Except I couldn't follow it after Step 2. (including Step 2).
The instructions are so vague, and major steps are being skipped. I just can't follow it.
You should really try to improve on that. I'd rather have too many details and too proper grammar than too little.
Maybe you should try to find some specific youtube-workshops about this themes
WOW this tutorial suck , couldn't understand a thing
Fantastic website. Lots of helpful information here.
I’m sending it to some buddies ans also sharing in delicious. And certainly, thank you for your sweat!
This tutorial is okay, but it's obviously lacking a LOT of information that's required to even get close to the desired look that the author is showing.
The tutorial is best at showing some ideas of what you can do and how to do it, but it's not showing an obvious step-by-step method to get the exact look (if you're trying for that) of the picture the author created.
Thoughtful tutorial. Hats off
Excelente
thanks for the tutorial!!
Thank you very much, it's really helpful!
holy shit ! you are so great !
Extremely Awesome Tutorial \m/ I love it
Humm... We can see a reflection on the city..
its totally amazin!!!!!
i have learnt a lot of effects through this and its awesome...... u have got a lot of ability and please teach me some.....
Thank you for the great tutorial,keep it up
hay.. in the begginig you say to create a new document.. can you please tell me the exact dimentions of the document coz i face difficulties with the begginig.. thnx a lot!
I believe the author used an image dimension of 600x900 pixels.
very nice!!!!
Great tutorial!
Thanks !!!!
Thank you very much for the tutorial, very well explained :) I have not had any problems in understanding it, Thanks
Good but I would change the meteors up so they aren't the same copy.