 Thank you very much for reading this tutorial. Hope it was useful for you and you've learnt something new or found some inspiration for your next photo manipulation! If you want to read more tutorial from me visit
Make your artwork look like they're from an alternate universe. These Cyberpunk presets work with Photoshop (via the Camera Raw filter) and Lightroom. Download all 788 presets for 90% off.
Step 18 - Bluer Tones I
In this and following step you'll make colors of the photo manipulation bluer. Add new adjustment layer Gradient Map on the top of all layers and set the gradient as on the following picture.

To blend it well with the rest of the image change Blending Mode of this layer from Normal to Color and lower its Opacity on 45%.

On the following image you can compare how the photo manipulation looks before and after this adjustment.

Step 19 - Bluer Tones II
To add even more blue tones add new adjustment layer Color Balance and set the values as on the following picture:

On the following image you can compare how the photo manipulation looks before and after the adjustment.

Thanks to the more vibrant colors the photo manipulation is more eye catching, isn't it?
Step 20 - Increasing Contrast
According to me the photo manipulation would look more interesting if there is more contrast. To increase it you use two adjustment layers in this step - Gradient Map and Curves. Let's start with Curves. You use this adjustment layer to to make lights lighter. Add new adjustment layer Curves on the top of all layers and set the curve as on the following picture.

To make shadows darker add new adjustment layer Gradient Map on the top of all layers and set it as on the following picture.

To blend this adjustment layer properly with the rest of the image change its Blending Mode from Normal to Multiply.

Step 21 - Sharpening
To create an illusion of more details you'll gently sharpen your photo manipulation in this step. Press Ctrl+A on your keyboard to select the whole image. Then go to Edit > Copy Merged (or press Ctrl + Shift + C) to copy merged image. Paste it by pressing Ctrl+V. Place this new layer on the top of all layers and name it SHARPENING. Go to Filter > Other > High Pass and set the value Radius on about 1,7 pixels. Press OK.

To blend this layer with the rest of the photo manipulation change its Blending Mode from Normal to Overlay.

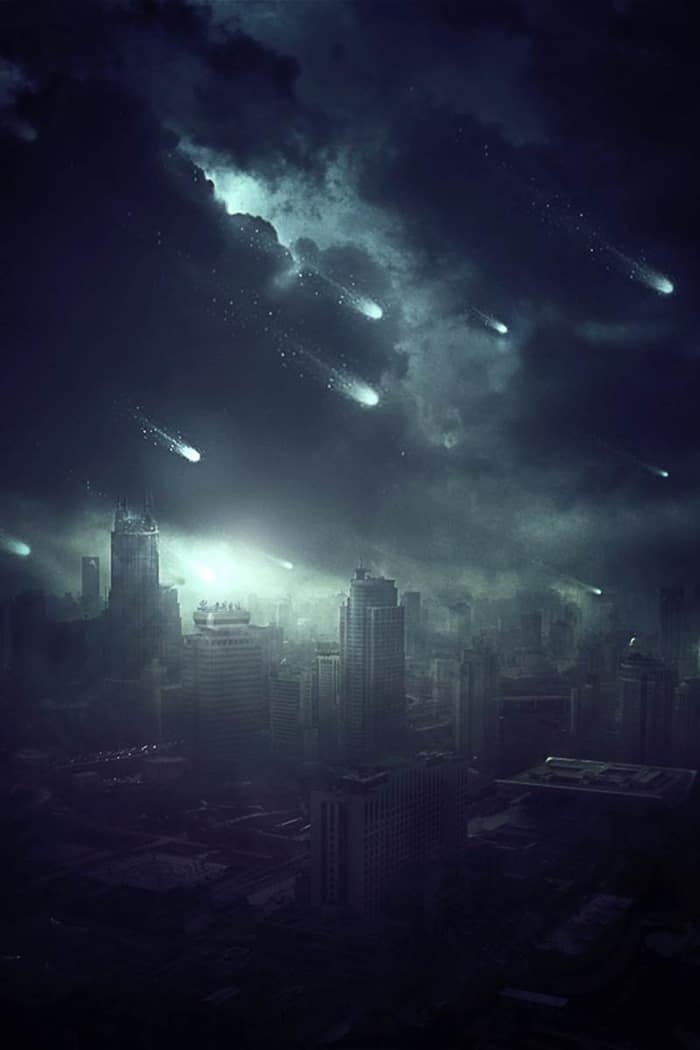
Final Results

33 comments on “How to Create an Apocalyptic Sci-Fi Photo Manipulation in Photoshop”
Love it
it sux no images
hi bro
thank you , I am teaclother you have explained the tutorial thanks a lot.
thank you , I am teaclother you have explained the tutorial thanks a
It is very helpful tutorial and great idea for this tutorial....thanks a lot
Interesting tutos and very well explained ! Congratulations!
But how can I get your stock (resources) pictures in Pelleron-Art?
Very Nice
I did your tutorial in the past, here: http://annewipf.deviantart.com/art/TMM-A3P2-Apocalyptic-Sci-Fi-Photomanipulation-408652475
But it seem we cannot see the tutorials published on photoshop-tutorials anymore. :(
I tried to contact photoshop-tutorial, but it doesn’t work. :(
Could you tell me if there is something to pay now, or what we can do? Thank you.
Please re uploaded PSD file because when i click on download showing 404 error, this is best work for me i want check how did you do this
Absolutely beautiful works.. This is what called “Creativity”.
Great, thanks for all the helpful info!
It's an okay tutorial... Except I couldn't follow it after Step 2. (including Step 2).
The instructions are so vague, and major steps are being skipped. I just can't follow it.
You should really try to improve on that. I'd rather have too many details and too proper grammar than too little.
Maybe you should try to find some specific youtube-workshops about this themes
WOW this tutorial suck , couldn't understand a thing
Fantastic website. Lots of helpful information here.
I’m sending it to some buddies ans also sharing in delicious. And certainly, thank you for your sweat!
This tutorial is okay, but it's obviously lacking a LOT of information that's required to even get close to the desired look that the author is showing.
The tutorial is best at showing some ideas of what you can do and how to do it, but it's not showing an obvious step-by-step method to get the exact look (if you're trying for that) of the picture the author created.
Thoughtful tutorial. Hats off
Excelente
thanks for the tutorial!!
Thank you very much, it's really helpful!
holy shit ! you are so great !
Extremely Awesome Tutorial \m/ I love it
Humm... We can see a reflection on the city..
its totally amazin!!!!!
i have learnt a lot of effects through this and its awesome...... u have got a lot of ability and please teach me some.....
Thank you for the great tutorial,keep it up
hay.. in the begginig you say to create a new document.. can you please tell me the exact dimentions of the document coz i face difficulties with the begginig.. thnx a lot!
I believe the author used an image dimension of 600x900 pixels.
very nice!!!!
Great tutorial!
Thanks !!!!
Thank you very much for the tutorial, very well explained :) I have not had any problems in understanding it, Thanks
Good but I would change the meteors up so they aren't the same copy.