

Make skin look perfect in one-click with these AI-powered Photoshop actions.

Step 7
Change the blending mode of the texture to Multiply. This will hide all the white parts and leave use with the black cracks.

Step 8
Create a new layer and select a dark orange(#882a00) as foreground color. With the chalk brush at 80% Opacity and 2px size paint some redness into the cracks. Name this layer "Cracks Light".

Step 9
Duplicate the "Cracks Light" layer by pressing Ctrl + D. Double click the layer to enter advanced blending mode. Use the settings below to add some glow.

Step 10
Open the file "Fire1". Select all, copy and paste into our scene. Convert the imported layer into a smart object. Use Free Transform to position the fire as shown below.

Step 11
Change the blending mode of the fire to Screen. Now only the fire will be visible.

Step 12
Duplicate the fire layer and move it a bit to the left.

Step 13
Group the fire layers together (Ctrl-click on each and press Ctrl + G). Import the fire brush . Add a layer mask and with a black brush hide the sharp corners by painting with a soft black brush and one of the fire brushes in the layer mask.


Step 14
Open the file "Fire2". Select all, copy and paste into our scene. Convert the newly imported layer into a smart object. Use Free Transform to place the fire as shown below.

Step 15
Change the blending mode of the fire layer to Screen.

Step 16
Add a layer mask to the fire layer. Mask away the hard edges.

Step 17
Duplicate the "Fire2" layer in order to increase the sparkling effect.

Step 18
Duplicate the "Fire2" layer again. Use free transform to place is it as indicated below.

Step 19
Group all the three "Fire2" layers and name the group "Sparks". You can add a layer mask to further hide the unwanted parts of the fire and sparks.

Step 20
Duplicate the "Fire1" layer and place it as shown below. Change the blending mode to screen.

Step 21
Add a layer mask and use the fire brushes and the soft round brush to mask the hard edges.

Step 22
Duplicate the fire layer we masked at step 21 and move a bit lower to cover the entire wooden portion of the scythe.

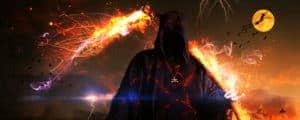
Step 23
Duplicate the fire layer again but this time move up the wooden portion of the scythe to further increase the brightness of the flames.
6 comments on “How to Create an Awesome Fiery Grim Reaper by Combining Images”
Awesome tutorial!
Cool
nic boy
That looks incredible! I can barely recognize the images in the final result. Well done and thanks for sharing.
nice ja
Jerson Acabado