

Download Lightroom presets and LUTs, absolutely free. Use the presets to add creativity and style to your photos.


Step 14
I make Color Balance and Curves layers (Clipping Mask) to alter color and brightness of the tree:

Step 15
Isolate the house and position it at the left side of the ground.

Step 16
Make shadow for the house as done with the wheel:
Step 17
Create group for the house and its shadow. Use Color Balance and Curves layers to change house color:

Step 18
Cut out the well and place it at the right side of the ground:
Step 19
Make shadow for the well as done with other subjects:
Step 20
Group the well and its shadow layers. Use Color Balance, Photo Filter and Curves layers to make color of the well fit the rest:

Step 21
Open stock of the vines. I removed most of the house parts:


Step 22
Use another vine parts to arrange around the house with same method. I used 6 layers to get the result shown on screenshot below:
Step 23
I use 5 vine layers to add to the well:
Step 24
Group all vine layers. Use Color Balance and Curves for them:

Step 25
Open fence stock. I take these stakes:

Step 26
Make shadow for these stakes as done in previous steps:
Step 27
Create group for these layers, I name it "fence parts 1". Make a new layer within this group and use Clone Tool to remove unecessary parts:
Step 28
Apply Color Balance and Curves for these fence parts:

Step 29
I use a Curves layer with Clipping Mask for the one near the right corner of foreground to darken it more:

Step 30
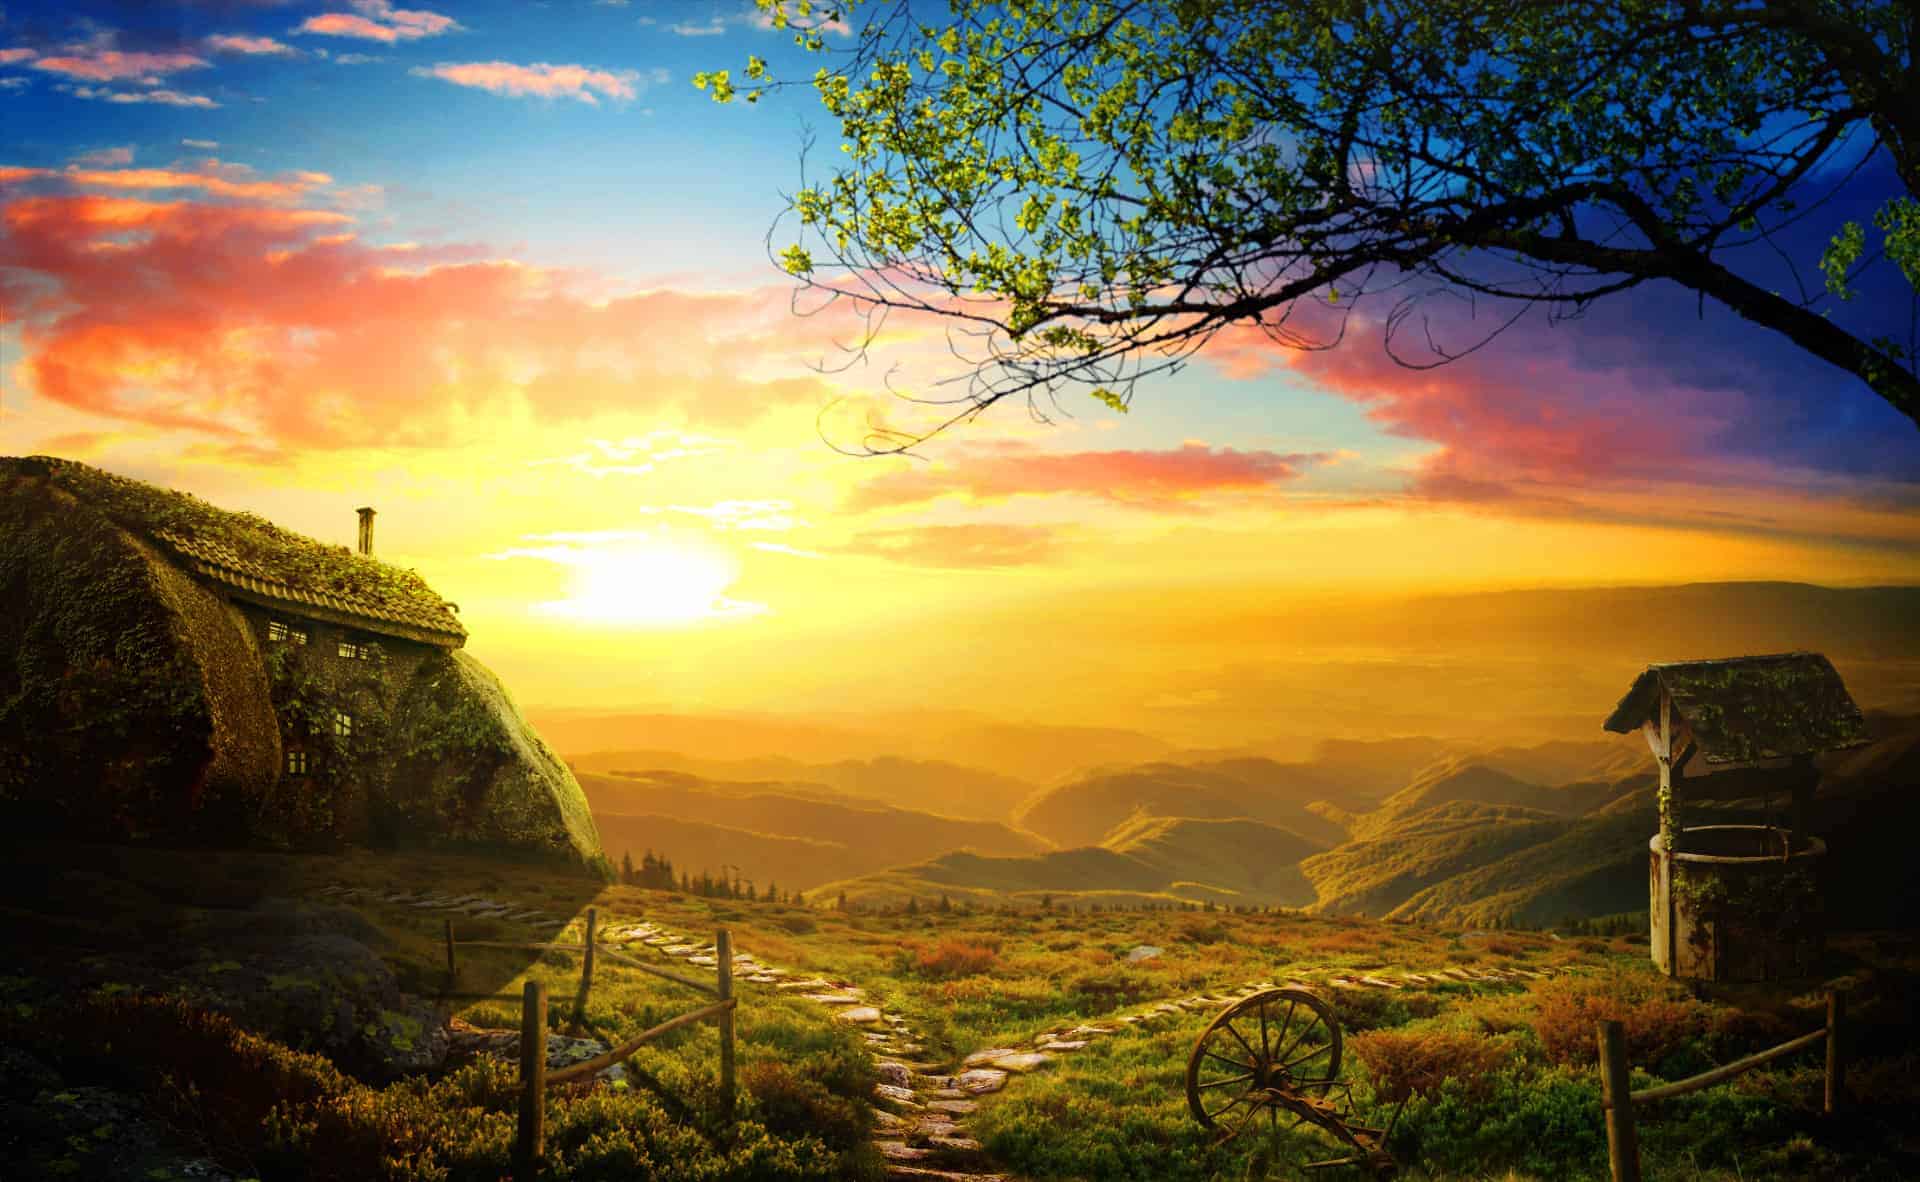
Take another parts of the fence from original stock and position them horizontally. I use Warp tool to bend them a little to avoid a rigid look:
Step 31
Make shadow for the parts that can be seen on this picture:
Step 32
Create group for these layers, name it "fence parts 2". I use Curves to darken them:

Step 33
With the fence part near the right of foreground I use a Curves layer (Clipping Mask) to darken it more:

Step 34
To add more contrast to this picture, I make a new layer on the top, active Gradient Tool (G). I choose Radial Gradient with default colors (black and white):
27 comments on “Create a Beautiful Sunrise Scene with an Old House”
man...this is some next level edit!
This is nice! I love your tutorials! Thank you!
Su
I started downloading everything so I could do this tutorial, even signed up for another site. But then it wants a credit card!! Sorry, not gonna happen.
So I deleted all the downloads and forgot about this tutorial.
Note to authors... just cause you're a member of a stock site, doesn't mean the rest of us want to be. Verify the images are truly free!
Wow, I love this. Thank you for a great tutorial!
wow amazing
Wow. Thank you for sharing this experience with us...........and for the challenge.Thanks Amazing designs, best of luck in your design career!
Wow! So cute, nice blog, I found it interesting. Thanks for sharing.
Thankyou very much.
Every link to sxc.hu redirects to a broken link on freeimages.com. Is there any way to find those images?
excelente
thank u! very much
Agreed with the stock photos. It's too hard to download them and easier to google it. On one hand, free stock photos are free. But on the other, they always disappear. So I am not sure whether I prefer paid or free stock photos. But I wish there are more tutorials where the writer provides their own so that there are no problems like these.
Sorry for multiples posts, but I found the picture on a wallpaper website.
http://www.stumbleupon.com/su/2gBZek/wallpapers-start.com/images/wallpapers/sunset-time-117525.jpeg/
I doubt he'll ever reply our request. He's selling the same pictures at shutterstock.
http://www.shutterstock.com/pic-120994354/stock-photo-majestic-sunset-over-the-little-mountain-peak-picture-is-made-from-frames-with-exposure-blending.html
ana nahab na3mal photo shop kifach na3mlahoum stp
photo shop
For the house google stone house Portugal and you'll find several pictures.
I have to agree with other viewers regarding the images used. I've had to join 2 more sites to obtain the individual images. Free Stock Images are not free. Get one free, but pay for the rest????!!!!! http://www.sxc.hu is the best one; I've been a member for years; but the sunset........waiting for owner to send permission to use Ha!
To create this tutorial, it would have been easier to google the images. I've wasted over an hour so far trying to get the images and I've still not had chance to fire up Photoshop yet. I might have to give this tut a miss. Nice end image; but the image resource gathering lets it down big time!!
I'm also waiting for the permission request to be answered. As for the path, google and you'll find several stone paths that can be used to replace the paid image.
very nice work
nice composition
Great app for fashionable scene --
Very nice work !!
Great image.
It's a shame I have to wait to get my request answered on the stock site for the landscape before I can do it.
I'm also struggling to get the path picture. When I click on it, it keeps taking me to a page and asking me to pay. I can't work out how to get it for free.
Hi all, This is Nice Project. Many Photo But One. I like this.
so beautiful
so cool!
wow so colorful!!!