

Make skin look perfect in one-click with these AI-powered Photoshop actions.

Use Dodge and Burn Tool (O) with Midtones Range, Exposure 20-25% to brighten the top of left and right shoulder and darken the edges. You can see how I applied this tool with Normal mode and result with Overlay mode:

Step 18
Open vines stock pack. I choose number 1 to put onto the top of left shoulder and different parts of number 11 to arrange over the two arms. Use layer mask to remove parts outside these areas and blur some details to get more natural look:

Step 19
Extract branches 1 from the background. I take different parts of them to position around model head, duplicate, transform, use layer mask if needed to achieve a random look:


I used 10 layers for this effect.
Step 20
Create a new layer under branches ones. Use soft black brush with low opacity (about 20%) to paint shadow of the branches on model body:

Step 21
Make group for these branches layers, set the mode to Normal 100% and call it "branches 1". Also change the name of them from 1 to 10. Make two Curves and a Photo Filter layers to change contrast and color of these branches:

On the first Curves layer mask I erase the left side to keep it brighter than the right. On the second I erase the right to make them darker:


Step 22
Drag the nest into our picture, downsize and warp it to fit the model head:

Step 23
Use Curves and Photo Filter (Clipping Mask) to make contrast and change color of the nest:

On Curves layer mask , erase the right side to make it darker than the left:

Step 24
Open branches 2 stock and isolate them from the background. I take different parts and position them at the two sides of the picture:


Step 25
To add depth to our picture I apply Gaussian Blur with 4 px for these branches:

Step 26
Make group for the branches (I call this group "branches 2"). Add Curves and Hue/Saturation to this group:

Brush over the left side to keep it brighter than the right:

Step 27
Create some adjustment layers on the top to change color of the whole picture. I use Hue/Saturation, Gradient Map, Color Balance and Photo Filter:


Change the mode of this Gradient Map to Soft Light 100%. On Hue/Saturation layer mask I use brush to erase the left of the model to keep it more vibrant than the rest:
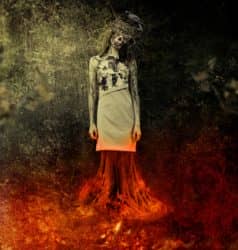
19 comments on “Create a Chilling Abstract Using Photos and Textures”
good
Nice tutorials
Awesome tutorial. I like to do composites that are similar to this, but my process is a bit longer. I think you just showed me a few shortcuts, which is nice!
Wow! Very good! Thanks you very much.!!
Wow.
I believe the purpose is not to have you use the same photo at all. It simply shows you how to do the effects, and you can then choose your own photos to edit.
Absolutely beautiful works.. This is what called “Creativity”.
Very good.
But you can download the PSD file and there are the stock images
WHAT exactly is the purpose of trying to have us follow a tutorial with stock images that are not free?? Are we expected to purchase them JUST for the purpose of following this tutorial? I'm confused.
Try to understand it from the writers view. I wish everything is free but bot everything is free on the web and often times the photos needed are not available free. The way I see tutorials is learn... but don't copy. The tutorial appears like it can be completed with a different model picture. Find a model picture on DeviantART or use Google.
I m Agree jordan sir.
You don't have to use the photo they linked to. There are plenty of free stock photos and they work on this tutorial. The point is to learn not to copy.
Good tutorial. Only downside is you have to pay for the model's picture.
check the PSD ;)
I like this effect but
too much photo-manipulation tutorials
didnt help
good