

Make your artwork look like they're from an alternate universe. These Cyberpunk presets work with Photoshop (via the Camera Raw filter) and Lightroom. Download all 788 presets for 90% off.

Step 38- High Pass
In that same layer apply a High Pass Filter. To do that go to Filter- Other – High Pass. Change the Radius to 50.0 and press ok to see the changes.

Step 39 – Photo Filter
Apply a photo filter to the image. Go to the layer menu and press the icon “Create New Fill or Adjustment Layer”. Then press the option Photo Filter.

Then find the photo filter Deep Blue and press Ok.

Step 40 – Hue/ Saturation
Go once again to the layer menu and press the icon “Create New Fill or Adjustment Layer”. Then press the option Hue/ saturation.

Reduce the Saturation by -25

Step 41- Elliptical Marquee Tool.
Create a new layer (Shift + Ctrl + N)Pick the Elliptical Marquee Tool and make an oval around the image.

Give a right click in the image and choose the option “Select Inverse”

Step 42- A bucket of paint…
Now Choose the Paint Bucket Tool and paint in the selection.

Step 43 – Fading
Used Gaussian blur to fade the selection. Go to filter – blur – Gaussian Blur. Put 150 of radius.

Step 44 – The final touch.
If you think the image is looking way to dark. Press (Ctrl + T) To change the size of the layer. Make it Bigger until you get the desired result.

Yay!!! That’s it, Hope you enjoy following this tutorial!!
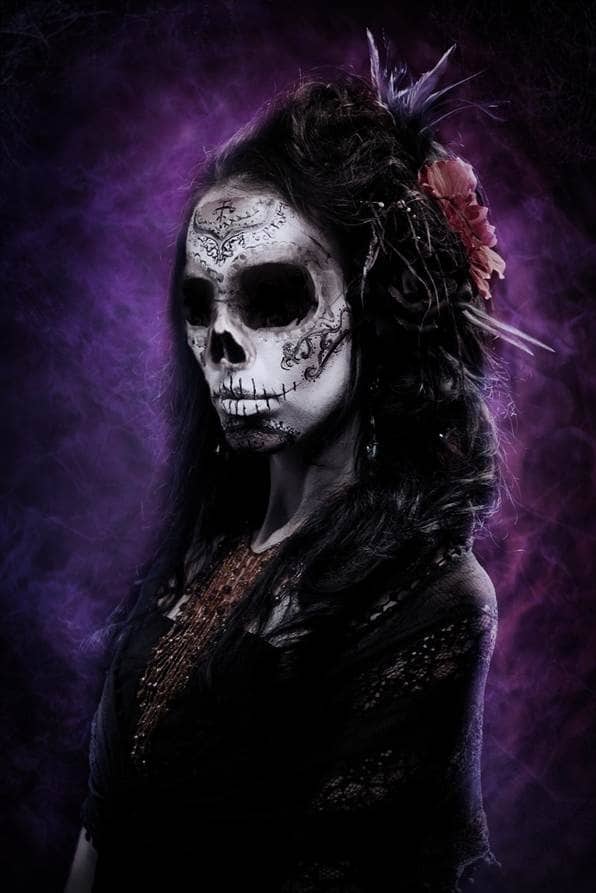
Final Results

About the Author

I like to make tutorials because I think we all have to help each other to learn new things, and I share with you all the techniques I know, so I hope you get good results with this tutorial. You can check more of my art at: https://www.andygoth566.deviantart.com
- Andrea García
10 comments on “How to Create a Chilling Portrait Manipulation for Halloween”
Me gusta el tutorial, el efecto es muy bueno. Pero deberías ser un poco mas especifica en ciertos pasos y resumir otros.
En algunos quedaba en la duda de las capas que debía tomar o quedaban lagunas que explicabas mas tarde, de todas maneras gracias por el tutorial y a seguir mejorando siempre.
because you have YouTube channel ?
Youtuber good and more serious with your tutorials. . Enjoy
Thank you
the "texture" link leads to nothing and i dont know what the texture looks like so i can't even find an alternative. i do like the final picture it's interesting. but the tutorial is slightly hard to follow
was not impressed with directions and had a hard time following. to make exact, i had to adjust against the directions to properly complete.
There is a missing important part you forgot to put in between part 15 and 16. It doesn't explain how you got the eye sockets to be black, doesn't explain how you blended the outer skull bits with the skin, doesn't tell you that you also darkened the forhead
I love your all icon sets….and start to bookmark this!!!
i really appreciate you struggle in this tutorial...!! loved it so shared it... thanks alot..
It´s so cool, thanx for inspiration
@Ferobanjo glad you like it!