
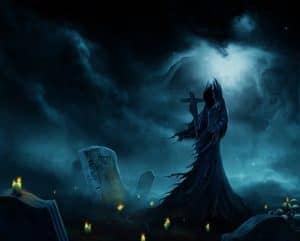

Luminar AI lets you turn your ideas into reality with powerful, intelligent AI. Download the photo editor and see how you can completely transform your photos in a few clicks.

Take a very soft round brush (0 opacity) and set the foreground color to black. Now with black color, stroke the brush on the lower part of the statue to hide it. The part is highlighted by red. There is black spot in the white mask thumbnail as indication of masking.

Now we have the lower part of the statue is masked.

Step 3 (Manipulating the stock)
Firstly we will manipulate the cloth in the hands of the figure. We will try to add torn cloth on them. To find out what it will look like, here is the scratch for reference.

Create a new layer (Shift+Ctrl+N) below the statue layer. Take pen tool and create a torn cloth like shape on this new layer. Fill it with color #504e4e. I named this layer left cloth.

On a new layer create similar shape for the right hand. I named this layer right cloth.


Step 4 (Defining details)
Next we will start defining the detail of the both cloth. We just simply do this with combination use of dodge and burn tool. Open the tool in the tool panel. Set its setting to the values given below. We can change the values accordingly later.


Details on right hand cloth
We will start defining the details on the right cloth. Go select again the right cloth layer. Start stroking the dodge and burn tool on areas where needed to give it some worn and crumpled parts on the cloth.

Keep on applying the combination of the both tool to give more details. We can change both the size of the brush or exposure accordingly depending on the areas to be stroked. We also can choose highlight for its range.

After finding desired result, we can duplicate the layer (Ctrl+J) and set its duplicate to soft light blending at desired opacity of about 80-100%. This will give more brightness and contrast to the layer.

Step 5 (Left cloth)
Do the same way to give details on the left cloth.


Step 6 (Smudging)
Next we will blend the both cloths to the main whole body of the statue. We will do this by smudging. Firstly, activate the smudge tool in the tool panel. Set its setting for this tool as given below. This setting can be changed accordingly as well. Make sure to keep checking sample all layers option.


Create a new layer above the extracted statue layer. On this layer, start stroking the tool to the direction where needed to blend the image.
16 comments on “Create an Eerie Photoshop Manipulation of a Dark Queen in a Cemetery”
Assume this assume that
===ASS OUT YOU AND ME
so good
Important Info
HIIIII!! there is a huge problem.... the first four images --I think the free image website ones are not available could you please make the stock image available and let me know when you've done that. I need this for a business project!!!!! VERRRRRYYYY IMPORTANTTTTTT!!!!!!!
Hi Taylor,
Unfortunately broken links are a common issue with free images. We recommend searching for other similar images.
Beautiful, creative and acutely enjoy able!
brilliant tutorial, time consuming but well worth it.
好厉害
Wow amazing and Professional tutorial,It's relay nice.
awesome
the Best Professional tutorial for Photoshop
Its simply owesome man keep it up.
I just love the statue transformation starting from step 3!
weldone
Wow great tutorial. I am too a Photoshop artist, but i am only 17 years old and don't have so much skills. On my Website are projects from me (jan.leibacher.ch) its on german, but it have possibilty to translate the site :)
AWESOME!!! Good job mate