
Make your artwork look like they're from an alternate universe. These Cyberpunk presets work with Photoshop (via the Camera Raw filter) and Lightroom. Download all 788 presets for 90% off.
![step-009[1]](https://cdn.photoshoptutorials.ws/images/stories/a6cd10bee1aa_11AFB/step-0091.png?strip=all&lossy=1&quality=70&webp=70&avif=70&w=1920&ssl=1 "step-009[1]")
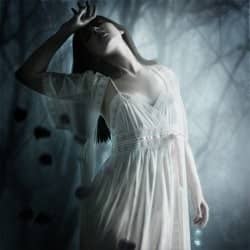
As you can see the brush will paint a lot of diamonds. So delete the ones you don't want and put the remaining like they are falling from her hand.
![step-010[1]](https://cdn.photoshoptutorials.ws/images/stories/a6cd10bee1aa_11AFB/step-0101.png?strip=all&lossy=1&quality=70&webp=70&avif=70&w=1920&ssl=1 "step-010[1]")
Step 5 - Shadows
It's time to shading! Add a Curve Adjustment layer above everything and drag the curve down like the image below. I set these values: Input 169 and Output 100. Set this layer to Multiply.
Everything will be darker but we don't want this effect on the whole manipulation! So add a Mask to this level and fill it with black or, in alternative, go to Masks (the button close the Adjustments) and click the button Invert. The manipulation will turn as it was before, like you did nothing.
Now with a white soft brush paint over the black mask and the darkness will appear where you brush. You can now choose where shadows go! I use a brush with low opacity and flow (generally 30% for both, it depends on the areas to paint).
![step-011[1]](https://cdn.photoshoptutorials.ws/images/stories/a6cd10bee1aa_11AFB/step-0111.png?strip=all&lossy=1&quality=70&webp=70&avif=70&w=1920&ssl=1 "step-011[1]")
Below you can see so far where I painted the shadows.
![step-013[1]](https://cdn.photoshoptutorials.ws/images/stories/a6cd10bee1aa_11AFB/step-0131.png?strip=all&lossy=1&quality=70&webp=70&avif=70&w=1920&ssl=1 "step-013[1]")
Step 6 - Dodge & Burn
Create a new layer and set it to Overlay.
Go to: Edit > Fill > 50% Gray
On this layer you can now Burn and Dodge the areas you want to be darker or lighter.
My settings are: Range: For shadows 90% of the times is midtones. With lights it's the same but sometimes, if you want more glowing lights you can also use the range Highlights. Exposure between 10% and 30%.
Use especially the Dodge on the diamonds, the highlights of her skin and the dress.
Below you can see where I dodged and burned.
![step-014[1]](https://cdn.photoshoptutorials.ws/images/stories/a6cd10bee1aa_11AFB/step-0141.png?strip=all&lossy=1&quality=70&webp=70&avif=70&w=1920&ssl=1 "step-014[1]")
This is the result.
![step-015[1]](https://cdn.photoshoptutorials.ws/images/stories/a6cd10bee1aa_11AFB/step-0151.png?strip=all&lossy=1&quality=70&webp=70&avif=70&w=1920&ssl=1 "step-015[1]")
Step 7 - Texture
Create a new layer and a texture like this (with a soft round brush). Set the layer to Soft Light
![step-016[1]](https://cdn.photoshoptutorials.ws/images/stories/a6cd10bee1aa_11AFB/step-0161.png?strip=all&lossy=1&quality=70&webp=70&avif=70&w=1920&ssl=1 "step-016[1]")
This is the result.
![step-018[1]](https://cdn.photoshoptutorials.ws/images/stories/a6cd10bee1aa_11AFB/step-0181.png?strip=all&lossy=1&quality=70&webp=70&avif=70&w=1920&ssl=1 "step-018[1]")
Step 8 - Light
Let's add some light! Pick one of the lightest color from background (not white, I chose #e1f9ff). With a round hard brush paint something like a did in the picture below.
![step-019[1]](https://cdn.photoshoptutorials.ws/images/stories/a6cd10bee1aa_11AFB/step-0191.png?strip=all&lossy=1&quality=70&webp=70&avif=70&w=1920&ssl=1 "step-019[1]")
Now apply some blur to completely dissolve it.
(Filter > Blur > Gaussian Blur) (Sometimes I need 250px to achieve this effect)
![step-020[1]](https://cdn.photoshoptutorials.ws/images/stories/a6cd10bee1aa_11AFB/step-0201.png?strip=all&lossy=1&quality=70&webp=70&avif=70&w=1920&ssl=1 "step-020[1]")
Step 9 - Final Adjustments
I think the picture is too much saturated. So Add a Hue/Sat Adjustments Layer and set the Saturation to -70 (You can choose the amount you want)
![step-021[1]](https://cdn.photoshoptutorials.ws/images/stories/a6cd10bee1aa_11AFB/step-0211.png?strip=all&lossy=1&quality=70&webp=70&avif=70&w=1920&ssl=1 "step-021[1]")
Highlights. Create a new layer. Set the brush Mode to Overlay (Opacity and Flow vary, I generally set 30%). With a light color from the background paint some highlights. I did it on the red areas I'm showing you here.
4 comments on “How to Create an Emotional Soft-Tone Photo Manipulation”
Cool
nice tutorial,thanks for sharing
Do you know what steps I take to do this. I have a picture but this will not let me post the pictures
This is one awesome collection. One of my favorites I have seen in a long time. Thanks for sharing.