

Make skin look perfect in one-click with these AI-powered Photoshop actions.
Step 46
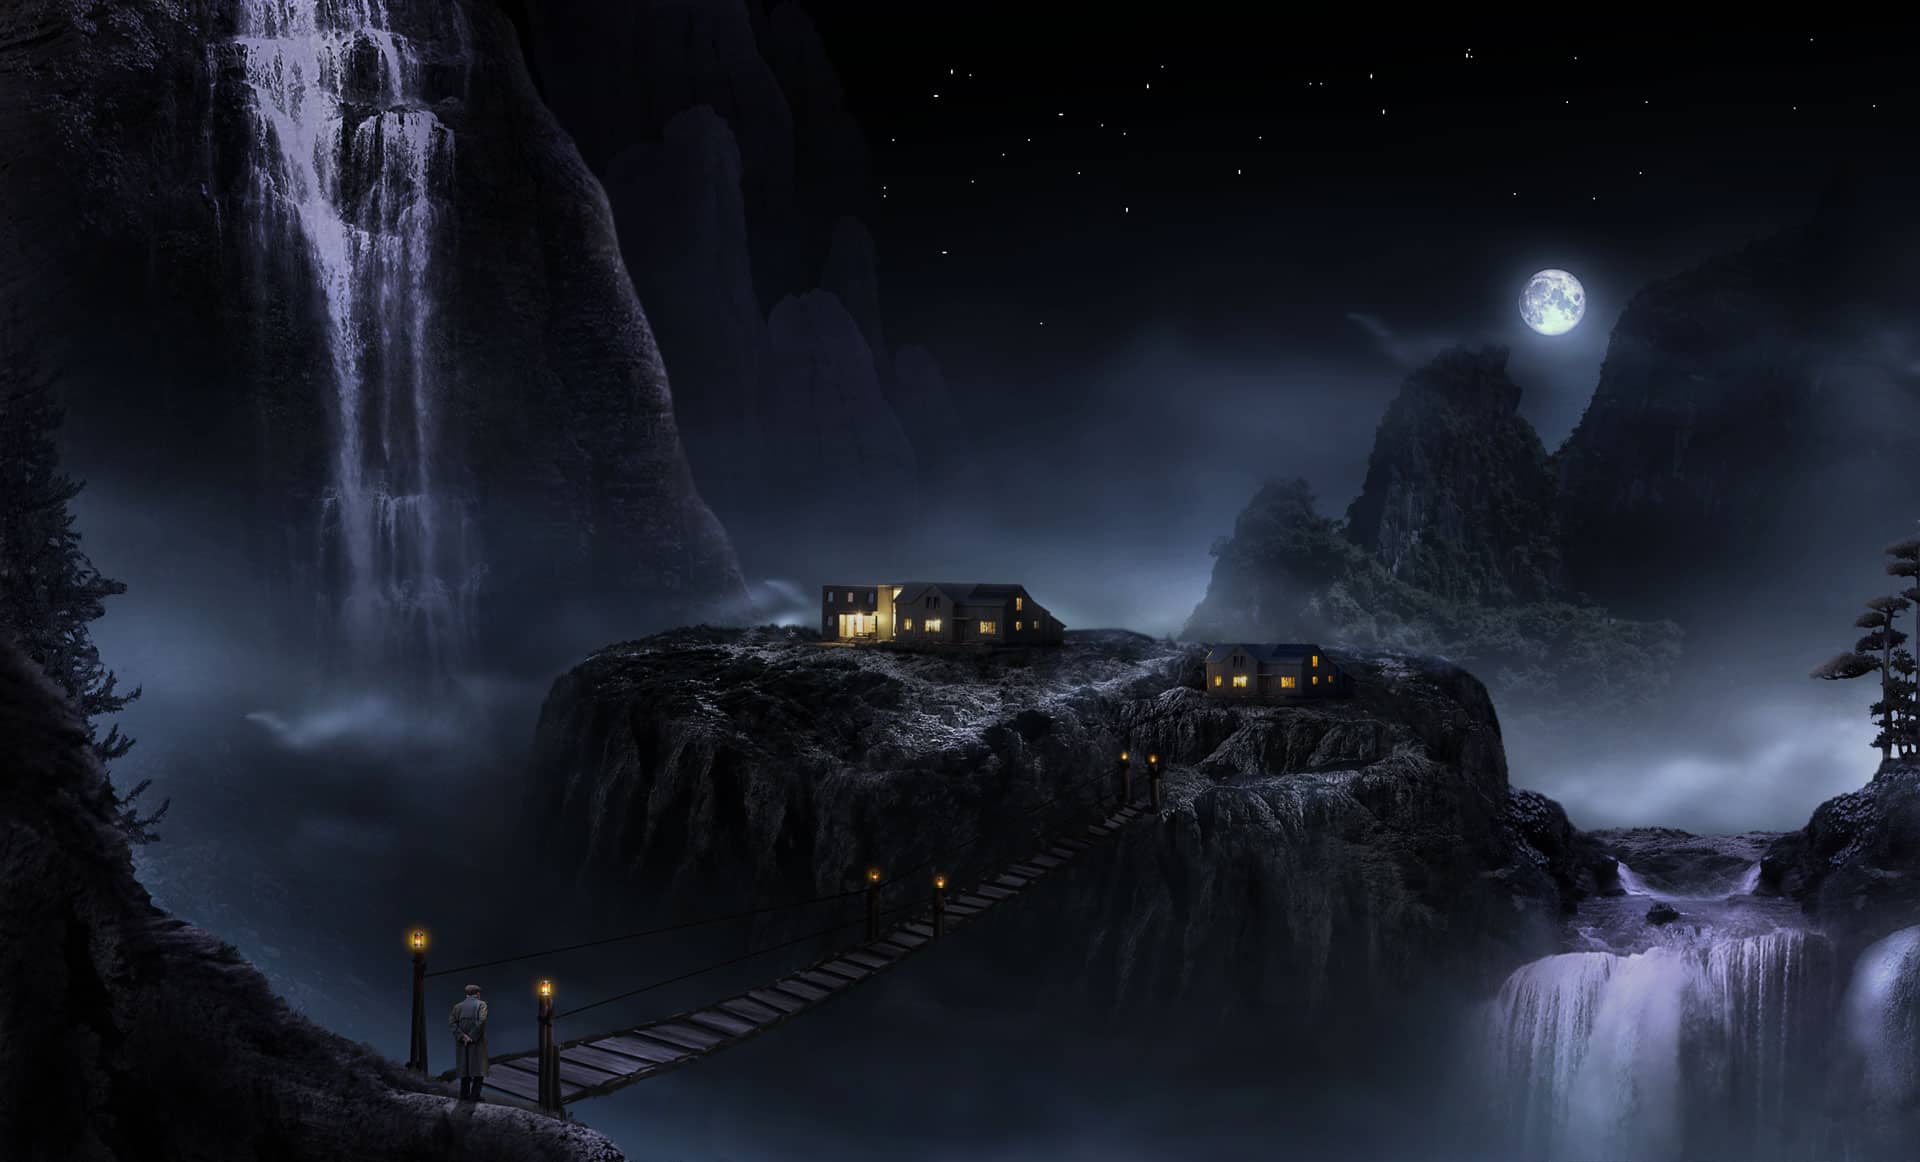
Next, we will add a moon to the scene to complete the composition. Open the moon image and cut it out.

Add the moon to the main scene. Scale its size and place it near the right rock. Make sure to position this moon layer above all the other layers or folders. Create a new layer without a clipping mask above the moon layer. I named this new layer light. On this new layer, I called light, we will paint some light for the moon. To do this purpose, take a very soft round brush and set its size to the same size as the moon. With white color click the brush right on the moon. It should look like the image below:

Duplicate the light layer one time. Set the original layer to soft light blending at 100% opacity and the duplicate to overlay at 100%. We should have the result like the one in the screenshot.

Step 47
Following the moon as the light source of the scene, we should do some overall adjustments to some parts and objects of the scene. Start by adjusting the BG. Go again then to the BG folder and open it. Select the topmost hue/saturation layer in the folder. Activate the mask thumbnail and mask the hue/saturation layer on the areas around the foreground rock and right waterfall.

Next, go to the model folder and mask the hue/saturation layer on the areas around the head, right shoulder, and cloth of the model. By masking those parts, we have added some highlights for the model image. Don’t forget to give this model some shadow as well.


After that, create a new layer filled with 50% gray set to overlay 100% above the BG folder. Take a very soft round brush and, on this layer, paint some highlight by stroking the brush with white color to certain areas on the scene as indicated by the red arrows:

Proceed to give some highlight to areas around the middle rock. Go to the middle rock folder. Create a new layer with a clipping mask above the photo filter layer within the folder. I name this new layer highlight. On this layer, paint soft white color to certain areas as indicated by the red arrows:

Finally, do the same to the left rock and tree folder to give them some highlight.

Step 48
Now we will create a bridge on the scene. Create a new layer under the foreground folder. Firstly we will create boards of the bridge with the pen tool. Take the pen tool and create some paths as the ones I created. Right-click the paths to show the path option command box. Choose fill path.

Fill the path with any color we want. I used the color of #513e22


I decided to make the boards narrower a bit. So I masked the selected parts as shown in the screenshot.


Duplicate the board layer one time. Move the duplicate upward a bit.

Now select the original layer again and give it a hue/saturation layer with a clipping mask. Set this layer to normal. NOTE: this value of the hue/saturation given is the one for the board filled with the color of #513e22. So we can set different values if we use a different color.

Then, go select the duplicate layer again and give it a layer style: drop shadow.

27 comments on “How to Create a Marvellous Night Landscape with Waterfalls”
the download link won't work
Thanks Zach! It's fixed now
Very awesome tut here. Sometimes I wanna make my images a little more "fantasy", but I always feel like I lack the creativity.
stunning
i am triying to remove background
Great article! Thank you!
thank you
I was unable to get the 2 waterfalls as my security wont let me and the Rock6 was not sure which one you wanted...really want to learn this but am having issues ~ thank you
wooooooooooooowwwww awesome
awesome and unique collection of sequence photography i love it.
Thank for sharing.
sorry, i didnt get step 16...i hit -100 on HS but the color changed to totally black n white! whats wrong?
this is what we call it "creative mind"
This is amazing! I'm going to try it out soon! Thanks Dek.
AWESOME.PERIOD
You did an excellent job of step by step tutorial with pics which helped me understand why and the reason for each.
Thanks ;)
I like your tutorial a lot!
But, sorry if it sounds dumb, how do i copy-paste the cut out into the main document (step 3)? It doesn´t work with ctrl+c/ctrl+v...
firstly select the cut out (hold-press Ctrl and click the thumbnail of the cut out layer. when it is selected, hit Ctrl+C and then be active on the main document, paste (ctrl+v) the layer on it.
very good tutorial I love your technique
thanks for share
Excelente tutorial, el modelo nolo encuentro, saludos desde España
Hola malissimo,
Aquí lo puedes encontrar: http://photoshopworld.ru/lessons/507/old_man.jpg
Un saludo desde Francia
___
Btw, thank you for this tutorial. This is impressive. And I learnt new useful techniques.
how do you get of masking??????????
If you see red than press Q to get out of quick mask. If you dont see red, just click on the left thumbnail of your layer... the left one not the right thumbnail.
pathi thane sollirukinga
This is a magnificent masterpiece. Excellent explanation. Thank you very much.
Duuuuuuuuuuhhhhhhhhhhhh!!!!!!!!!!!!!!!!!! Mwanangu jembe unatisha kinoma
I like yer tut... good