
Download Lightroom presets and LUTs, absolutely free. Use the presets to add creativity and style to your photos.

Grab the Gradient Tool (G), pick black color and fill the layer mask of the adjustment layer with solid black color.
Grab the Brush Tool (B), select some very small brush (Master Diameter on 2 - 5 pixels), lower its Opacity on 10% and pick white color. Start painting over the areas where highlights are to make them even lighter. Below there are red parts showing where I painted. You can use it as an inspiration.

After you're done painting highlights move on shadows. Add new adjustment layer Levels again and this time set the Input Levels on 0; 0,13; 255. Change the Blending Mode on Luminosity and fill its layer mask with black again.

Grab the Brush Tool (B), use the same settings as before and now paint over the areas with shadows to make them darker. On the picture below you can get the inspiration where to paint again.

Notice that I painted also over the grass in the foreground to make it better visible. You should do it too.
Your image should look like the one below after this step.

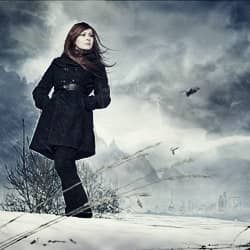
Step 9 - Contrast in Clouds
In this step you'll do quite the similar process as in the previous step. Only this time you'll focus on increasing contrast of clouds.
Let's begin with shadows. Add new adjustment layer Levels and set the Input Levels on 0; 0,68; 255. Change its Blending Mode on Luminosity and fill the layer mask with black color.

Grab the Brush Tool (B). Use the same settings as in the previous step, only make the brush little bigger - set the Master Diameter on 5 - 8 px. Paint over the shadows to make them darker. Below you can see where to paint.

Highlights should be lighter. To do that add new adjustment layer Levels again and set the Input Levels on 0; 1,62; 255. Change its Blending Mode on Luminosity and fill the layer mask with black.

Grab the Brush Tool (B) and paint over the highlights. You can get the idea where to paint from the picture below again.

According to me the whole picture should be bit darker. To fix it add new adjustment layer Levels and set the Input Levels on 0; 0,81; 255. Change the Blending Mode on Luminosity.
10 comments on “Create a Mysterious Fashion Photo Manipulation in Photoshop”
Thanks for stopping by!I use Lightroom and Photoshop for my pp'ing. I'm rlleay just learning still have found some actions that I like that I have actually rlleay learned a lot from using.
struck in first step...plz tell me how u remove cloth and retain the straw..plz mail me the solution so that i can go for second step
And here's mine:
http://oi59.tinypic.com/2c126w.jpg
:)
I used a different mountain - the original is missing.
Alirght alright alright that's exactly what I needed!
Hi,
Great tutorial, thanks.
And this is my result: https://imageshack.com/i/0lh0uxj
I have made snow instead of rain ; )
This is really amazing.. its great. but given model image resoulution is not enough for this type of design. Thanks..
Those were very educational Terence! It was like you took us into atenhor world that we would never see & into the eyes of those that work up in the sky. The shot behind the crane operator was awesome and I loved the candid shots that you took. Amazing work my friend! Must have been quite the experience.
amazing. thks!
Thank you very much,I love you !
i liked it very much...thnk u