

Turn any photo into a dot grid artwork with these Photoshop actions. You'll get great results with dots that change size. They get larger in brighter areas and smaller in darker areas. Free download available.

Now go back to our Big Planet group and let’s finish the painting of the first planet.

In this step we’ll be painting with pure white. To quickly access white as your foreground color press D and then X.


Step 12: Painting the small planet
This is the last part of our painting process. Create a new group called Small Planet and place the Small Planet layer (the actual small planet) inside it.

Now create a new layer and place it on the top of our Small Planet group.

Now hold Alt/Opt and click in the space between the layer we just created and the Small Planet layer. If you did this right, you should see a sign (highlighted in the image below) next to the layer, which means that that layer is now clipped to the layer underneath it, so all the painting we do in that layer will only affect the layer underneath it.

Finally, change your foreground color, and let’s paint!


Create a new layer, place it on the top of the layer stack inside the Small Planet group, and clip it to the previous layers (Hold Alt/Opt and click between the layers).


Create a new layer inside this group, but this time drag it underneath the Small Planet layer.


Create a new layer and place it anywhere beneath the Small Planet layer, but still inside the Small Planet group.


Create a new layer and place it on the top of the layer stack inside the Small Planet group.

We’re going to use pure white to paint again. Press D and X to quickly change your foreground color to white.


Create a new layer and place it anywhere underneath the Small Planet layer.


It’s kind of hard to see, but just draw a straight line on the left corner of the screen (shown with the arrow).

We’re going to add a Motion Blur again. Go to Filter -> Blur -> Motion Blur and chose an angle of 0º and a Distance of 2000px.


Then, with the same layer still active, add a Gaussian Blur with a radius of 75px.

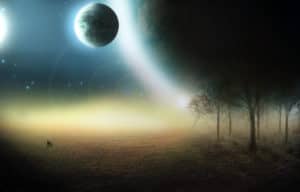
And this is the result:

Create a new layer and place it on the top of the layer stack inside the Small Planet group.

This next step it’s kind of hard to see but it makes a huge difference in the end. Select white as your foreground color (Press D and then X to quickly access white) and paint a vertical line on the corner of the image (same place we painted above).
16 comments on “Create a Mysterious Scene with Planets”
wow this is so emotionally amazing
How can I get the video tutorail
Very great job..............keep it up :)
Hey great tutorial it help me a lot make this http://beauduval.deviantart.com/art/Clocks-425499015 thank you
HOW CAN I GET THE BIG BLUE PLANET AND THE BUSHES? I'M PRESSING ON THE RESOURCES BUT I CAN'T FIND THEM? KINDLY, REPLY FAST.
There's no lighting effects for 64 bit systems :(
great stuff, thank you for sharing.
It says I have to buy the field image from the website. Is there anyway I could get it without a purchase?
When you are making custom brush, before you press define brush preset, do this - ( your shape will be automatically changed to grayscale mode when you'll define it as brush preset) so go to black and white and adjust object cause you won't have that opportunity after brush is created.
Hi, nice tutorial, but... I have one question.
How do you make the brush like you use in this tutorial?
it is almost without shape, some kind of transparency. Perfect to work with, especially this type of pictures.
U open picture then go to Edit -> Define Brush
If its grayed out then image size it to 2500px max width & height
Play with the opacity and brush shape. Make sure the hardness is at 0%. He is using a tablet I think, so unless you have a tablet also you will not be able to get the brushstrokes that perfect (at least, I couldn't).
Very clear tutorial with some great techniques to learn from. Thank you.
good work
nice
Either the trees are too big or the humans are too small. Layers are messy too.