

Turn any photo into a dot grid artwork with these Photoshop actions. You'll get great results with dots that change size. They get larger in brighter areas and smaller in darker areas. Free download available.
Step 17
Open the other stock image in photoshop. Take the pen tool again and trace the model by clicking the entire edges of it to create path. When the path is closed, right click on the path to show the path command option box. Choose Make Path Selection and set 1pxl for the feather of the selection. After the model is selected, hit Ctrl+J to duplicate the selection into a single layer.

Proceed to clean out the face of the model.

Step 18
Add the image to the main document. We need to scale its size to fit the face of the model. Use free transform tool to do this purpose by hitting Ctrl+T to activate the tool. To scale the image, press the Shift key on the keyboard while clicking, holding and dragging one of the transforming points

Click the warp icon to activate the Warp tool and then alter the shape of the robe by warping it to fit the model head.

Here is the result so far.

Step 19
We need to fix the shape of the upper part of the robe. To do this purpose, cut out the upper part of the robe and alter the shape of the cut out by warping.

Give the cut out layer a layer mask and mask the unwanted parts as shown in the selection.

Here is the result should be

Step 20
Duplicate the cut out layer and flip the duplicate horizontally. Place the duplicate where needed.

Mask the unneeded part of the duplicate. Finally, select all the robe layers and then hit Ctrl+E to merge them into a single layer. I named this new layer merged robe. Here is the model should look so far.

Step 21
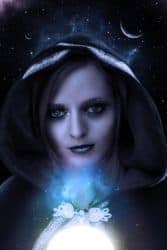
We need to add some shadow under the robe. Create a new layer below the merged robe layer. Take the brush tool. Choose a very soft round brush set to 10-20 pxl. On the new layer, paint the shadow by stroking the brush with black on the areas indicated by red arrows in the screenshot.

Here is the result I created.

Step 22
Next, create a new hue/saturation adjustment layer above the merged layer and give this adjustment layer a clipping mask by checking the Use Previous Layer to Create Clipping Mask.

Here is the setting of the hue/adjustment layer:

Step 23
Create a new layer above the hue/saturation layer. Make sure to give this new layer a clipping mask, set the blending to overlay and fill with overlay neutral color (50% gray).

Take the dodge tool in the tool panel. Set the tool to highlight for the range at about 15-20% exposure and choose a very soft round brush for the tool.

On the new layer, start to give some highlight to the robe by stroking the tool on some areas. Try to alternate to the burn tool to give some shadow as well:

Step 24
Now we need to clean out the background of the scene. Select the background copy layer and give this layer a layer mask. Clean out the background by masking it.

Step 25
Next we need to give the scene a new background. We will use the cosmos images for this purpose. Start to add one of the cosmos image under the background copy layer. With the free transform tool, scale the size of the image to fit the scene.

Then, duplicate the cosmos background two times. Set the first duplicate to multiply blending at 100% opacity and the second to color dodge blending at 100% opacity. The result should look like this:

18 comments on “How to Create a Mystic Lady Photo Manipulation”
She is beautiful. Fantastic tutorial thank you
Amazing, thanks a lot but i got a few things to say:There is no way u gonna resize and warp and get that. Where is d ice queen's necklace??? I thought u wld cut all that out before moving d image. I dnt knw if am d only one but after moving d cut part of d ice queen, no way am getting d next stop by warping n resizing.
nice explanation. What does Filter> Others> Custom do ? PSD file would have helped a lot.
It lets you change the brightness of pixels.
https://helpx.adobe.com/photoshop-elements/using/filters-1.html#custom_filters
wow! you have done a excellent work,thanks for sharing.....
Wow, these are really creative! They remind me of those Chip Fosse drawings from Overhauling’. Great work!
Thanks for the great tutorial, this is what I created out of this tutorial. (edit: I used a picture of my own wife, so some things might be a little off like colors and stuff)
http://helldog2004.deviantart.com/art/Ellen-robe-410515125?ga_submit_new=10%253A1383173051
Xosssssssssss
I like
très bon tutoriel,merci pour le partage
wow, is there any way to make that into a video tutorial so we can see how you do it too? Please?
AWESOME!!!!
Awesome!! This is really cool Photoshop tutorial, thanks for sharing.
WOW so amazing!!! nice one
Very nice and creative job u have done, keep it up
very creative
Metamorphosis. Fantastic.
Amazing...
Plz give PSD download too...
this help us to feel your great creativity...plz
sayeper fri